Saturday, 6 March 2021

Lindern 1944

 This was a playtest of the NBC WW2 scenario I'm planning on putting on at Winter VCOW 2021. I wanted something which was fairly manageable for a single session, but which featured a combined arms operation with enough manouvre units to make it interesting. The desert games I was running last year were a bit big for the camera, so I also wanted to try something on a small table.


Command Decision came to the rescue with an interesting scenario covering a US RCT from the green 84th Div attacking the Westwall in November 1944 near the village of Lindern, garrisoned by elements of 10th SS Panzer Division. It fitted nicely into a 6x6 hex grid, with each grid being 800m.


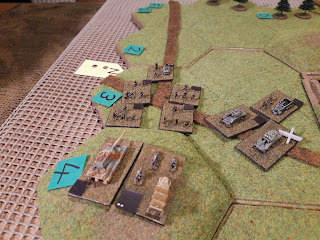
Battlefield from the east. Lindern in the foreground, with two major features, the railway line on a riased embankment to the rear, and an AT ditch snaking across the front. This is the last of the Westwall defences in this sector.


Lindern. The village is heavily fortified and garrisoned by a couple of SS panzergrenadier companies and some mortars and AT guns. The KG HQ is parked up behind the railway embankment. There was only a single battalion from 21st SS PGR in this sector, but they had so many heavy weapons it was more straightforward to model them as two small battalions, each with a weapons company. They were at full strength as they had been replenished after Arnhem, prior to taking part in the Battle of the Bulge in a few weeks time.


The north was secured by another SS KG with three companies on the heavily fortified 'Toad Hill'. This was one of the key US objectives as it outflanked the defences further north. One of the US battalions is occupying the hill opposite. The US Corps artillery shelled the German positons for two days beforehand, which cleared away any wire and mines, but the AT ditch and concrete bunkers survived.

In reserve the Germans had a small KG from 9th Panzer Division with a single company of panzergrenadiers and a platoon of Tigers from 506th SchwPzAbt. The rest of 9th Panzer was re-equipping for the Bulge. The 506th was also slated for the Bulge but supported the Westwall defences by committing odd platoons of tanks here and there, including the combat trials of the Jagdtiger. Nasty.

Tim G, Pete and Tom took the Germans.


The first wave of 335th RCT. Two infantry battalions with three rifle companies and a weapons company each.  I factored the regimental AT company into the weapons companies to keep the element count down. The US had another battalion in reserve, as well as a battalion of Shermans supported by a company of armoured engineers and two battalions of artillery, including one of 155mm howitzers.

Tim C, John, Simon, Jerry and Mark took the US.


The action opened with Jerrys battalion occupying the hill in D2. Simon stayed on A1. Both sides exchanged mortar and artillery fire. irl the US moved up under cover of darkness to their jump off points without a prep barrage to take the Germans by surprise and got very close indeed. Petes battalion in Lindern suffered some losses from US Corps artillery, despite their concrete bunkers.


Simon was content to call in artillery fire on Toad Hill for now. The US were hampered in the real battle by poor communication due to bad weather, and the US artillery in the game was quite erratic.


Both sides were lucky with their reinforcement rolls. The 9th Panzer KG came rolling down the road (rather slowly thanks to the Tigers who failed their move roll for a second hex).


And Marks US tank battalion came on, and decided to lurk in the woods at E1. I was a bit concerned at this point that the US were being too passive, but it turned out that they had a cunning plan.


Johns reserve infantry battalion and the RCT HQ now turned up, so all the US forces were now on the table. This was Jerry's cue to start marching northeast, where he came under fire from the troops in Lindern as well as German artillery fire. Meanwhile Tigers and their accompanying infantry motored onto the hill in F4.


Things started hotting up on Toad Hill. Jerrys battalion took some losses but US 155s suppressed the Germans in their concrete bunkers.


The panzers on Hill F4 were suddenly faced with a 'target rich environment' as John and Marks battalions surged forward. The Tigers picked off some Shermans.


The German defenders on Toad Hill were still suppressed and suffered some losses from artilery fire. They did however manage to repulse Simons assault from A1 - the US marched into the valley, took some fire, and promptly broke and fell back again! It was too fast for me to even take any pictures. Jerry worked his way forward however.


Over in the south, the waves of US infantry and tanks rolled on forward. Mark threw his tanks and halftracks forward in an armoured overrun attack to negate the range and armour advantage of the Tigers. He passed his morale check, and then made his movement roll....


And in the the vicious close quarter fighting the Germans were overrun! The US didn't get off lightly however, and were left at half strength, the field littered with burning Shermans and half a dozen knocked out Tigers.


Meanwhile Jerry assaulted Toad Hill, his troops had been serious attrited by German defensive fire, but an assault would negate much of the cover provided by the bunkers.


Sadly his weakened troops weren't sufficient to carry the position. The US infantry scattered and the battalion disintegrated, and the SS held on, albeit at 50% strength.


Over in the south the US found that trying to push armour through a dense forest wasn't going to work. The US troops all jammed onto hill F4, under artillery, mortar and AT fire from Lindern.


Now it was Simons turn, and his battalion set off across the valley again, covered by artillery fire. The Germans managed to inflict some more losses but the US held on.


The 105s and 155s rained down on Toad Hill, suppressing the defenders, which was good news for the US infantry. The Americans had to pass a morale check to assault, and then a movement check, hampered by the deep AT ditch.


They made it however, and in a bloody close quarters battle, both sides took heavy losses. The SS were reduced to one damaged company, while the US were down to two damaged companies. Both sides morale was maintained and they hung on grimly.


Meanwhile John pushed his infantry through the forest, while the battered tankers fell back off Hill F4. German artillery managed to knock out the last of the Shermans as they withdrew.


In a final bloody conclusion on Toad Hill, the remaining SS were destroyed and the US were left with half a battered company among the wrecked fortifications. Toad Hill had fallen! The excitement made the camera shake.


Johns troops meanwhile pressed on with their flanking manouvre, but failed their move throw to enter the rail junction (the embankment is a linear obstacle).  German mortars in Lindern chipped a hit off them.


In response, US artillery plastered Lindern, but with little material effect.


Next turn (the very last turn of the game), John managed to take the rail crossing and with both objectives firmly in US hands, it was declared a US victory.

That was a very satisfactory playtest, we rattled though the whole thing in an hour and fifteen minutes, so at VCOW the two hour slot should be long enough to allow for some preliminary blurb and a decent washup. At one point I was a bit concerned the US weren't going to make it, but it turned out they had a cunning plan, which was very effective. I also realised after the game that I kept forgetting to roll morale tests for units under artillery fire, I must make a mental note to myself for the game at COW. I'll also substitute a company of Pz IVs for the platoon of Tigers as the latter are so distracting. It is supposed to be a regimental level infantry game, not a tactical game for trackheads. The original CD scenario had also subbed Pz IVs for the Tigers, as I suspect given the terrain and the way tank combat works in CD,  a platoon of Tiger IIs would knock out all the US armour in a couple of turns.


Sunday, 28 February 2021

A few rules updates

 After recent chat about rules I've added a few of my more recent sets to the rules downloads link.

These are:


Arras with One Hour WW2


  • The latest version of Panzergruppe which I used last year for Kasserine and Goodwood. Panzergruppe v1.9


Kasserine Pass


Operation Goodwood


Russians and Austrians clash in Galicia in 1914

These are all available from the rules download page on my blog, but I've included the links here too.


Friday, 26 February 2021

Tank Duel

 Tom put on this very innovative game using Jim Wallmans 'Tank Duel' rules from the 1980s, adapted for on-line play.

Each team takes on the roles of members of a tank crew (commander, gunner, loader and driver) and then proceeds to stalk their opponent over a congested battlefield. The players can't see the enemy  unless they come into view, so looking in the right direction is quite important....

Screenshots are thanks to Jim, I was too busy peering though my gunsight to take any pictures! We were in Red tank (which turned out  to be a T34), John was the commander, Tim G the driver, Mark the loader and I was the gunner.


The battlefield used a grid to regulate position, movement and direction. The tank positions are Jims best guesses (he was in blue tank and was uncannily accurate in guessing where we were). The various buildings and woods obstructed LOS and blocked movement, while the hedges were passable, at some risk.


Off we went. Each segment was 15 seconds  in both game time and real time - the umpire said go, and we all said what we were doing. The commander gave us his intentions, and the crew did specific things using the correct syntax and terminology. 

So e.g. a valid fire order was <target>, <location>,<ammo type>, FIRE! Assuming you had actually picked the right spot and the ammo type indicated matched that actually loaded in the gun (the loaders job) then dice were thrown to determine the effect.

The poor old umpire then had to sort out what happened, and to avoid utter confusion, we very rapidly determined a sequence of speaking to avoid babble. It was just possible to get through it all in 15 seconds.


One of my jobs was turning the turret, this handy picture shows the turret arcs, so a typical order would be <arc code>, TRAVERSE! You can only fire at things in arc. In this example, red could engage blue, but not vice versa.


In the first game, after much driving around, we ended up facing off at point blank range. Whilst I attempted to shoot at the rather unexpected target, Blue tank decided the best tactic was to charge and ended up ramming us! I missed and they crashed into our tank and disabled it. Boo.


For the second game we were much more canny. Each tank crept around the table, then spent much time waiting to see if the enemy hove into view. After a while I figured out that they were trying to outflank us.


And lo and behold, we ended up like this. Unlike the photo, Id guessed where they were so Red Tanks turret was pointing due aft. 'Panzer IV to the rear!'. I popped off a shot and disabled the Germans with one shot. Great!

That was really good fun, the time limit made it feel extremely pressured and tense, and it really captured the thing that in tactical armoured combat, whoever fires first, wins. Which sounds simple, but as Clausewitz observed, in war the simple things are really difficult. It was hard work for the umpire though, and Tom did a sterling job of manging the chaos.


Wednesday, 24 February 2021

Hydaspes

 Simon put on a game of the Hydaspes using a squared version of Neil Thomas's Ancient rules. These are the more standard rules which we've used for Nineteenth Century, Napoleonic and Pike and Shot, but not so much the Ancients version as we've generally use CnC Ancients. Sadly CnC Ancients doesn't work too well over Zoom. I was interested to contrast these with the OHW game that Mark put on recently.

I got to play the Macedonians, being no less a personage than Alexander. Tom had the  various light cavalry and skirmishers, Tim C had the pike phalanx, while I was left with the Companions. Well, it is a tough job, but someone has to do it...

The wicked Indians were commanded by John as King Porus, while Tim G  had the elephants and  Mark the Indian Cavalry (which included some Heavy Chariots). The bulk of the Indian Army were massed archers.


Here we are all lined up. Indians on the right with cavalry on each wing and elephants out front. I went with Alexanders historical deployment with the phalanx weight towards the right and cavalry on each wing. I was with the Companions on the left. 


Nellie the elephant and her friends rolled forwards in a menacing wave. We set about enveloping them.


A big scrappy fight developed as we tried to deal with the grey menace. The movement and geometry rules got a fairly good outing at this point. I remain unconvinced by the buckets of dice close combat system NT likes to use. To exaggerates some effects while underplaying others.


The Indian cavalry weighed in at this point. I'm sure Veteran Companions will soon make short work of them. Well, evidently not.


We managed to get rid of the elephants anyway. The Indian cavalry were busy rolling all over us instead now. I just had to hope the cavalry held on while our infantry won the battle for us. 

It was all down to our veteran pikemen now. The Indian archers shot half of them down on the approach march, so that could have gone a bit better.


The last of the Companions went down in a tide of Indian horseflesh, although Alexander survived to live another day. The excitement made the camera shake.


And, heavily outnumbered, the veteran Macedonian pikemen were massacred by the lightly armed Indian archers.  Ooops. And that was that, back to the boats boys!

TBH, if it had been any other battle or army, the result would have been predictable from turn 1 but I genuinely thought that Alexander and his Macedonian veterans might roll right over the Indians. Unfortunately this set of rules suffer from the same problem as the Neil Thomas Pike and Shot ones, the 'per base' dice system overly emphasises equipment differences instead of experience/morale differences. I can forgive that in the nineteenth century set, as breechloaders really do make a huge difference, but not so much in periods where motivation mattered so much more than kit. 

Yes, I could fix it but fiddling by with the various combat modifiers, but I really can't be bothered as CnC Ancients or Lost Battles are perfectly good for f2f Ancients games. It did inspire me to re-visit  the One Hour Ancients rules again with a view to remote games though, so we shall see how that turns out in a future post!


Friday, 19 February 2021

Clash of Spears

 Mark put on a One Hour Ancients game, featuring Spartans vs Athenians (plus various hangers on). The Athenians had landed on some far flung beach, and the Spartans rather objected. This was played using the standard OHW Ancient rules rather than a modified version.


Tim, Simon and I drew the mighty Spartans. We had three phalanxes (including two of rather dodgy allies) plus some slingers, a unit of archers and unusually, a unit of cavalry. Tim took the hoplites, Simon the cavalry and slingers while I got the archers.

We deployed in a fairly long formation, hoplites in the middle, light troops on the ends and cavalry in reserve on the right flank. Like many Ancient battles, our deployment was what largely determined the eventual outcome. 


The wicked Athenians had four units of hoplites (ouch) and two of light troops. They opted for a compact deployment with all four hoplite units grouped in the centre and their light troops out front. Their ships are visible on the beach to the right. John, Jerry and Pete played Cleon and his pals.


Both lines rolled forwards. The temple in the far distance was impassable, which protected both sides flanks in this sector, although my mercenary archers had the option to occupy it. The Athenians had a huge gap on their left flank though, so unsurprisingly, out cavalry galloped forwards to take advantage of it.


The Athenian hoplites rolled up behind their skirmishers, while our own hoplites also rolled forwards. Our light forces opened fire from the flanks with little effect against the well armoured enemy (although the archers did score a couple of hits). The cavalry meanwhile galloped around the open flank and wheeled inwards.


The lines of hoplites engaged and the Athenian light troops fell back. The Athenians outflanked our shorter line near the temple, but this was an opportunity for my archers to hit the Athenians exposed flank as they wheeled round, which they duly did.

Over on the other flank our slingers secured the flank  and engaged the enemy lights at long range. Our cavalry meanwhile fell on the Athenian flank while it was engaged frontally, and after a short struggle, the first Athenian phalanx was fleeing for the rear. The Athenians would have been better using their light troops to screen the flanks of their hoplites, at least it would have held the cavalry up a bit.


This in turn enabled our own hoplites to advance and crush the Athenian light troops with flank attacks. Meanwhile the cavalry worked its way along the Athenian line, wiping out each phalanx in turn, while the enemy was pinned frontally. The only thing which went wrong was that my archers finally succumbed to  last Athenian hoplite unit, but they had so few hits left that the cavalry would have been able to make light work of them.

We called it there as with all their hoplites destroyed or crippled, the game was up for the Athenians.

Well, that was a quick and decisive game, almost a version of Cannae as our more extended forces enveloped the enemy, although it was more touch and go in the centre than the narrative highlights. 

I do like the One Hour Wargames rules, they are very unforgiving as there are so few units so each decision is crucial.  Once the Athenians were pinned frontally, they couldn't withdraw unless they defeated the opposing unit (a slow process against armoured heavy infantry) which essentially gave our cavalry a free pass to ride down the line slaughtering each unit in turn.


Saturday, 13 February 2021

Business as Usual

 For our regular weekly gaming slot we were fortunate enough to have a guest visitor - the historian Gary Sheffield. He put on a committee game covering the meeting of the British War Cabinet in August 1914 to decide the future strategy of the war.


Gary took on the role of Asquith (the dithering PM) while the rest of us assumed various dramatis personae. We had a fair number:

Lloyd George - Mark (Chancellor of the Exchequer)

Lord Grey - Jerry (Foreign Secretary)

Reggie McKenna - myself (Home Secretary)

Winston Churchill - Tim G (First Lord of the Admiralty) 

Admiral Jellicoe - John

Sir John French - Pete

Douglas Haig - Tim C

Lord Kitchener - Tom

Sir Cecil Spring-Rice - Simon (The British Ambassador to the US)


We all had a general briefing covering the military and political situation, as well as individual briefings with our particular personal background and objectives. Ultimately Asquith would decide on the strategic options to be pursued, but based on the advice of the cabinet and military advisers. And what a range of advice it turned out to be.

It was a pretty free form game, although we all had a round to state our particular positions and then we were off into promoting particular viewpoints while denigrating others. Lord Kitchener seemed to really have it in for Sir John French, and Asquith seemed particular baffled as to why Jellicoe wasn't planning on refighting Trafalger in the Heligoland Bight. We spent a great deal of time discussing the importance of trade routes and keeping the Americans on side, while the soldiers got increasingly frustrated, particularly Haig and Kitchener who apparently wanted to raise a million men to fight on the the continent (goodness knows why, the war would be over by Christmas).

I was primarily concerned with maintaining economic and political stability, whilst making use of the very expensive fleet I'd spent years building in my time as First Sea Lord. In the end things panned out nicely, the fleet adopted a nice safe blockade of Germany (that will show the Hun while not frightening the Americans), Lord Grey went off to speak to the pleasant chaps in Berlin and we sent three divisions of the BEF to France to show willing while Haig, Kitchener and French tore their hair out. 

Churchills scheme to send the Army to the Baltic (or possibly the Balkans) was kyboshed, and Lloyd George was manouvered into a brand new Ministry of Supply, leaving the Chancellors position vacant. I am pleased to say a very worthy candidate was found as a replacement. Ahem.


Bish, bosh, job done and home before the leaves fall.

That was an excellent game, great fun to play and very informative. The players also really got into the spirit of it, particularly Kitchener and his wayward moustache. Many thanks to Gary for putting it on.


Friday, 5 February 2021

Munchkin

We managed to see our kids for our state mandated one day of Xmas, and as they are both avid board gamers, managed to get through quite a few games. A new one for me was Munchkin from Steve Jackson Games. This is a sort of joke Dungeons and Dragons type game, but competitive rather than cooperative.


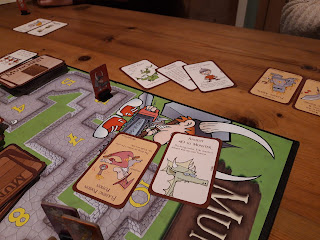
The board is a stylised Dungeon. Each level is represented by a 'room' and as you progress through the rooms, you automatically level up, so eg a character in Room 8 is counted as Level 8 and gets +8 in combat. Very slick and clever.


Characters have the usual D&D tropes - races, classes and of course piles of equipment. My character here has Mithril Armour (yay!), a rat on a stick which will come in handy for something and a minion with some leather armour. This is all determined by cards drawn from the 'treasure' you get from entering rooms and defeating monsters.


Off we go. Many of the cards are 'bad' (ie monsters, curses, traps etc),  ideal to play on other players. If you  find a room with no monsters in it, you can't level up, but you have the option to play ones in your own hand so it can be worth hanging on to a few monsters to ease your own progress. If you fight a monster, other players have the option to help out and share the spoils). Combat is very simple, add up all your bonuses, including single use items etc and compare with the monsters value. If it is higher you win. Simples. Until other players start chucking in bonuses on the monster...why would they do that you cry?


Well, in Munchkin you win by being the first to get into the Level 10 room. You can only do this by fighting a monster, and naturally the other players have an incentive to stop you. Here, by some miracle, my character has advanced all the way to level 9, while everyone else is stuck on level 5. I guess all those years of playing D&D, Runequest, Tunnels and Trolls etc must have been handy.


Naturally this was a cue for everyone to pour all manner of bad things on my poor Elf, which gave the rest of them a chance to catch up.


Various players rolled up to Level 10 and various almighty scraps ensued. Fortunately losing was mainly penalised by being knocked back a level or two if you failed to run away. Various magic items of classes helped running away if it all went horribly wrong. I managed to end up fighting the Level 20 Dragon, one of the few monsters which can kill you outright. Fortunately I had a magic ring to aid my retreat from that one!


I ended up as an Elf Wizard (still with my Mithril Armour, yay!). We all had several attempts at getting into Room 10, burning out various curses etc along the way. Finally I got lucky and drew a monster I could actually beat and none of the other players had enough buffing cards to stop me, so I ended up the winner, more by luck than judgement.

Anyway, that was great fun and highly recommended. The Boardgame Geek entry is here: https://boardgamegeek.com/boardgame/1927/munchkin, but as it was released in 2001(!) I don't imagine it will be news to experienced gamers.