Tuesday 29 March 2022

A bit more 6mm desert stuff

 We've played a fair few WW2 desert games in the last few years, and I've been toying with going with 15mm instead of 6mm. I enjoyed the Tunisia game in 15mm a lot, and I had two quite large 1941 15mm desert armies some years ago which I later sold off (back in the days when SDD were still making things!).

I had another look though, and while the infantry may be OK in 15mm, I can't really face doing all the armour variations and soft transport needed for North Africa.


I have a fair bit in 6mm already.


And a bit more. And I still haven't really got El Alamein era stuff yet.

So, I decided to stick with the 6mm for now and fill in a few gaps.  One of the complications is that I like to game at three different levels - brigade level using company stands, Corps level using battalion stands and Army level using brigade sized stands. That means I need stuff to fill in gaps pitched at different command levels. I'm generally OK for Army level as I have all the kit needed for  Compass, Crusader and Gazala with brigade elements. I'm a bit light at Corps level, and the more recent Brigade level games have shown up some distinct holes.  


I dug out a few books to look at some OBs and have a think. Beghazi Handicap is just fabulous, but stops in late 1941. I can't recommend Green and Massignanis 'Rommels North African Campaign' enough, an excellent single volume treatment of the Italian and German armies, with far more detail on the Italians than you normally get.

My main shortfalls are in Italian infantry divisions and the dismounted version of 90th Light Div. I did the latter in its fully motorised version, but for Crusader you need it as Zvb Afrika on foot. The original plan was to strip and rebase all the existing Italian infantry bases as they are very generously populated with figures. But when I opened the box (see above), I just couldn't face it.

However, rummaging about in my 6mm spares pile I found a few strips of Heroics & Ros 6mm desert figures I'd already painted and were presumably left over from earlier projects. With a bit of mixing and matching they were quite enough for what I actually needed. Result!


Here is the massively underwhelming result. Here they are stuck on the bases with sand and bits of magnabase on the rear edges but need finishing off. Another ten stands will come in very handy though, and  no painting required.

The bases just need finishing off with a light drybrush of Magnolia emulsion, and the edges doing black. I probably need to lighten up the magnabase strips so they blend in a bit more, as they are too dark.


First up are these four stands, all made up from one lonely Italian infantry strip and the ends of some support weapons strip. The prone figures have Solothurn ATRs, but from a distance they just look like more infantry. At Corps level these will do nicely as the core for another four battalion Italian division, or as IR 361 Afrika and the two independant battalions Zvb Afrika had during Crusader. At Brigade level, you can't have too much infantry.


These guys are what was left of a strip of Afrika Korps figures, fleshed out with some kneeling figures from redundant 50mm mortar teams. With a weapons stand added they will make another infantry battalion for Brigade level games, and at Corps level they can be IR 155, another component of Zvb Afrika.


Finally I made up an HQ stand and a couple of engineer stands. Two of the figures are actual engineers (one with a flamethrower, the other a mine detector) but the rest are bodged up from gun crews and infantry figures. I need a dismounted version of Engineer Bn 200 for a couple of Tobruk scenarios at Brigade level and they will be useful as divisional assets at Corps level. HQs are always handy, and if I want to do another Italian Infantry Division at Corps level, they just need an artillery regiment adding and I've got loads of Italian artillery. 

I'm pleased with those. They didn't end up being much work to do and will be very useful. Hmm, I really need to do something about those old Italian units, but not today.


Saturday 26 March 2022

Waltzing Matilda

 Tim took us off on another 54mm skirmish game using Fistful of Lead, this time we were back in the Western Desert during Operation Compass, the assault on the Italian fort at Nibewa to be precise.

The scenario was taken from the relevant Skirmish Campiagns book, we've already done a few of these. Essentially the Italians are caught asleep by a British dawn attack, and have to wake up, man the defences and get in their tanks while being rudely attacked by by a small British force which includes a mighty Matilda.

John, Jerry and Tim C were the British, taking the Matilda, Infantry and Sappers respectively. Me, Pete, Russell and Diego were the Italians. Pete and I had an infantry section each, Russell had three tanks (two L3s and an M13/40) alebit with the crews asleep in tents! Diego was CO and had platoon HQ and the crew of a 47mm AT gun. Also asleep.

Many apologies for the grainy photos, I'm sure Tims will be a lot better.


The battlefield from the west in the early morning gloom. The Italians are snoring in the tents in the distance, the parked M 13 on the left and the L3s on the right. The 47mm AT gun is in a pit behind the central tent, facing the wrong way!


First up is Petes section, awakened by some noise or other and they pile put of their tent. Meanwhile Jerry and Tims infantry are sneaking on.


One of Petes eagle eyed riflemen spots some of the British and they open fire. The British return fire fells one of them. At the same time, the Matilda comes rumbling on. All this noise is sufficient to wake my guys up, and as Petes troops are already fighting to our front, we head for the fortifications around the camp with the intention of moving to the south. 


Here is a rather better shot of the Matilda, a 1/48th scale kit. Tims sapper group are behind it. 


Russells tankers also wake up and dash for the L3s. These are actual, proper tank crew figures. Jerrys infantry section can now be seen, the very finest Airfix 1/32nd scale figures.

In the centre, Diegos platoon HQ has also woken up now.


Petes section spreads out and uses the parked M13 as cover. It is going to take a while for Russells tank crew to get there. A lucky burst of Italian LMG fire kills the Matilda CO. The Matilda is busy firing at the M13 and unaccountably missing.


The L3 crew finally mount up under a hail of small arms fire. Jerry now engages Diegos HQ group, although the officer very bravely runs for the rear! My guys are busy making their way along the wall, but some of the rearmost riflemen have managed to get stuck trying to cross it in the gloom.


The erratic nature of the Matilda gunner may be explained by this. AT fire is resolved by Tim firing at a block of oasis with a nerf gun on the basis of the gunners directions. Up a bit, left a  bit... just like the Golden Shot of yore. The Italian AT gunners have now woken up and prove to be just as bad at it as the British.


Petes guys are nicely spread out now and in cover or prone (there are markers by the standing figures). They start shooting at the sappers and cause some suppression. A few of my tumbled riflemen can be seen in the distance behind the wall.


The exchange of fire between the British and platoon HQ is rather one sided. A lot of Diegos men go down wounded. Hopefully my guys will be in position to help next turn, and Russell might have a chance to get his tanks started up!


Here is the Italian 47mm AT gun, and rather grand it is too. They finally managed to score a hit on the Matilda, which unfortunately hit the thickest part of the armour and bounced off.


The guys in the middle are the M13/40 crew sheltering behind a tent. The infantry at the top right are my blundering riflemen who fell over the wall.


The AT gun hit however spurred the British into action. The Matilda gave up shooting at the uncrewed M13 and instead set off across the table at top speed in the direction of the tents.


The British sapper team sprinted for the M13, despite Italian MG fire, as Russells crew climbed inside.


One of them got there and wedged a satchel charge under the turret!


His success was short lived as he was cut down by MG fire. Definitely a posthumous VC there. Petes NCO dashed around the back of the tank and pulled the charge away with its fuse fizzing. What a hero!


The Matilda piled through the Italians and the tent. Diegos officer was run down as were two riflemen. Dear me, an atrocity.


Sadly for Pete, he joined Tims brave sapper as a casualty next to the M13. He dropped the satchel charge next to the tank (it took two turns to go off).


Over on the other flank, the L3s were now in action and sprayed Jerry's section with MG fire. My section was finally in position behind the wall and the LMG team opened fire as well.


The MG fire covered my riflemen who advanced in open order around the tents to support the L3s. Faced with this torrent of fire, Jerry began to lose the firefight. The most significant casualties were the Bren team, but not before they'd managed to immobilise one of the L3s.


At the other end of the battlefield, Russells crewmen tried to start up the M13 and failed. This led to a dash for the hatches and two of them got out.

BOOM! The M13 was engulfed in smoke from a huge explosion as Petes remaining infantry moved away from the blast area.


Meanwhile the Matilda just ran right over the 47mm AT and fell into the gun pit. (It is a bit hard to make out in the distance). More of my section crossed the wall and hastily advanced away from the rampaging Matilda. 


The game ended at that point. As the smoke cleared, it turned out the blast had been big enough to knock out the M13, although some of the crew escaped.


The Matilda had also destroyed the 47mm gun, although it was now stuck in the gun pit. I'm sure it will make a nice prize.

The British had achieved their objectives (to either knock out all the Italian tanks or to knock out the M13 and the 47mm), but at huge cost. Overall losses were over 70%, and the only player figures left on their feet were myself and Jerry. Diego, Pete, John and Tim had all perished in the close quarters fighting.  In the real battle the dawn attack sowed utter confusion in the Italians, although it took longer to clear the fortress than planned which delayed the attack on the Tummar position (covered in a recent operational game).

Well, there was certainly a lot of chaos and confusion in the game. It was a real blast to play, and the ticking timebomb really added to the tension. Our FFoL games aren't usually that bloody, but then again, we don't usually have four tanks on the table. Looking forward to the next one in the series.


Wednesday 23 March 2022

More ACW. This time - Shiloh, with Neil Thomas

 Having scratched my Ancient gaming itch with the 3x3 experiments, I was still unhappy with my ACW gaming efforts. I think the ACW variant of Rifle and Kepi has the most legs, but it takes a fair bit of work to set the scenarios up and I'm really not sure I can be bothered to do that every time.

I have been very taken with  http://hereticalgaming.blogspot.com/  and his project to fight through a load of One Hour Wargames scenarios using Simplicity in Practice. I've played SiP before and I think it needs a lot of work to be a passable ACW game, but I was a bit baffled to find no mention of the ACW in Neil Thomas's Nineteenth Century Warfare rules which I've also got. I was sure I'd read some of his ACW rules somewhere, then it came to me, there was a set in his Introduction to Wargaming book.

They are a pretty basic set, and include some very similar mechanisms to both SiP and the Nineteenth Century rules, but with some ACW specific tweaks. I particularly liked the propensity of units to run away and reorganise rather than just stand there and lose lots of bases, as well as the random unit quality which varies by year.

Time to break out some toys. I went with OHW Scenario 27 'Disordered Defence' which is based on Shiloh in 1862, but played with the ACW rules from Into to Wargaming. 


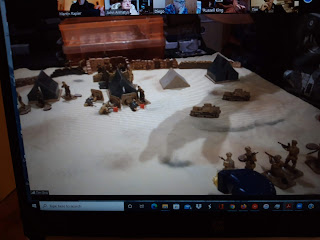
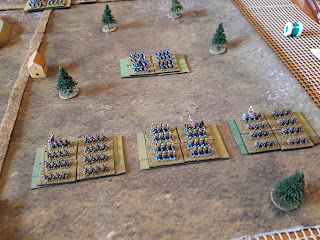
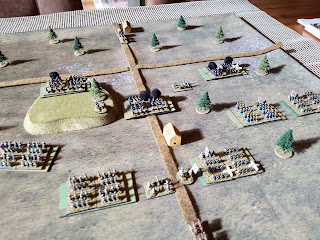
Battlefield from the south. The terrain is pretty abstracted compared to the real battle, but I added in the extra hill near the Hamburg-Savannah road junction and scattered trees around as the terrain was heavily wooded. Shiloh Church is in the foreground and the deployed units represent the elements of Grants army caught by surprise by Johnstones attack. Sherman on the left, Prentiss on the right and Hurlbut back on the crossroads with an artillery piece. Prentiss's division was Green while the other two were Seasoned. irl there were other units in the area, but these appear later on.


The Tennessee river is off to the north along with Grants base at Pittsburgh Landing. Having painted some wagons I thought I may as well put some on even though they have no effect. As the movement distances are so short (8cm for infantry), I played this on a 2' x 2' table. not a 3x3.


Half the Union Army is offtable, 1st and 3rd Divs, plus two more divisions from the Army of the Ohio plus more artillery. These chaps will enter from the north on turn 8. Historically the Union scrambled to throw units into the fight.


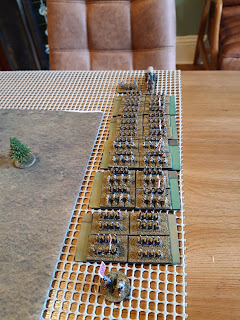
Johnstones Army of the Mississippi. Five Corps/Divisions and some guns. Hardees Corps was Veteran, I Corps and Reserve Corps were Seasoned while Ruggles and Withers were Green. These all set up a few inches from the southern edge. 


Ruggles and I Corps face off against Sherman, supported by the gun.  The only major change I made to the original scenario was to limit maximum visibility to 16cm (rifle range) due to the woods. This mainly inconvenienced the artillery, but they are massively underpowered in these rules (1 dice each!).


Reserve Corps, Hardee and Withers face Prentiss. The Confederates need to capture the crossroads and hold it at the end of the game, It is a race against time to take it before the Union reinforcements arrive.


The Confederates go first and withering fire inflicts eight hits (!) on Sherman. He loses two bases (I just marked them with puffs of black smoke) and had to take two morale tests. In these rules, each failure results in a retreat, so having failed both, he legged it back to the road. 


On the other flank, Prentiss took eleven hits! Well, these are certainly quite bloody. They also ran away. Historically Hardee overran Prentiss early on.


There didn't seem much point advancing back onto the inferno, so both Sherman and Prentiss tried and failed to rally. Rallying is only allowed out of small arms range, and recovers a base if successful. Hulburt and the artillery moved up to Shiloh Church.


The entire Confederate line rolled forwards, very, very slowly as movement is only 8cm. No interpenetration is allowed either so I left gaps between units in case they needed to wheel (which reduces their movement to 4cm!).


Hurlbut put a couple of hits onto Res Corps but not enough to remove a base.


The centre of the Confederate Army halted and gave Hurlbut a volley, inflicting eight hits (two bases lost). The flanks advanced. At least Sherman managed to rally a hit off. Hurlbut failed one morale test and retreated.


The Confederate advance resumed on the left and centre. Just visible on the right is Prentiss division being blown to pieces. Four bases lost and unit destroyed. Johnstone set up his HQ next to  the church. Leaders have no role in these rules, but I've painted them so... 


Sherman put a couple of hits on Ruggles. Infantry get one dice per active base, so three shots in this case , unlike SiP where they always fire four dice.


The rest of the Confederates pushed up to and beyond the Church. Res Corps had lost a base by now. At this point I swapped the big white hit markers for little dice as they were less obtrusive. It is a bit confusing keeping track of two kinds of hits, but I don't like taking bases off, too much stuff to sort out when it needs putting away. Over on the far right Withers pushed right forwards. 


A hail of fire landed on the Union centre. The artillery was knocked out and Hurlbut reduced to a single base. Rather annoyingly he passed his morale test instead of sensibly running away.


Hardee and Withers wheeled inwards. Pivot on the centre but only 4cm of movement allowed. Clearly fancy manouvres are not encouraged.


I Corps joins Ruggles in a very close range firefight against Sherman. Now both sides are a bit weaker, the rate of losses has fallen.


I Corps goes in with the bayonet. Unlike the nineteenth century set where charging is based on relative advantage in hits, in these rules units have to make a morale test to charge frontally and it is quite hard. I Corps rolled a six though.


The Confederate fire demolishes Hurlbut on the crossroads and Hardee and Withers close in.


The assault on the hill is bloody but hilariously indecisive. The winner of close combat has to retreat, but it was a draw! In fact charging was a really stupid idea as it blocked Ruggles fire and just resulted in I Corps taking losses from defensive fire. It would have been better to just shoot but I wanted to push Sherman back.


The Union reinforcements arrive, much to Grants relief. They can't use road  movement as this is disallowed within 24cm of the enemy, so they inch on a mere 8cm. As rifle range is 16cm, that brings the crossroads under fire.


Hardee and Withers cross the turnpike. They still haven't physically managed to take the crossroads yet.


There is now a bit of a traffic jam ahead so Res Corps stops to rally instead and manages to recover a base. I do like this simple approach to traffic management, funny how easy it is to get in a jam.


Hilariously the close combat is another draw, but losses have now reached such a point that both sides lose a base and both fail their morale and fall back. That was a slightly unlikely result. Normally the loser would fall back and the winner is immune to morale tests.


The stationary Union troops open a withering fire on the Confederates, but only Hardee actually loses a base. I Corps moves back up to the hill.


Sherman is finally routed however. Not quite sure how I Corps managed to rally there, maybe I've missed a turn.


The gun slips in between Hardee and Withers, allowing Res Corps to move up. The Confederates fire is absolutely devasating as the Union troops can't retreat (too close to the table edge) so every morale failure results in another base lost. tbh, I'd probably just let them retreat off in future.


Hardee loses another base and retreats, but the rest of the Confederate army is in line now and blazing away. I can do Lanchester calculations as well as anyone and I think this is only going to go one way.


I won't bore you with several pictures of static units shooting at each other. Suffice to say that the Confederates started with a dice advantage (20 vs 17) and as they progressively weakened the Union their relative advantage just grew. By this stage their advantage is 16:10.


By the last turn it was at 18:1! I don't think the Union are going to retake the crossroads. Johnstone has indeed 'hammered them' as he promised to do.

That was actually very enjoyable, and I liked playing on the 2x2 table. As with all NT rules, there were some (many) vague bits, but overall it hung together well. I liked the running away and rallying, and the truely devastating firepower. I found the tiny move distances a bit limiting though, made worse by the wheeling restriction, and I'd prefer a role for leaders in the game. There are no situational modifiers for close combat at all, apart from it being easier to assault from a flank, so I'm not really sure how well that works. The low dice artillery worked OK, as sometimes that extra dice was enough to make up to a full base lost, but they do seem terribly underpowered compared to his other rules.

If I was going to make changes, I'd probably increase the movement distances to be a bit closer to SIP and convert all the distances to inches as I found cm too fiddly. Anyway, that was an interesting experiment and quite fun. From a play balance pov I must remember that on average the Confederate troops are better than the Union, and adjust the number of units accordingly. I'll have a bit of a think and make some modifications.

I wanted to run bit of a campaign to try out various rules iterations, so I had a look through Frank Chadwicks 'Battles of the Amercan Civil War' and picked out some OHW scenarios which mapped roughly onto their real life counterparts. They are all from the western campaign as I'm thinking about how best to approach Gettysburg, but these will give a spread of years so troop quality will improve and the last one even features some fortifications. So we have:

Shiloh 1862 - Scenario 27 Disordered Defence. USA (Red), CSA (Blue)

Stones River 1863 - Scenario 3 Control the River. USA (Blue), CSA (Red). You could do Pitched Battle for this one instead

Bakers Creek/Champion Hill 1863 - Scenario 7 Flank Attack. CSA (Red), USA (Blue)

Chickamauga 1863 - Scenario 5 Bridgehead. USA (Red), CSA (Blue). This one will have restricted visibility like Shiloh as it was heavily wooded.

Franklin 1864 - Scenario 21 Twin Objectives. USA (Red), CSA (Blue). For this one I will borrow the dug-in and barrage mechanism from the Machine Age rules as Franklin was fortified.