As it is September, time to go to Arnhem once again. This is the latest of my interpretations of the Command Decision 'Market Garden' campaign scenarios. This will also be my 500th published blog post, a bit of a landmark, and hopefully worthy of this epic game.
The scenario name is actually lifted straight from the 19th September chapter in Kershaws 'It Never Snows in September' and covers the end of the attempts by 1st Airborne Div to break out, and the start of the series of major German counterattacks by KG Tettau and 9th SS Panzer Div.
The published scenario is enormous, with dozens of (German) battalions, albeit many very, very small ones! I have spent a few years thinking about how to do this one, and in the end I went for NBC and rolled all the little German units into bigger 'Regiments'. This loses some of the entertaining detail like the Fliegerhorst 'battalion' of luftwaffe ground crews handed rifles, or the naval observation battalion etc but it makes it easier to handle. Even so, Von Tettau ended up with four units (some of which had five or six stands) and the equivalent of a division, and Krafft ended up with four units, albeit somewhat smaller. That was plenty. Their quality is also quite variable, which makes things entertaining, although they get to drag a few armoured vehicles along, including Pz Ko 224 with its Flammpanzer Char Bs. I painted these about 20 years ago, ready for the game:)
1st Airborne had five battalions in play, some of which were quite weak (the poor old South Staffs), but a couple of the Airlanding Battalions were quite strong. The battle is further complicated as the unfortunate Polish AT battery is due to arrive by glider at 4pm as the urgent messages telling the 1st Airborne Army to cancel the drop hadn't got through. This was accompanied by a ground attack of no less than 50 Bf 109s, which was as much a surprise for the Germans as the Allies.
Lots of players lined up for this one. Tim G, Simon, Mark, Russell and Diego took the Germans, while John, Pete, Jerry and Nick were the British. Both sides had competing commanders Hicks (John) and Hackett (Pete) on the British side who continued to disagree about who was in command, and Krafft (Tim) and von Tettau (Simon) on the German side. In theory Krafft was in command for the Germans, but as von Tettau was a full Lt General, he rather outranked the Sturmbahnfuhrer. This promised to be complete chaos, just like the real battle.
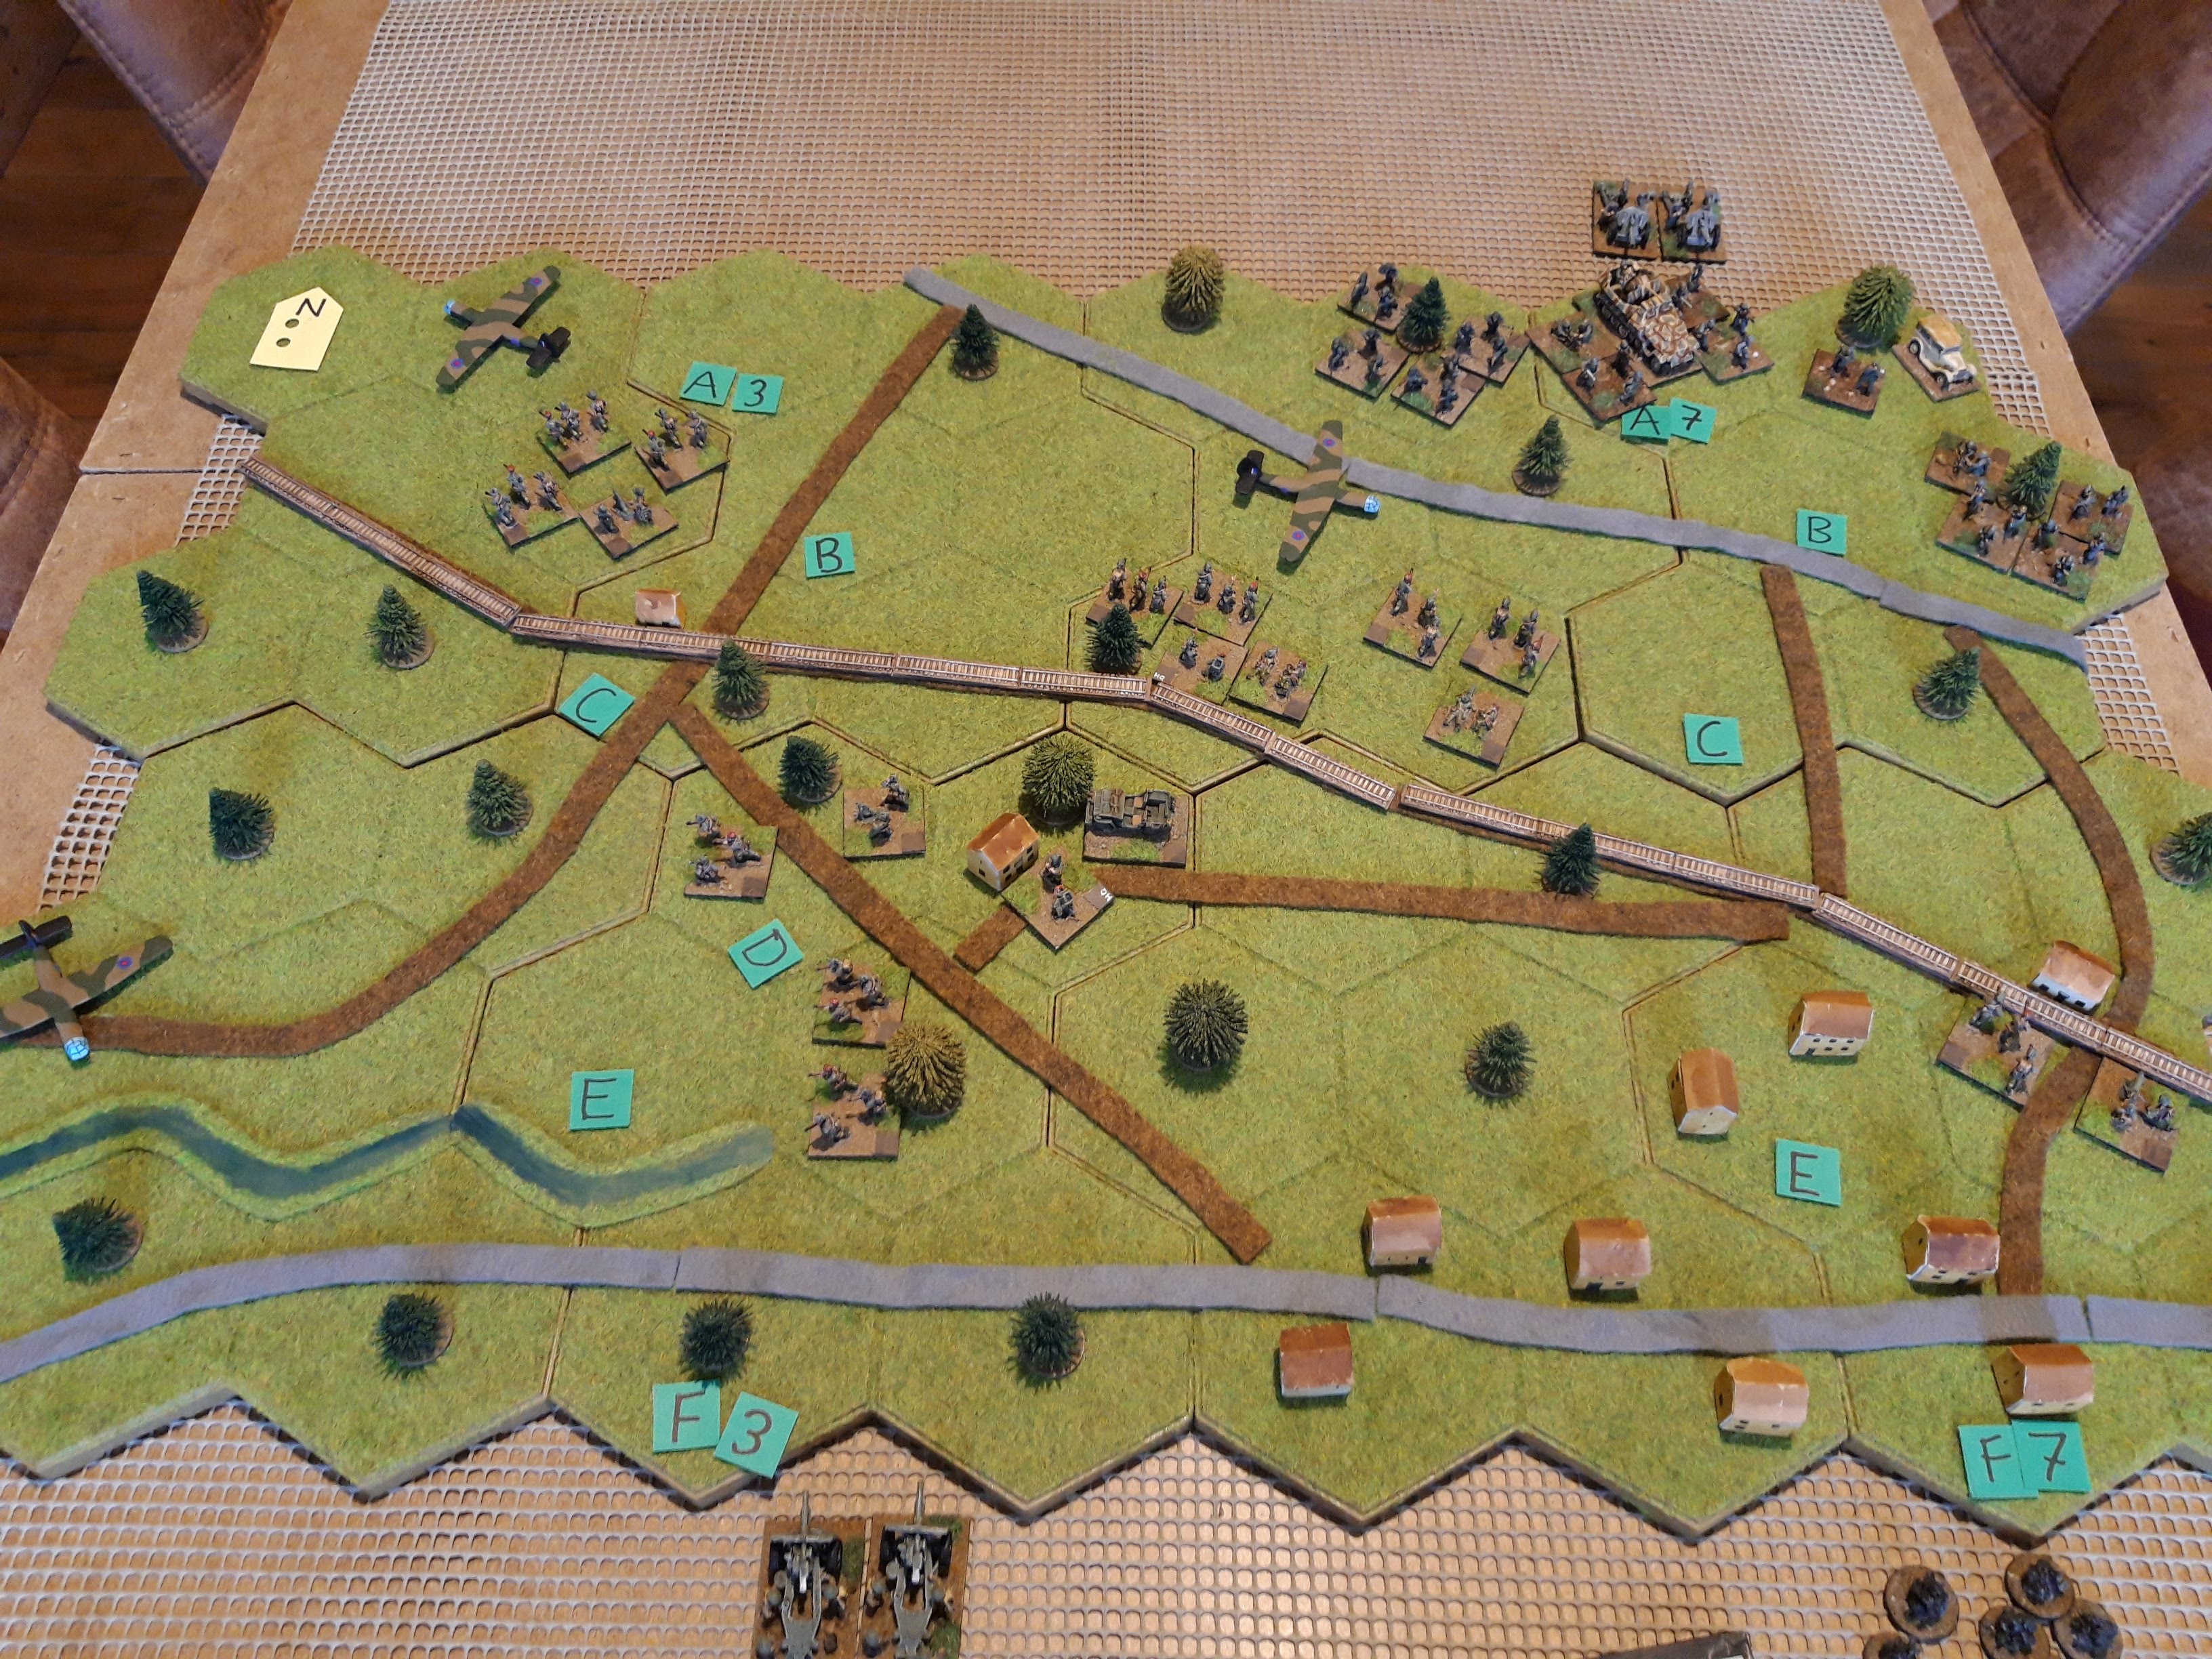
The battlefield from the south. As I'd painted a load of 15mm British Paras, I did it in 15mm, with 6mm terrain as it is a very busy battlefield.
Wolfheze Hotel and Station from the east. 1st Border Regt hold the approaches to the hotel, KOSB the station. Both regiments are covering the landing grounds. Hicks HQ is in the hotel. The railway runs along an embankment (an extra layer of felt in this case).
The northeast. 4th Para Bde on the left on the wrong side of the railway, and the South Staffs in Oosterbeek. KG Krafft is massing to the northeast. Krafft has two decent battalions (16th SS and KG Bruhns) plus the 642 'Marine Regiment' aka dockyard workers handed rifles.
4th Para Brigade reorganising on the landing zone. Hacketts HQ is with 10th Para on the left, 156th Para is on the right. Both battalions are under strength now.
KG Krafft. L-R, 642 Marine Regt, 16th SS Bn and 361 PG Ersatz Bn (Bruhns). 9th SS Pz Artillery in support. 16th SS was the depot battalion for 16th SS Div in Italy.
The South Staffs hold Oosterbeek station. The Regiment has been reduced to a couple of companies following the abortive attacks into Arnhem but still has a few AT guns.
1st Airlanding Brigade HQ at the Wolfheze Hotel. 1st Border Regt positioned in the woods to the west.
7 Bn, Kings Own Scottish Borderers up in the northeast. They have already repelled one attack from SS Regt Eberwein and destroyed the Dutch SS Nederland battalion.
Two units from KG von Tettau massing to the southwest. SS Schultz drawn from the SS NCO Training School Arnhem, and the 'Naval Manning Battalion' which is a mix of naval trainees, the Herman Goering Depot battalion and various other bits and pieces. In the real battle the HQ was SS Colonel Lippert, but I though it was more fun to have von Tettau himself, riding a horse.
SS Regiment Eberwein. This was also composed of various bits and pieces including Luftwaffe ground crews handed rifles and a few unfortunate artillerymen without guns.
26th Security Regiment, two weak security battalions which I rolled into one unit, supported by Panzer Co 224 with its flammpanzer Char Bs. A 15mm Char B is very big indeed...
On the first turn (2pm), 156 Para fell back to the line of the rail embankment while KG Krafft surged forward in a dense line. 10 Para started digging in frantically.
The South Staffs also fell back away from the rail line for some reason. Perhaps the NAAFI was serving tea?
Over in the west the KOSB fell back to Wolfheze Station and the Borders sent a couple of companies back to the hotel. The companies covering the road started digging in.
156 Para now fell back to the Hartenstein Hotel, while the South Staffs moved forwards once again. KG Krafft rolled forward another hex as 75mm artillery fire from 1st Airborne Artillery landed among them. 16th SS suffered some casualties but kept on moving.
At this point, 26 Security Regt rolled on into the woods opposite 10th Para.
The rest of KG von Tettau came on the from the west. L-R the Naval Manning Battalion, SS Schultz and finally SS Eberwein astride the railway. The KOSB brought Eberwein under mortar fire and the SS troops scattered and took cover.
Panzer Ko 224 trying to hide behind a very small tree.
Things began to hot up around Oosterbeek. The South Staffs managed to pin 361 PG, 16th SS pushed right up to the rail embankment, hoping to use the underpass to get its SP Flak guns across. 642 Marine Regt piled across the railway in fine style. Meanwhile 156 Para fell back to F7, which covered two of the objective hexes F6 and F8.
26 Security Regt set off eastwards along the tree line while 10 Para finished digging in.
Over in the west SS Schultz and the other half of SS Eberwein made contact with the KOSB at Wolfheze Station, while the rest of KG von Tettau marched up the road behind the General on his horse. The Border Regt was well dug in by now.
The Germans were around the flank of the KOSB but now pinned in a zone of control. British small arms fire was ineffective.
Suddenly the sky was filled with Dakotas and gliders! The Polish AT battery (and supply vehicles) had arrived! Just like the real battle, they were about to land in Nomansland between the British and German positions.
As they'd drawn a very low card, they landed early in the turn and avoided any unpleasant defensive fire from 26 Security Regiment. The Germans seemed to be as surprised as everyone else as the Poles started unloading the gliders.
Things got very sticky in Oosterbeek as 16th SS charged the South Staffs and a bloody melee erupted. The Staffs manged to knock out the SP Flak guns, but it didn't stop the Germans. Just visible in the top right corner are the assault guns of 280 Stug Brigade, which had just arrived.
The sky blackened with aircraft again, this time it was a strafing run by 50+ Bf 109s. Both sides were equally surprised by this, and the German pilots set about indiscriminately strafing the landing zones and Wolfheze.
Virtually every unit around the Polish landing was attacked, but the fighters only managed to hit some of the Polish gliders. All the units passed their morale tests for being strafed, apart from the Poles.
Around Wolheze, the great cluster of units was also strafed, albeit causing little material damage. One of the leading groups of SS Eberwein became disorganised, and irl Von Tettau complained bitterly about the Luftwaffe strafing which hit as many of his own units as the British.
Things were a right mess around Oosterbeek. 642 Marine Regt ran into a hail of small arms fire from 156 Para, plus an effective stonk from the British artillery and they became disorganised. 361 PG failed to rally and Krafft himself moved to gee them up a bit. 16th SS were now below half strength but had reduced the South Staffs to a couple of platoons.
There was a bit of a Mexican Standoff around the LZ and Security Regt 26 continued its march eastwards. It looked like the Poles would get to unload unmolested.
Back at Wolfheze the KOSB seemed to be holding off everything which was being thrown at them.
At 1st Airlanding Brigade HQ, all was quiet.
Meanwhile the Naval Manning battalion had decided to wade across the stream and march up the main road from Utrecht. Perhaps they were looking to outflank Wolfheze from the south?
We broke for the night at this point. At the end of turn four, the Germans still didn't control any objectives so didn't get any VPs. From now on they would need to control an extra objective per turn to garner any victory points. They are getting close in Oosterbeek (where three objectives are clustered together), but so far aren't making much headway around Wolfheze. I wonder what will happen tomorrow!
Turn 5 opened with KG von Tettau finally closing with the KOSB. SS Eberwein was looking quite shaky by now, but SS Schultz charged into Wolfheze Station despite a hail of defensive fire. Lt General von Tettau led them in on his horse, to great cheers from the players. In the bloody melee, both sides lost half their strength, but hung on grimly.
Further south the unequal struggle at Oosterbeek game to an end as 16th SS overran the South Staffs. The survivors withdrew south, and 16th SS were now down below 50% strength became disorganised having taken the objective. 156 Para sidestepped into F6 (one of the objective hexes) as the 642 Marine Regiment were pinned by artillery fire and had lost their ZOC.
The Naval Manning Battalion marched up to the 1st Borders, took some losses from defensive fire, and promptly fell back in disorder once more. It is much safer at sea.
Meanwhile 26 Security Regt continued its long march to the southeast. 280 Stug Brigade passed under the railway embankment and started shelling the Wolfheze Hotel and 1st Airlanding Brigade HQ.
At Wolfheze Station SS Schultz finally overcame 7 KOSB and the survivors withdrew back to 1st Airlanding HQ. Schultz was well below 50% strength now, even von Tettau's HQ stand had taken a hit, and they stopped on the objective to reorganise.
Back in Oosterbeek, 16th SS occupied the objective hex in F8 while 361 PG pushed over the railway embankment. 642 Marine Regt was in a terrible state now, disorganised, pinned by artillery and reduced to two weak companies by withering fire from 156 Para. The Char Bs of Pz Ko 224 manouvered through the rail underpass.
In a shock development, the AT platoon of the 1st Border Regt managed to knock out some of the Stugs with some lucky long range shooting.
SS Eberwein bypassed Wolfheze to encounter the now fully debussed Polish AT battery preparing to drive off the LZ.
642 Marine Regt in a bit of a pickle around the Hartenstein Hotel. Pinned down, disorganised and at 25% effective strength. Another round of artillery fire routed the survivors and the unit completely disintegrated.
Eberwein came under mortar fire from 10th Para and became disorganised. Their morale was really shaky at this point.
This prompted the Poles to mount a motorised assault against the disorganised Germans. Their morale broke and they fled across the heath, pursed by the Polish jeeps. Right under the guns of SS Schultz who had sorted themselves out by now.
Back in Oosterbeek 26 Security Regiment rolled into the outskirts through the British artillery barrage and prepared to engage 156 Para. The Stugs continued to shell Wolfheze and 361 PG Battalion moved up in support of 26 Security Regt.
The Polish AT battery and loaded supply jeeps ran into a hail of fire from SS Schultz around Wolfheze, and the exposed softskin vehicles were all destroyed. The survivors fell back on foot to 1st Airlanding HQ. With all the rail bridges in German hands, they would have had to abandon their guns and vehicles anyway, and the charge was a glorious way to go out.
26 Security Reg poured a hail of fire into 156 Para which inflicted heavy losses on the British. The flamethrower tanks were particularly unpleasant. When the Germans tried to assault the British positions however, the attack just fell apart and the Germans became disorganised.
361 PG took advantage of the confusion to charge 156 Para and bloody street fighting ensued. This was also an objective hex so the Germans needed to capture it fairly soon.
The Germans at Wolfheze were content to hold their hard won positions while Eberwein continued to withdraw.
361 PG finally overcame 156 Para and the survivors withdrew westwards. The Germans garnered another victory point. Krafft moved his HQ to encourage 26 Security Regt reorganise.
It was all quiet at Wolfheze as the Germans didn't have the strength to push on, and contented themselves shelling the hotel. The Border Regt and 10th Para were still holding their positions, well dug in.
Back in Oosterbeek KG Krafft mopped up pockets of resistance. The Germans now had three VP and held four objectives. Even if they captured another objective they couldn't improve on the overall result which was a draw. That seemed fair enough and we called it a day at that point (6pm real time, so only an hour or so until dusk). The German units were all pretty shot up by now and would need to reorg and resupply before doing anything else.
Here is what will become known in the future as the 'Wolfheze Pocket'! This is actually a better spot for 1st AB to make a stand as the Heavadorp Ferry is due south from here, which makes a successful XXX Corps crossing much more likely. In the real battle the pocket ended up further east and it was much easier for the Germans to push them away from the ferry site.
The re-fight ended up a bit back to front as irl KG Krafft were stopped at the railway line while it was the Wolfheze front which was pushed back. The fighting was so heavy that Krafft decided the British were attacking him, and wrote a lengthy report to that effect. Well, it helped him get his Knights Cross. In this game it was Krafft which had the most success, but in any case, the results all seemed plausible
I was really pleased with how that went. It was a big, complicated battle and we managed the whole thing remotely with nine players in two and a half hours of game time over two evenings. The players were very complementary, so many thanks to them for playing and participating with such gusto. The role playing award goes to Nick, CO of 7th KOSB and bravery medal goes to Lt Gen von Tettau leading a charge on horseback. Russell gets Tank Mechanic 1st Class for managing to move the elderly Char Bs several miles including through dense woods without losing a single one. Both Hicks and Hackett get to survive and write their memoirs and both get 'sang froid under fire' badges. Hackett went on to command BAOR and CENTAG, as well as play Napoleon in a scarily efficient manner in the TV show 'Game of War'.