I have been planning (on and off) on doing Amiens for at least 15 years since I put on a Cambrai game at the club and at COW. I wanted to do it justice and do as much of the battle as possible, but it was a much larger affair than Cambrai. At Cambrai the tactical commanders were division commanders, which with half a dozen assault divisions vs a couple of defending Germans divisions was quite manageable, but at Amiens there were in excess of twelve assault divisions and a big chunk of 2nd German Army opposing them, a much larger affair.
After many years of considering various options, in the end I plumped for doing it with a very streamlined version of my late war version of OP14 with the players in the role of Corps Commanders. Even with 2km zones this is still a huge battle, so I stripped it down even more and set the flanking Corps (III Corps and the French XXXI Corps) to be system run, while the players concentrated on the Canadian and Australian Corps. I also took out all the reserve divisions and just modelled their artillery, but even so the player controlled forces comprised no less than eight infantry and three cavalry divisions. Unlike Cambrai, the penetration was also much deeper (six zones as opposed to four).
For the rules themselves I reduced everything to a D6 rather than mucking around with different kinds of dice and factored quality differences into the strength points. Using a D6 also altered the calculations for artillery SPs so it became 1SP per 36 field guns or 18 heavy guns. I reduced the German Corps strengths quite considerably as many of the divisions holding the line only had 4000 or so infantrymen, rather than their authorised strength of around 6,000. I also amalgamated the British field artillery brigades into Corps level groups (so each represented the artillery of two divisions) but it still produced an impressive twelve field gun brigades. The Germans I left was weaker divisional and Corps artillery regiments, scattered around the German artillery deployment area. I also re-wrote the standard tank rules to eliminate all the card drawing. Instead AFVs could take four hits, suffered from combat in the same way as infantry and from each successful artillery anti-tank shoot, but also for each Corps with a moving AFV, roll a D6 equal to or under the number of movig AFVs and one suffered a breakdown loss. That is considerably more generous than the rules as written and the same system I used for Cambrai many years ago. AFVs still operated in combat as the standard rules, suppressing MGs and eliminating wire, regardless of the number of models. I also wrote some quick recce rules, based on those in Megablitz, for the pre-assault setup (essentially infantry patrols, air recce and some limited artillery recce).
Overall the Allies had 64SP of infantry, 12SP of cavalry, 44SP of tanks and a whopping 60SP of artillery (plus 15SP of aircraft). The Germans had 30SP of infantry, 14SP of artillery and 6SP of aircraft but were in a prepared position. The overall force ratio was 4:1, which according to the Dstl force ratio: risk tables gave the attack a basic 60% chance of success (prepared attack vs prepared defence) but at the point of contact for the leading brigades the odds were a more satisfactory 7:1 giving 80% sucessu probability,. As always on the Western Front, the command challenge was maintaining that ratio through the full depth of the defence zone as losses and confusion mounted. The base exhaustion level for each if the Allied Corps was 8, and for the German 52st and IX Corps, 3 and 5 respectively. Once losses reached that level, any additional losses risked the formation becoming exhausted.
For planning the layout, this map from the Canadian War Museum was particularly useful, as well as various Canadian and Australian websites and the rough sketch Guderian drew in Achtung Panzer!
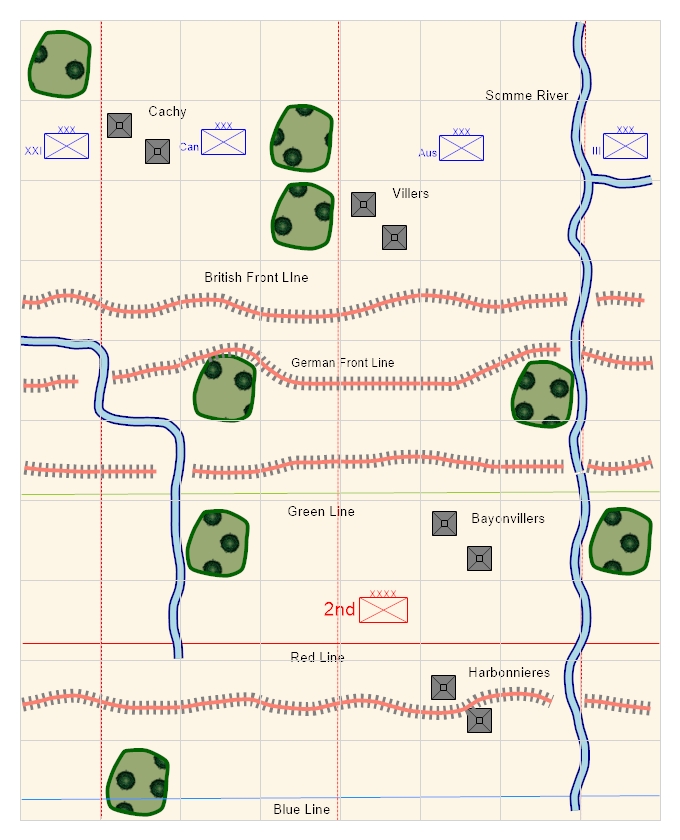
The battlefield was abstracted as above, the top is west, the bottom is east (so the Somme runs top to bottom). I did have a think about modelling the salient in the Canadian front line but in the end I decided it didn't make much difference to the final operation so I left the front lines as linear ones.
The objective lines (green, red and blue) are marked, as are the Corps boundaries, and I adopted my usual 'straight ahead' restriction for the committed assault divisions, at least within the trench systems. There is actually a fair gap between the Germans front line system and the old Amiens inner defence line, but I just absorbed it into structure of the zones.
Even with more generous stacking limits there is barely space in the Allied deployment area to fit all the troops, guns, HQs and reserves. The Germans had the thick end of two Corps defending the area, albeit at reduced strength and fairly poor quality units. As being run over by hundreds of tanks is a fairly dismal prospect, I ran the Germans as an umpire, and set all the players to running the Allies. I planned out a multi-layered defence for the Germans (essentially a regiment per zone,with the divisions deployed in great depth). The German infantry were rather thinner on the ground in the Australian sector, whereas in the Canadian sector the reserve line was fully manned. The German artillery was deployed chequerboard pattern to provide a backstop to the front line and battle zone.
Allied briefing below.
General Briefing
Operation Micheal, a major German attack in Spring 1918 finally petered out in front of Amiens and the front solidified along the Somme River. The Germans left the sector in the hands of static divisions who built up their defences based on the old Amiens defence lines abandoned by the British. Haig was determined to mount a major counteroffensive in the sector, using techniques perfected during the Battles of Hamel and Cambrai - a surprise mass tank attack with no preliminary bombardment.
Extensive deception measures were implemented which allowed the secret relocation of the entire Australian and Canadian Army Corps to the front south of the Somme in front of Amiens. These Corps would bear the brunt of the attack, supported by III Corps in the north and the French XXXI Corps in the south. Over 500 tanks and 500 aircraft were allocated to the attack, as well as 1300 field guns and 600 heavy guns. The Cavalry Corps (supported by Whippets and Armoured Cars) was held in reserve to exploit any breakthrough.
British Briefing
Friendly: Preparations for the attack are still apparently undetected, and there will be no preparatory bombardment to maintain surprise. Extensive air recce is available to pinpoint enemy gun positions to neutralise with counter battery fire. Each assault wave has tanks designated in support and it is important to keep reserves close up to maintain the momentum of the attack.Our troops are now expert in platoon level tactics using Lewis guns, rifle grenades and trench mortars to fight forward.
Enemy: The enemy forces comprise several weak infantry divisions holding rudimentary trench lines with little wire or deep dugouts supported by around 500 artillery pieces. Enemy storm troops and tanks all appear to have been withdrawn apart from one division north of the Somme.
Objectives: There are three designated objective lines to capture by the end of the day, these comprise:
Green line: the enemy forward trench positions.
Red line: the enemy battery positions.
Blue line: the enemy reserve position.
Forces: 4th Army (Rawlinson).
III Corps (Lt Gen Butler). 18, 58 Div plus one battalion of tanks. Flank attack north of the Somme.
Australian Corps (Lt Gen Monash). 2,3,4,5 Div plus two battalions of tanks.
Canadian Corps (Lt Gen Currie) 1,2,3,4 Div plus two battalions of tanks.
French XXXI Corps. 62,63 Div plus one battalion of Whippets. Right flank protection.
Cavalry Corps (Kavanagh)
2 x Cav Divs plus 2 x Battalions of Whippets in support of the Australians
1 x Cav Div plus 1 A/C Battalion in support of the Canadians.
Each Corps has its integral artillery brigades (approx 300 field guns and 50 heavy guns each), in addition there are a further 600 field guns and 300 heavy guns available. Huge amounts of ammunition have been dumped which is required for the field guns to fire a rolling barrage and makes the heavy guns and much of the field artillery immobile.
500 Aircraft are available for recce and strafing.
Terrain and weather
The terrain is generally gently rolling good going, the woods, streams and villages are obstacles to movement. The watercourses may only be crossed by wheeled transport at bridges. The trenches are obstacles and bad going for armoured cars, light tanks and field artillery. The weather is warm and dry with morning mist. Dawn is at 0600 and nightfall at 1930 (9 turns).
Next time, the battle...

I can hardly wait to read your battle report!
ReplyDeleteAll the best,
Bob
Great set up for the battle there. Looking forward to the game report itself.
ReplyDeleteCheers,
Pete.
Thanks guys, I enjoy the research and planning as much as the actual game, and IveI been planning this one for so long I thought it was worth putting up some of the background.
ReplyDeleteOne sobering thought is the effect raising the level of preparedness to "fortified" and giving the Germans one more full strength division has on the force ratios and likelyhood of success. Assaulting a fortified position with a 3:1 force ratio is only a 30% chance of success, so it becomes clearer why surprise was vital to success.
Respect for this Uber planning!
ReplyDeleteA long time in the making!