As I wanted to try out some revisions to the morale system in my OHW Napoleonic variant, I thought I'd give Steves 'Echeloned Attack' scenario a go. https://soundofficerscall.blogspot.com/2024/04/scenario-31-echeloned-attack-developing.html
It is based on Aspern-Essling, so a chance to get the Austrians out.
.jpg)
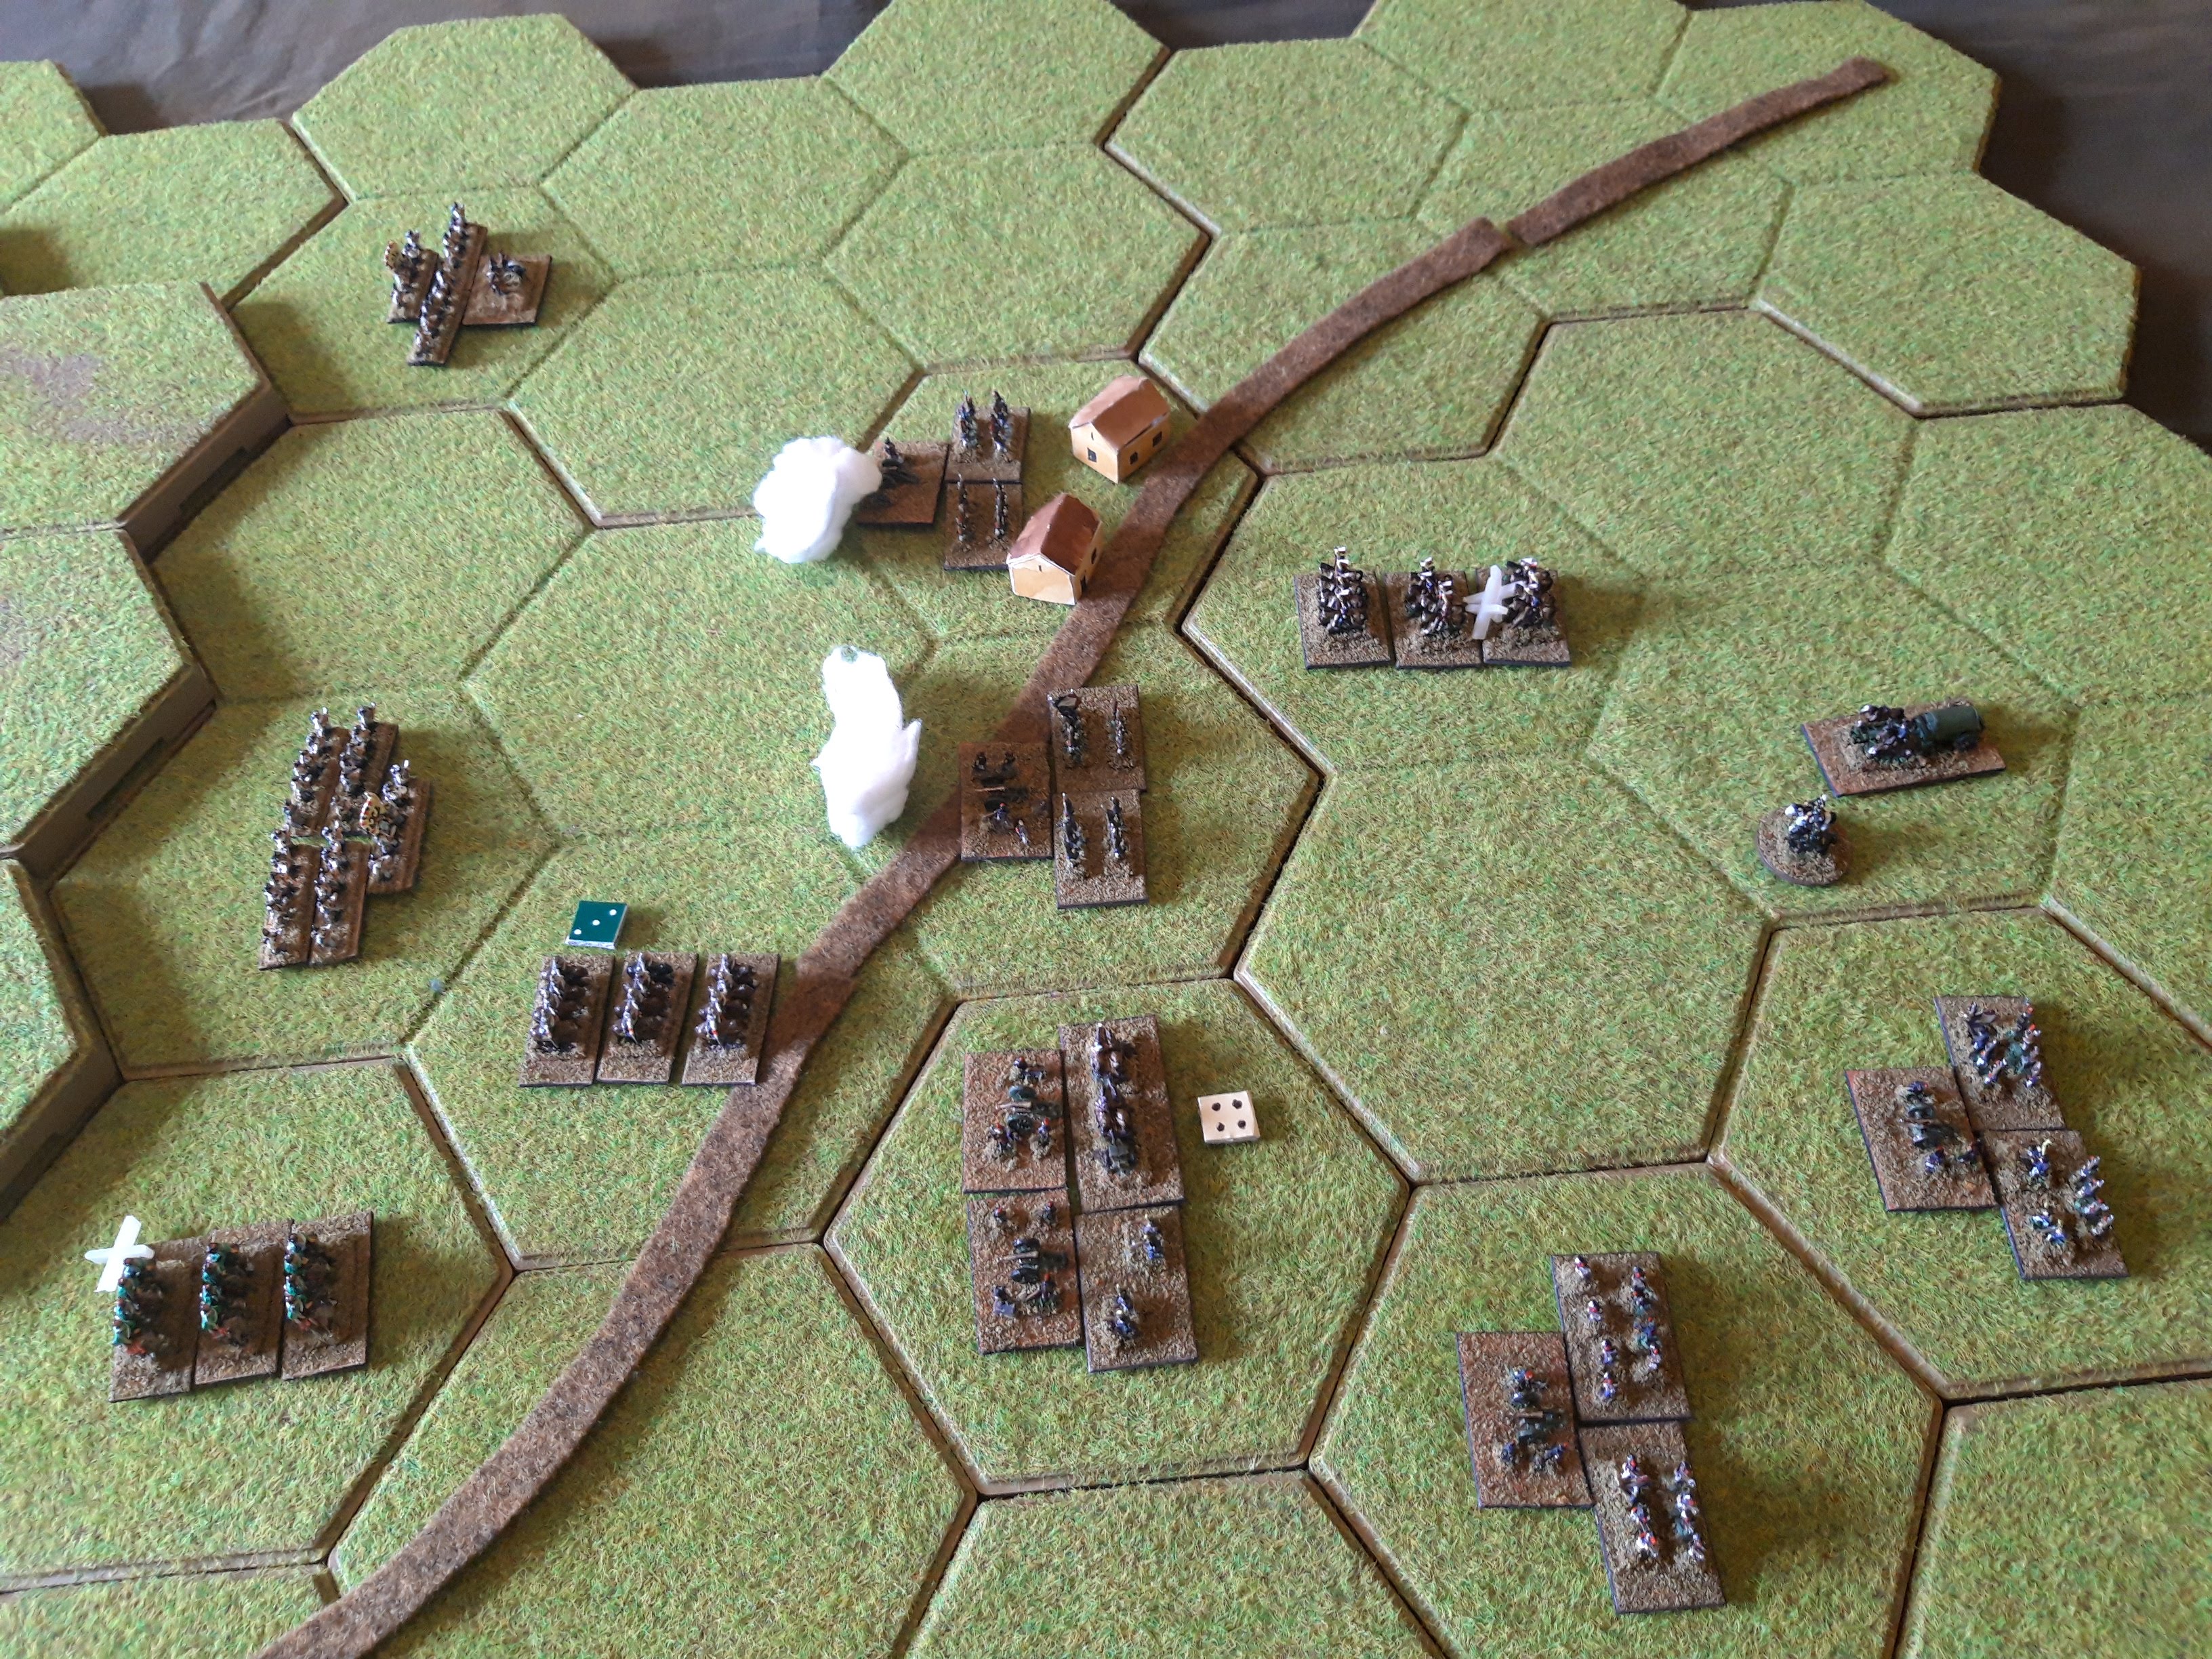
Battlefield from the south, Aspern left centre, Essling right centre. Imagine the Danube and the islands off to the south. Obviously I've converted Steves scenario to a 9x9 hex grid. The only terrain I added was the NW-SE highway which ran across the front. If doing it again I'd probably do a bit more research on the minor terrain features as I did for Friedland.
Massenas Corps starts deployed on table in and between the villages. I roughly worked out the OBs based on the historical forces, and as usual each unit is around 8,000 infantry or 4,000 cavalry (possibly a bit more for this one). On a 9x9 grid I prefer a higher unit density than the standard 6, so I aimed for 9 on each side.
Massena starts with two infantry, one Cavalry Corps and the lone French artillery unit - most of the guns are assumed to be factored into the units.

The French reinforcements straggle on across the Danube, each unit may be delayed by Austrian attacks on the pontoon bridges. First up is Lannes Corps with two units, then the Imperial Guard with one elite infantry, and finally Bessieres brings up the rear with the reserve Cavalry. I added another infantry unit to the Imperial Guard, which makes the number of units even on both sides, although the French have two leaders as well (Massena and Lannes). Napoleon and the baggage train are purely representational.

The Austrian right wing, Hiller and Bellegarde with two infantry and an artillery. Coming on down the road is Prince Frederick with another artillery and another infantry. The Austrians had such a huge artillery superiority in this battle that I gave them two guns. Each is assumed to be supported by around 4,000 infantry for headcount purposes. The Austrian Army HQ is lurking in the top corner.

Lichtenstein commands the Austrian centre, two cavalry and the Grenadier infantry. Finally Prince Franz is off in the far corner with another infantry unit. The arrival of all these units is staggered so Hiller and Friedrich move on first, then Lictenstein, then Franz, hence 'Echeloned Attack'.

I struggled with the French deployment. Both towns have to be occupied, which was best done by the infantry. I left them configured as massed infantry and not lights, which reduced their defence vs artillery fire, but increased their firepower. I put the cavalry in reserve, ready to intervene/block/harass as required and in the end went for quite an aggressive deployment of the Grand Battery, angled to cover the highway (which of course exposes its flank to Lichtenstein). I could always move it later I figured. Right.

Hiller came marching on first in column of route, but deployed his Grand Battery in range of Aspern. I really messed up the initial Austrian deployment, the lead infantry unit moved into range of the French unnecessarily and suffered two hits from long range artillery fire.

And then more Austrian infantry managed to mask the guns! What a cock up. Prince Franz at least came marching on, so there was a big local superiority over Massena in Aspern. The French cavalry went floating around north of the road to discourage anything too brave. It is now in charge range of the limbered Austrian guns, so they would be advised to deploy.
One of Hillers units has now taken three hits. For this game I've dumped the old disorder rules, instead units which aren't adjacent to the enemy can rally hits off. The wrinkle is that they only get half back, and the rest become permanent hits which can never be removed (thank you NQM). Think of them representing actual casualties and/or a permanent loss of cohesion.
If a Leader is with a unit (like Massena in Aspern), they can attempt to rally next to the enemy, but at some risk to the Leader.

The Austrians manouvre very aggressively against Aspern to maximise their local advantage. All their guns are deployed with the village in their firing arcs, and no less than three infantry units are now deployed, one has pressed hard up against the town to clear fields of supporting fire and assault the village.
Lichtensteins cavalry are now up on the high ground, forcing the French cavalry to fall back and cover the flank of their guns. The remaining French can only blast away and hope for the best. The Austrian unit beside Aspen is masked from the French guns so Massena will have to drive them away himself. That was why I left them formed up in close order.

Help is on the way as Lannes now starts to march on in column of route, heading for the sound of the guns. Neither unit was delayed crossing the Danube.

All hell breaks loose around Aspern as almost every Austrian unit opens fire, the Austrian guns rip into the French infantry and Massena suffers heavy losses. Lannes closes up on Aspern and deploys behind the village, while his other column moves to support the Grand Battery. Massenas defensive fire is quite effective, and the Austrians now have one unit on four hits and another with five. Massena in Aspern is now on three hits though.

At Essling it is a bit of a Mexican standoff. The Austrian cavalry occupies the high ground but needs more infantry support to attack effectively. Lannes' relief column will arrive before the Austrian infantry.

The Austrians pour more fire into Aspern. Massena is forced to retreat or be destroyed. He could try and rally in place but the risk is too great. Instead Lannes marches in and occupies the village while Massena falls back.

Meanwhile, things are happening at Essling. The Grenadier division is now deployed on the ridge and Prince Friedrich is moving up on the left. The Austrian cavalry has a go at the French, but only inflict one hit and bounce off. Lannes' other infantry unit deploys next to Essling.
The French cavalry counterattack and inflict two hits on the Austrians. Was that wise? It was too tempting. They are still covering the flank of the French guns but are now a bit exposed.

The intense fighting at Aspern continues. Massena and Lannes concentrate their fire and one Austrian unit is finally routed, but Lannes is shredded in Aspern and takes four hits. Unlike the real battle, Lannes survives, for now....

Back at Essling, the Austrian Cavalry come back again, and supported by the Grenadiers, the French cavalry are shredded. They withdraw behind Essling to rally. This of course leaves the flank of the Grand Battery exposes tot he Austrian Cuirassiers on the ridge. I got too carried away firing at the Austrian assault on Aspern.

At Aspern, Massena rallies, recovering all his hits but keeping two as permanent ones (those unsightly white markers). If I keep this mechanism I'll make up some different markers for permanent hits which are less obtrusive. Lannes is now quite weak, hopefully I can swap the units back next turn.
The Austrian attack on Essling finally goes in. The infantry advance off the ridge and then cavalry charges the French guns and inflicts a whopping four hits! (flank attack). The French cavalry rallies, obtaining two permanent hits, and now Napoleon and the Imperial Guard are moving up in support. I could withdraw the guns to rally, but the French infantry are so near now....

The Austrians take Aspern. The French are routed and Lannes escapes by the skin of his teeth.

And the Austrians crash into the French at Essling. The Austrian infantry very aggressively moves up to Essling, and the Austrian cavalry charges both the French infantry supporting the town outside, and the French guns. The Grand Battery is overrun. The guns are lost and the gunners flee or are cut down.
The crisis of the battle is upon us.

The Austrians assault Essling. The cover of the village proves to be good protection and the defenders are largely unscathed. The revived French cavalry even puts in a charge on the Austrian infantry. The struggle hangs in the balance.

In the centre the exposed Austrian cavalry pull back to rally and are subject to long range fire from the second line of French infantry. Massena heroically leads his battered infantry in a counterattack and retakes Aspern!

The Austrian attack on Essling begins to struggle, and the French cavalry rout one of the attacking infantry units..

The Austrian Grenadiers don't have any choice but to turn to face the French cavalry, and the Austrian horse (with one hit left) puts in a final charge. I completely forgot that Line Infantry can turn to face cavalry, and so what would have been a devastating flank attack, became an ineffective frontal attack.

The final Austrian units at Essling are blown away by massed defensive fire. Even though the Austrian horse on the ridge has rallied, they are now carrying three permanent hits and are very fragile. There isn't much the Austrians can do here now.

And back at Aspern, the Austrians still have their guns, but only one weak infantry unit (also carrying three permanent hits). If the Austrians hang around, they might batter Massena some more, but they are just going to get their guns overrun by French cavalry.

So game over, Napoleon has (just) pulled it off. Wagram next!
That was a really good scenario, very enjoyable, and well balanced. As it is a while since I've played the Napoleonic rules, I made a few rules mistakes. I also messed up some of the play for both sides, particularly Hillers deployment and the French battle in the centre. The Austrians need to be aggressive in this scenario as the French reinforcements will tip the balance later in the game, but I erred on the reckless at times. This was the first game I've played where the combined arms stuff really worked though, as if you could get your artillery/infantry/cooperation going properly, it was just devastating.
The new rally system also worked well. It felt less gamey than the old system and it perhaps increased the impact of player decisions as it was less random. Deciding whether to fight, run or stand and rally was really quite hard a times. I'll try another game with it, and if I stick with it as a mechanism, I'll make up some more markers for permanent hits as the tile spacers I was using stick out like sore thumbs. As I was solo playing, I didn't use the sabot bases for this either, which looks much better I think, but I'll keep them for remote games as it makes the pieces easier to manage.
Regular readers may have noticed a drop off in solo game posts, that is down to me playing Fallout 4 (again) but on Survival Mode, thanks to the TV series. I don't usually play big computer RPGs in the summer, but for some reason it grabbed my imagination. As the last run through took me 180 hours, this may take me a while, especially as I've downloaded the Far Harbour and Nuka World expansions. I will try and keep a bit of solo gaming up, but there are only so many hours in the day. Normal service will be resumed at some point!

Probably my favourite Napoleonic battle! I think the main problem with it from a war gaming point of view, is that one has to make some OOB contortions to balance the game.
ReplyDeleteAbout 30 years ago I played the role of Archduke Charles in a multiplayer game (large 'free' board and lotsa figures, none of them mine). I like to attack, so I ordered attacks. At the end of the day, a small rearguard was hanging on heroically in the Muhlau salient, having, against steep odds, repulsed three separate attacks. Of course, by then Aspern and Essling were both firmly and irretrievably in Austrian hands. I had a lot of fun that day, overseeing the action. Had to intervene personally on a couple of occasions to set things right...
Memories...
Cheers,
Ion
Tbh, this was a new battle for me. I'd tended to focus more on Wagram in this campaign, but like all reinforcement battles, the schedule for arrival of both sides reserves is vital to the flow of the scenario.
DeleteBravo Martin and thank you for the shout out! This was a nail biter - All the way down to the final few turns :) it went almost the same way for me and I tried numerous force compositions.
ReplyDeleteAspern fell to the Austrians but Essling held for me.
It is a great scenario, very exiting, and it felt very "Napoleonic", as reserves turned up to save the day at critical moments. Very repayable.
DeleteNow that was interesting. I like a truly grand tactical game like this.
ReplyDeleteThanks. I much prefer fighting whole battles as it gives more scope for manouvre and a general view of the "big picture". The price is a degree of abstraction, but I'm fine with that.
DeleteHello Martin,
ReplyDeleteAgain, a great AAR, a scenario that worked really well and some rules testing (and forgetting, lol). The fact you enjoyed it a lot really came though. Thanks for posting.
Thanks Shaun, as Long mentioned above,, Aspern Essling isn't a battle I'm that familiar with, but the scenario was lots of fun to play.
Delete