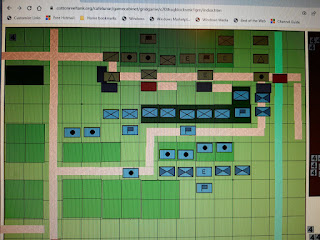
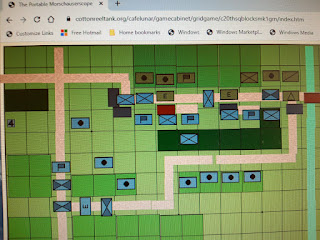
I've owned a copy of Mike Smiths 'Tabletop Battles - Grid Wargames' for some years but never actually got around to playing them. I've been working on a Chancellorsville scenario and it is just a bit big for my hex based ACW rules, and I thought I'd try some faster play alternatives. I had a look at some non card versions of Battle Cry but they looked like too much hard work, I'm not a huge fan of the Portable Wargame for ACW but then it occurred to me that Grid Wargames might be worth a look.
The grid is much denser than the PW, typically around 12 squares by 20 using 50mm squares. I do have a 66mm grid set of boards, but I dug out the old Portable Morchauserscope software which has some tools for setting up games of various shapes and sizes.
I set up Mikes '2nd Manassas' scenario on the square grid using with WW2 NATO icon set - as long as I could differentiate raw and average infantry, HQs, mounted/dismounted cavalry and artillery it was fine.
2nd Manassas happened as Lees Army of Virginia was rampaging around and was finally corned near the site of 1st Bull Run. Stonewall Jackson put his Corps in a defensive position on a long ridge and various scattered Union units concentrated to fight them. On the second day, more Union and Confederate forces converged on the site, but I'm only doing the first day.
Each division has one or two stands depending how strong they are, and there seem to be quite a lot of guns. This is around three weak Union Corps facing one strong Confederate Corps.
The rules owe a great deal to the original Morchauser set, infantry/guns move 2, cavalry 4 and each unit is rated for combat strength, generally on the range 1-4. Combat is a bit like DBA, add up the combat strengths on each side, apply some mods then throw opposed dice plus the modified combat strengths. If you win by a bit the enemy recoils, if you double them, they are destroyed. One unusual feature is that each side rolls a D12. I'm not sure why, as it makes combat extremely random, and many of the modifiers add or subtract 2. I would have thought D6 and +1 modifiers would do the same job.
Each Army has a breakpoint of half its combat strength, so as units are destroyed, keep a running total until it gets to half SP lost.
Each turn you roll for initiative, each side then moves in initiative order, fires in initiative order and resolves close combat. The winner of the initiative gets plus one to combat rolls and does all those actions first. This means in each turn there are two rounds of firing and two rounds of close combat.
On the first turn the Union rolled forward to bring the CSA under fire while Jackson manouvered his units to provide the maximum mutual support and cover. There are bonuses for support (hurrah!).
Units can move and fire, apart from artillery, so when units are in range (rifle range being three squares), there is an awful lot of of firing, each combat being resolved by adding up lots of mods and throwing opposed dice. Firing first is a big advantage as player B will have units pushed back out of range or destroyed before they can respond.
The Union kept pushing forward and the CSA kept firing and pushing them back. After a couple of turns the superior numbers of the Union were telling, three CA units down to two Union and much of the Union artillery was in position to fire over the woods and at Jacksons ridge. So far there hadn't been any close combat at all as no unit had survived long enough adjacent to the enemy.
The randomness of the opposed D12 means that even though the CSA units are much better, eventually the more numerous Union units will roll an 11+ vs a 3 or less and destroy them. Unlike Horse, Foot and Guns, there are no adverse results from a failed ranged attack, even if the target is in range for return fire.
The Unions reserve division set off on a flanking march, the 'E' is their one decent infantry unit. Units get a move bonus on roads if their whole move is on the road, but not adjacent to the enemy. Interpenetration is allowed, but not stacking.
The Union keeps coming on in the same old way. Units falling back can move from 1-4 squares, in a 45 degree arc, so they can end up retreating quite a long way as stacking isn't allowed. The artillery units at 90 degrees are 'limbered' ie have moved so can't fire.
Although the CSA units are better (they all get +1 to their dice rolls), the Union numbers are now starting to wipe them out. Five CSA units down now, and still only two Union. As the CSA units lose their supports they lose the support bonuses, whereas the Union has a strong firing line with leaders to the rear (bonus +2 in many cases).
The Union reserve Corps heads north.
The Union finally charges the CSA breastworks. Close Combat is quite hairy, the strengths of the engaged units are all added together, with mods and then the usual opposed dice rolls. This makes it very easy to overwhelm and annihilate exposed enemy units, and there is all the usual silliness of square based games where units can magically march straight onto an enemy flank and pivot, although the rules allow defending units to pivot too unless they are engaged frontally.
The better quality CSA units prove surprisingly resilient in their trenches.
Although the dead pile on the right tells its own story. The CSA reach their breakpoint and withdraw.
That was certainly interesting and good way to learn how to play the game. I had to keep referring back to the rules at various points as much of it is rather abstract with special rules for this, that and the other, even if the core concepts are actually very simple.
There are plenty of things I liked, movement was vey quick and simple, and I like the unit density although the granularity of the terrain would make this hard for remote games using figures, it would work fine with computer assistance. I can also see the influences on rules like The Portable Wargame.
I found many aspects too abstract for me though, and I found the endless adding up of modifiers and die rolling a bit tedious. It did occur to me that the unit density is about the same as many of the old Horse, Foot and Guns games we used to play, so I might be better off re-visiting my grid based version of those.
Having been through all that, I eventually figured out how to scale down Chancellorsville to do it in my usual ACW rules with just a couple of minor tweaks.


I have seen D10’s used in a couple of games in which the randomness seems the desired outcome, so that the army general can set things in motion, but has little control of what happens down at the ‘hex’ level …. As that is what colonels are paid to worry about. I.e. the army general (player) is kept pure from the ravages of his direction, the commander can but look on and hope!
ReplyDeleteYes, I suspect that is the intent. I also wondered if the rules were more aimed at solo play, but given the number of moving parts, I don't think so. It was interesting to finally try them out though, although the inexorable logical of Lanchester Law applied to ranged combat led to a predictable outcome, despite the randomness.
Delete