I was actually going to set up Archduke Piccolos 1809 campaign, but I seem to be back on Waterloo again after fighting Ligny and seeing the recent movie. Now I've got access to a bigger table space, I can set up a much larger Hexon configuration, so I thought I'd try the 100 Minutes Waterloo campaign again.

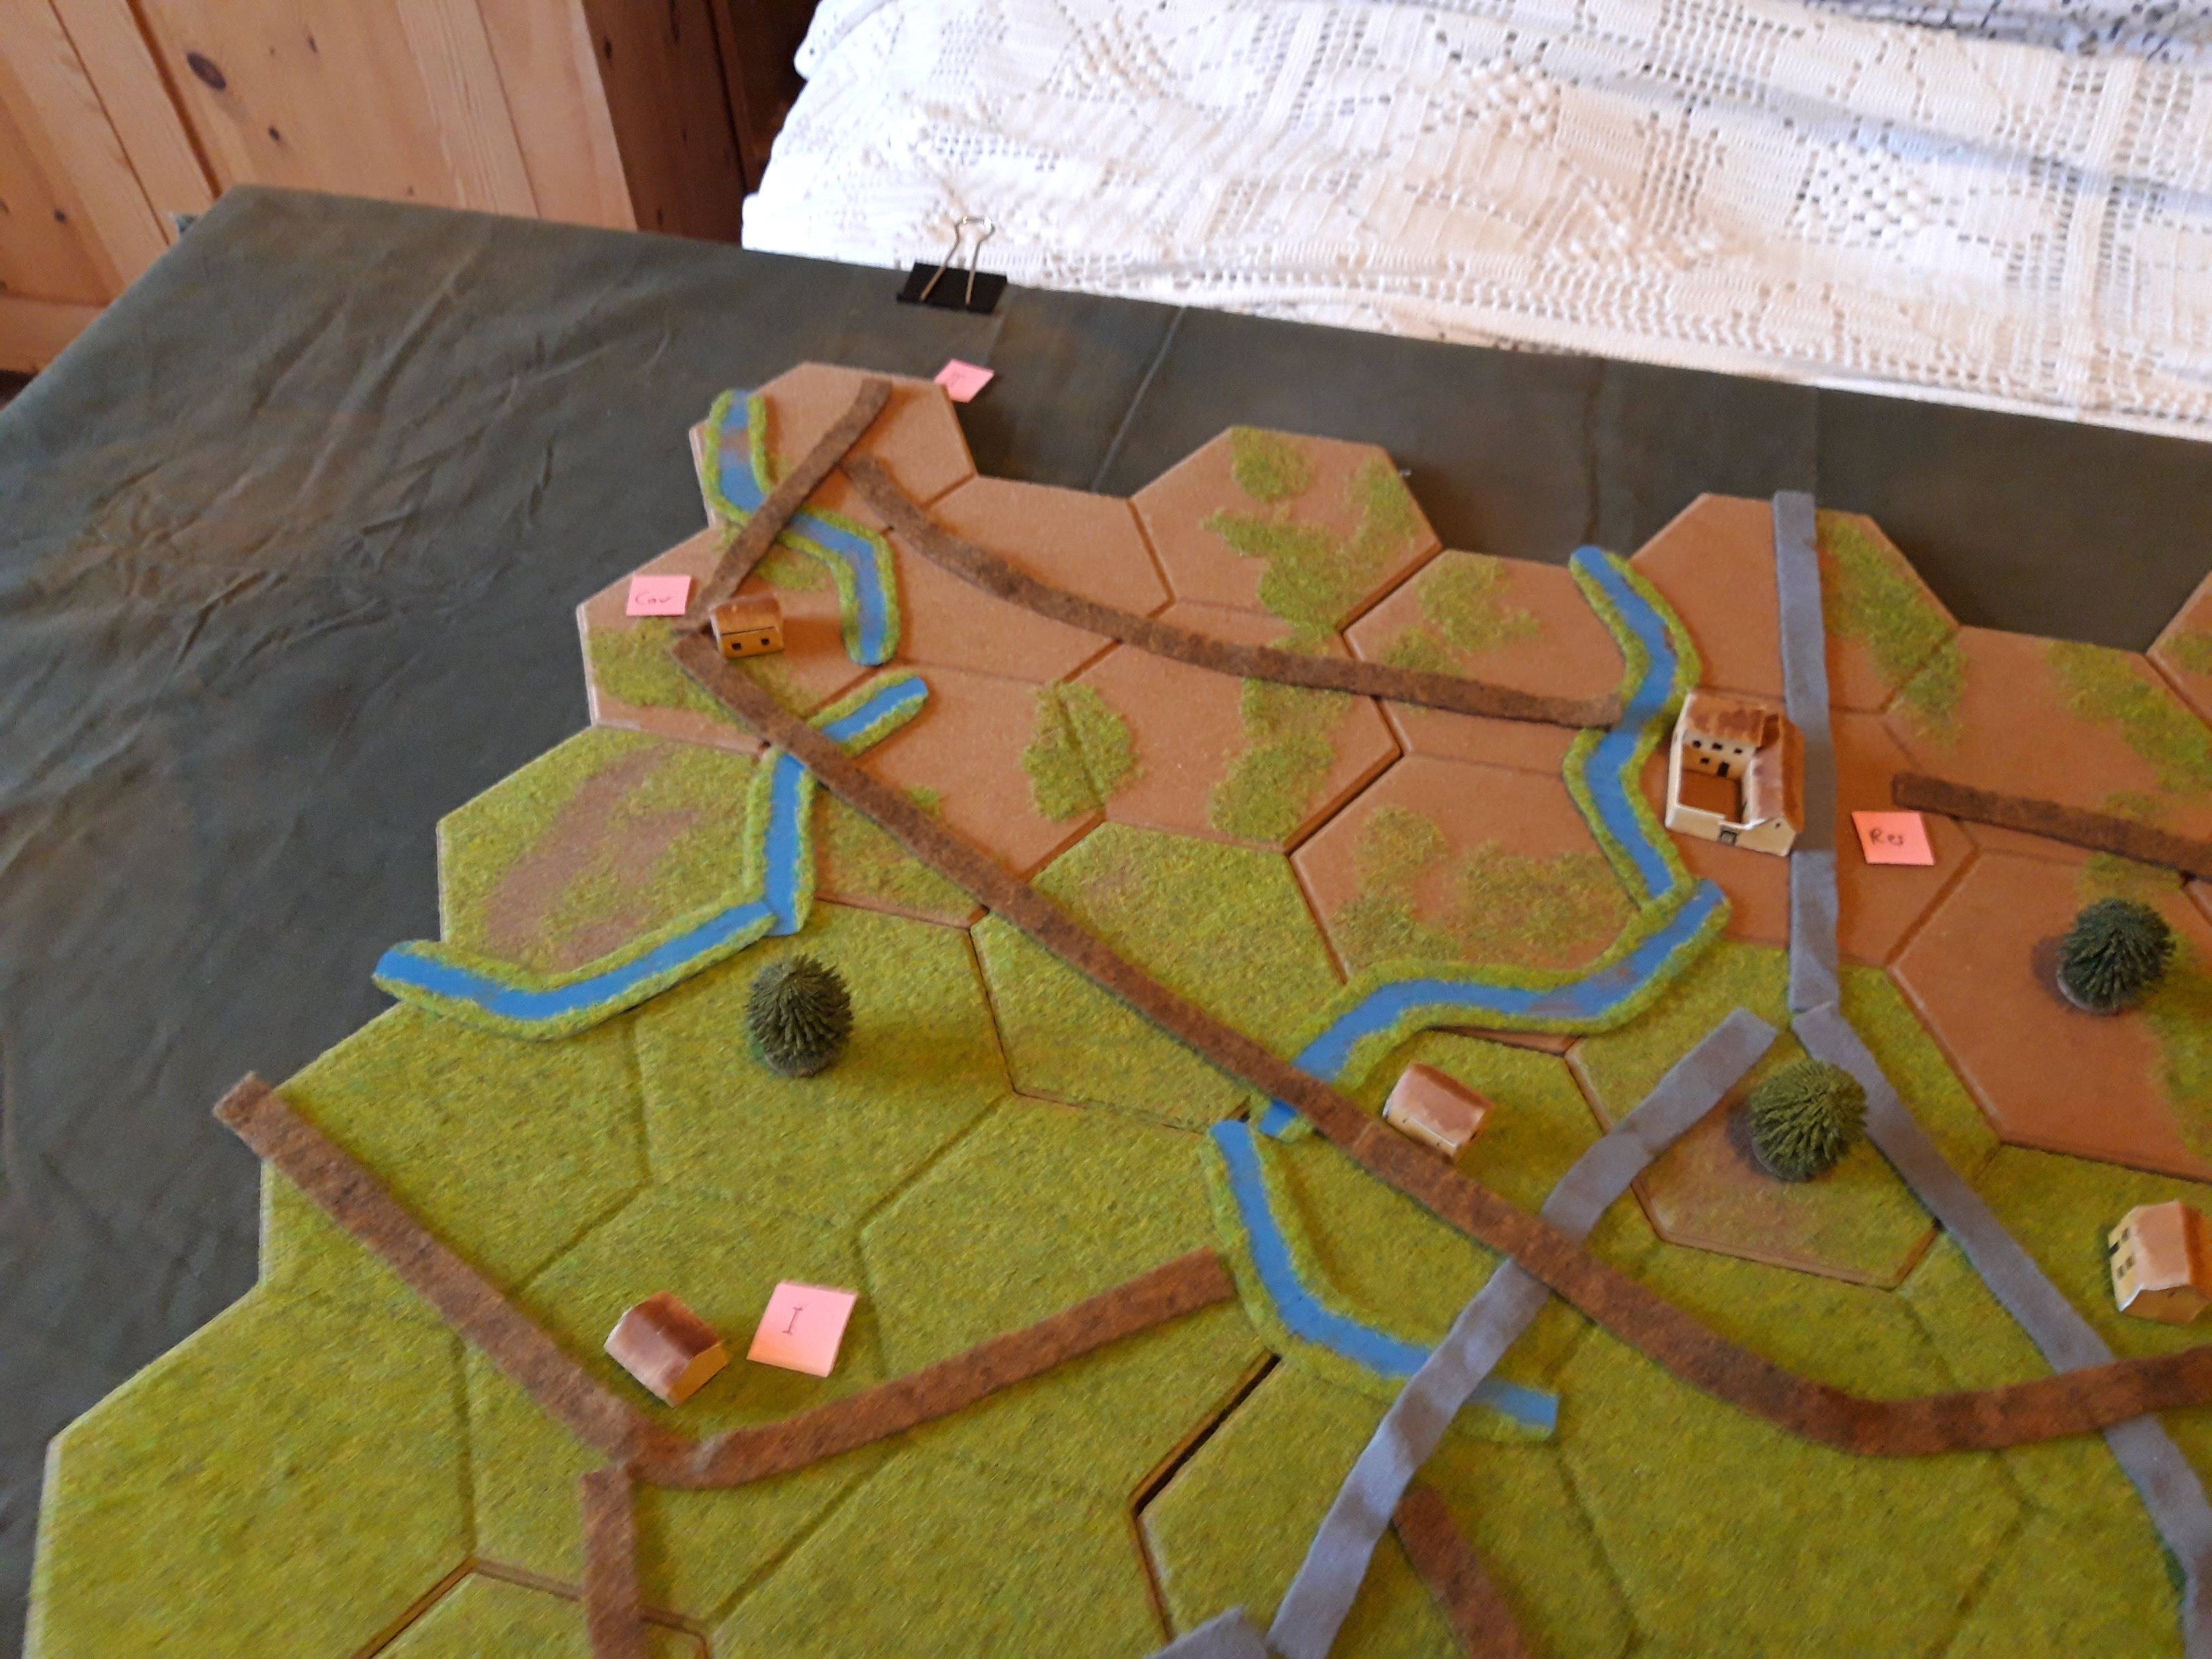
That is more like it. The grid is 11x15 hexes, I still had to drop one row compared to the Archdukes original map, but it is close enough. I can actually have the various units in their start points rather than offtable when I did it before. The top row of hexes are brown as I had to use some desert boards to make up the numbers, but it isn't too obvious . That famous Brussels heathland...
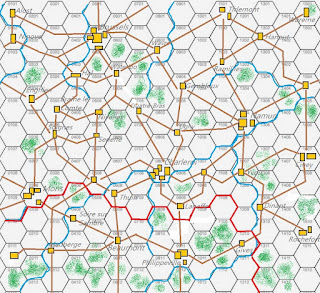
This is the map I'm trying to duplicate. I haven't done the entire road network or all the villages, although I managed to do most of the significant rivers, all the major towns and a lot of the minor ones. The woods are just representational as they don't have any game effect, but I had to put in the Foret de Soignes etc.

The French starting positions around Philppeville. Charleroi is just over the Sambre on the top right. While doing the setup, I just used colour coded chits to mark the various Corps. These are analogous to the Flags the Archduke uses for his games.

The Prussians are scattered all over the place. Namur is the large town in the centre with II Corps it. I Corps is just south of the Sambre in the bottom left. IV Corps is the one miles away in the top right. Dinant is towards the bottom centre of the map.
The British are equally scattered. Reserve Corps is in Brussels (top right), I Corps in the foreground at Enghein and the Cavalry and II Corps are off the top left corner.

Southeast of Brussels are the hamlets of Wavre, Waterloo and Quatre Bras. I wonder if anything will happen here? Gembloux is the town on the far right.

The British Army! I, II, Reserve and Cavalry Corps, all led by Wellington. Each main Corps has five infantry stands (a mix of British, Hanoverian, Dutch-Belgian etc), a gun and a cavalry unit. I ended up giving the British one infantry stand per 4000 British/Hanoverian and one per 6000 Dutch Belgian.

The French Army. L-R VI, IV, III, II and I Corps. Behind is the Imperial Guard and the left and right wings of cavalry. I merged the Cavalry Corps from four real Corps to two units as on their own they are very small.
The Corps vary in size depending on their infantry strength, generally one stand per 4000 infantry, but they all have an artillery piece (representing 40-60 guns each), and apart from Lobau, all have their integral Cavalry Division. The Guard is huge, as they are quite good, they get four infantry stands representing their 13,000 infantry, plus two artillery pieces (the 122 guns of the Imperial Guard artillery) and two cavalry stands (4,500 Guard Cavalry!).

The Prussians. I,II,III and IV Corps plus Blucher. I wondered best how to represent the Prussians, in the end I went with 1 stand per 6000 men because of the high proportion of Landwehr. Tbh I may have been better using 1:5000 and knocking a dice off in combat, as the units don't really look like the vast 30,000 man Prussian Corps.

The starting positions populated with troops. The French concentration around Philippeville is very obvious. I shall apologise in advance for the quality of the photos. It is a big table with tiny soldiers in not very good light.

As Napoleon, I seriously thought about a left hook via Mons. The road network is quite favourable for that route, but in the end the scattered Prussians were too tempting, and off to Charleroi the main French column went. Having these huge units marching in columns up the roads forces you to make hard operational decisions each and every turn.

In response Blucher moved II Corps from Namur towards Ligny, but unlike real life I Corps decided to fight for Charleroi instead of retreating over the Sambre from Fleurus. They attacked IV Corps (Gerard?) in the town.

Considering they were attacking over a river, they did quite well! They lost two infantry hits (the two white puffs) but their guns were shattered (black puff). They hit the French cavalry division and an infantry division, and then fell back towards the river crossing at Dinant.
I let elements take two hits before they are combat ineffective (like the Portable Wargame). To avoid moving stands on and off the table all the time, I just mark the 'destroyed' ones with a black puff and keep moving them around as a formation.

Prussian II Corps set up a blocking position north of Ligny, but most of the Prussian Army was forming up around Namur to the east. The British were marching on in dribs and drabs, Wellington had actually got Reserve Corps as far as Quatre Bras, with the Cavalry Corps to the southwest.
The French had a critical strategic choice to make at dusk on the 15th. Which axis did their reserve units go down? Napoleon sent the Guard down the Charleroi route. It was too tempting to try and split the Allies.

Overnight both sides rallied their shaken or shattered units. Each Corps recover half its infantry losses (rounded up) and half its artillery/cavalry losses (rounded down).
At dawn on the 16th the French attacked the Prussians at Ligny and the mass of the French went for Wellington at Quatre Bras, moving up the roads or cross country to give battle when assembled.

Reilles powerful II Corps, supported by Grouchys cavalry wing, threw Pirch's II Prussian Corps back to Gembloux with heavy losses. Reilles cavalry were shattered but otherwise he suffered no losses.

Wellington chose to stand and fight while his other two Corps drew ever closer. The Prussians moved up to Ligny, but weren't in a position to attack it yet.

The French launched a massive attack on Quatre Bras in the afternoon of the 16th with III Corps, IV Corps and Grouchy, only to be roundly defeated by Wellington! Quelle disastre! I'm not really sure how that happened, but it was a catastrophe for the French and their defeated units fell back. Wellingtons Corps was a bit beaten up but basically OK.

Wellington stood and awaited the next French attack as the Guard and Reille moved up. Lobau took over Ligny to hold off the Prussians.

There was a certain degree of shuffling on the French left as British I and II Corps got ever closer, and losses were recovered overnight again (I think I may have slightly lost track of which day it is at this point!).

Reille and the Imperial Guard, led by Napoleon himself, finally pushed Wellington back from Quatre Bras with heavy losses. The Duke retreated to Waterloo, covered by the Cavalry Corps. I and II Corps had now linked up with the rest of the Army.

In the afternoon, British IInd Corps moved up to block the road junction while Wellington regrouped at Waterloo and the Cavalry fell back towards Wavre.

Meanwhile back at Ligny, The Prussians attacked Lobau. Prussian I Corps (top right corner) is busy marching northwest to link up with Wellington.

Lobau was thrown back with heavy losses. At this point I decided it was silly that retreated units could just move off straight away, but instead that the retreat was their 'move' for next turn. So I marked Lobau with a yellow marker, to be removed on his next activation.

The overall situation. The Prussians and British still haven't really linked up, but each Allied Army is now united, and there are an awful lot of casualties.

On the 18th, after overnight loss recovery, Grouchy took over the garrison of Ligny as a forlorn hope to hold off the Prussians one more turn.

Meanwhile almost the entire French Army attacked the British positions in front of Waterloo.

II Corps was heavily defeated and fell back to the main British position. Wellington was now in trouble as two of his Corps were crippled, while the French losses were distributed over more units.

Ligny was a bloodbath. Lobau had recovered some losses but repeated Prussian attacks shattered Grouchys Cavalry Corps.

Back at Waterloo, the last intact British Corps, I Corps, took over the main position. II Corps fell back to the Foret de Soignes and Reserve Corps hunkered down on the British right.
Time for Napoleon to commit the Guard for the final breakthrough to Brussels.

The French right desperately tried to hold back the Prussians, losses were heavy on both sides. Grouchys Corps was shattered, but Lobau hung on.

As the sun set at Waterloo on the 18th, The Imperial Guard assaulted I Corps, led by Napoleon. The result was massive losses on both sides, but a drawn combat. Sadly, one of the losses was Napoleon himself, cut in half by a cannon ball. With the loss of the Emperor, the campaign came to an abrupt end!
A bit of a sudden stop, but I think the writing was on the wall for the French there. That was very enjoyable, particularly the strategic manouvre choices each side had to take. Once a force was committed to a particular route, it had to stick to it and deploying for battle took a while. I think the French vacillated a bit too much, they should either have focussed on destroying the Prussians, or concentrating on Wellington. Instead they started on the Prussians but then switched to the British. The British have fewer Corps, but they are stronger than the Prussian ones, so need a big effort to overcome.
I had to make a few decisions about mechanics in the game. I was overly generous with allowing adjacent defending Corps to support each other early on, and switched to allowing Corps to gang up in their own turn, which was much more satisfactory. I also revised the way retreats worked, as it was too easy for a force to be pushed back then just march straight back into battle again, something I don't think happened in real life. The Leader lethality was also a bit high, Wellington, Blucher and Napoleon were all hit in the course of the campaign, although only Napoleon was killed outright. I'll adjust that in future.
On the whole though, it worked very well and was an interesting change from the usual set piece battles. Where battles did break out, they felt quite Napoleonic as reinforcing Corps arrived to intervene in the fight. Well worth trying again in a different setting, and the larger table made all the difference,160 hexes vs 96 in my previous outing. It did take a lot of setting up though, particularly the road network, but I don't think there is any easy way around that. It did get me thinking about the large scale Portable Napoleonic Wargame again, as there are many aspects of that I like, just some of the combat outcomes don't seem right. My recent foray with the revised One Hour Napoleonic set has a much better handle on the relationships between the different arms and terrain types.

Martin -
ReplyDeleteI was really chuffed to see this posting! Looks great. The result looks like the 'near run thing' of legend. It also has the look of the 'World of Counterpane'.
Since my original 'Hundred Minutes' campaign I have made some changes to the game mechanics - really more formalised - and to the Orders of Battle.
On the matter of retreats, I tend to permit a formation that has retreated to attack the next turn. I call it the 'Marengo Option'. Bear in mind that if it is the same day, the defeated formation will have been weakened relative to their opponents. Otherwise, who knows what reinforcements might have invigorated the lads overnight?
On the matter of leader casualties, the '6' rolled in combat, if not cancelled by a similar enemy roll, now signifies a lost infantry element (along with 4s and 5s) with the potential loss of a leader. For each 6 in excess of enemy rolls of 6, a die is rolled. A 6 = the leader is lost - KIA, WIA, POW, take your pick. In my Eckmuhl campaign, Marshal Davout and General Morand have become casualties, both having in a single turn to avoid rolling a 6 for each of 3 excess 6s in combat. I don't recall any other leadership losses.
When two formations attack one, the combats are taken as separate one-on-one battles, but with the results applying at once and separately. So, if as a result of I Corps' attack, the enemy loses and is forced to retreat, that retreat is carried out at once. If the II Corps has the movement capability, it can follow up and/or attack in its turn.
If ever I 'do' the Hundred Minutes again, I would call it the 'Hundred Hours' campaign, and completely overhaul my OOB into something more resembling what I used for the Jena and Eckmuhl campaigns.
I will almost certainly 'redo' the Eckmuhl campaign, reorienting the map in an effort to avoid the 'edge of the world' problem that developed from my hastily extemporised version.
Cheers,
Ion
Thanks, I'd gleaned some of your new ideas from the 1809 writeup, particularly how to handle multiple combats. I'll think about the retreat thing (I had in mind an old variant of AHGCs Waterloo). The main thing was I really enjoyed playing it, and it felt more like a campaign than a normal wargame. Many thanks for the concept, and there is an awful lot of critical decision making to do during play. I'd like to try it f2f at some point and see how different it is, but as a solo experience it is great. I'll have to do it again and actually try and maintain some strategic focus this time!
DeleteGreat write-up, really interesting game.
ReplyDeleteIt is very clever, and well worth a try if you have an appropriate mat and toys (although tbh you could use Corps markers and a roster).
DeleteHello Martin,
ReplyDeleteI remember seeing this on Archduke Piccolo's blog and thought what a great idea. Glad to see it worked for you as well.
This is actually my second attempt at it, the first was on a smaller map. It takes a bit of setting up but is fun to play. I'll have a go at the Archdukes 1809 campaign next.
Delete