Saturday 24 October 2020

Sidi Rezegh

 The latest outing in my series of NBC WW2 games was a trip to the Battle of Sidi Rezegh during Operation Crusader in 1941. 7th Armoured Div faces off against 21st Panzer Div on the route to Tobruk, this covered the battle on the 22nd November when 7th Armoured Div finally concentrated against 21st Panzer Div. It was also the day Jock Cambell won his VC, which says something for the ferocity of the fighting.

In a bold experiment I ditched my Samsung tablet and phone combo over Skype, and instead used my laptop webcam over Zoom. Well, if you don't try new stuff you'll never improve.

We had a big turnout for this one, Tim G, Pete and Jerry were 21st Panzer Div (KG Stephan 5th Panzer Regt, KG Knabe 104th Schutzen Regt and Div CO von Ravenstein respectively). Tim C ws Jock Campbell commanding 7th Support Group, Graham had the three RA regiments of 7th Armoured Div, Simon had 7th Armoured Brigade and John reprised his role as Brigadier Scott-Cockburn, dashing commander of 22nd Armoured Brigade. So we essentially had two entire armoured divisions on the table.


View of the battlefield from the east. The escarpment runs up the middle of the table, with the airfield on the left. The Axis Bypass (the road constructed around Tobruk) is the metalled road running along the base of the escarpment.

Map of the battlefield (North is up). The critical objectives are circled,from L-R, Sidi Rezegh (tomb), Supply dump, ridge overlooking the Axis Bypass and finally the Airfield. 


1 KRRC deployed at the Airfield, supported by two batteries of 2pdr portee. 


2RB deployed to cover the other wadi breaching the escarpment with another RHA 2pdr battery. 60 Field Regt and Jock Campbells HQ, deployed behind. The remains of 7th AB with their elderly cruisers took up Hull down positions on the rise covering the Track. 


8MG Bn deployed in a wadi on the German left, with the Regimental HQ and motorised engineer and AT companies up on the ridge. One of the supporting 105mm artillery battalions can be seen, as well as a battalion of heavy artillery from Gruppe Boetcher. 


Over on the German right, II Schutzen Bn deployed near the tomb , with another 105mmArty to the rear and the FOO for the heavy artillery and DivHQ just behind. 


Irl the Germans led off with an infantry assault, but in the game the Germans were more cautious and waited an hour or so for 5th Pz Regt to roll up.  Two panzer battalions arrived on the western flank, plus various supporting assets, including a battery of 88s.


This was the cue for the Germans infantry to advance and II Schutzen set off down the road, while 25pdr fire dropped around them. 


8 MGBn also shuffled forwards to the Axis bypass, the wadi in D7 looked inviting. 


German infantry approached the escarpment fairly rapidly, while CB fire landed around 60th Field Regt. The Germans had an unusual amount of artillery support as they were close to the Tobruk siege lines. 


Both German  Infantry Bns were well on their way to the escarpment now, 2RB was looking a bit outnumbered. 


Over on the left flank, 22nd AB intervened with a torrent of Crusaders! Oberst Stephan was now in a semi circle of British tanks. Fortunately the British tankers morale was low after their heavy losses on previous days and one Regiment broke. 


View from the supply dump. 22AB has taken the Hill to the left and has one of the Panzer battalions thoroughly pinned. 


The 88s have what might be called a target rich environment. Unfortunately the Crusaders are far too close for comfort. 


View from the North. 8MGBn is right up at the escarpment now,, II Schutzen is not far behind. 


KG Knabe climbs the escarpment in front of the Airfield, and the RHA  portees head off to face the Panzers further west. 60 FA has taken some losses now. 


 In bloody fighting, 2RB are overrun by 8MG Bn. The Germans take 50% losses but the British break and run. The Airfield is in German hands! 

In the centre 60th FA and  the RHA 2pdrs retreat in disorder after beingoverrun by Panzers. 1KRRC is assaulted by II Schutzen and a melee ensues. 


22AB has great success and overruns the 88s while reducing one of the Panzer Bns to platoon strength. The British  lose a regiments worth of Crusaders in exchange. 


John led 22AB HQ and the remains of one regiment up the road to Sidi Rezegh and engaged Jerry (von Ravenstein)  and 21st PzDiv HQ in close combat. In the close range fight, the last of the Crusaders were knocked out, leaving the armoured HQs to duke it out. 


The RHA 2pdrs were dispersed by German heavy artillery fire and 60 Regt was looking decidedly shaky. Back on the escarpment II Schutzen and 1 KRRC were still slugging away,  but both sides were suffering extremely heavy  losses (75% each) and effectively eliminated each other. 


The airfield was firmly in German hands now. 


1st Pz Bn meanwhile engaged 7th AB in a very one sided fight. 


Over in the west though, the supply dump was in British hands and the way was (almost) open down off the ridge to the tomb. German IInd panzer Bn had been destroyed, and the British had one undamaged regiment left. 


The sneaky Germans had their motorised engineers and Pak 38s enroute to Sidi Rezegh tomb though, so whether 30 odd Crusaders would be enough to break the Pak front was anyones guess. 

We called it a day at that point. The Germans held three of the four objectives but both sides had suffered brutal losses. Irl the Germans overran the British position and destroyed the bulk of their armour, so in game terms the British actually did better than their historical counterparts. It was a shame we didn't have time for a couple more turns as the battle for the tomb would have been interesting. I suspect Veteran German AT gunners and engineers supported by three battalions of artillery vs one weak regiment of Crusaders wouldn't have gone the tankers way though. Zoom worked fine and the players commented on the superior picture quality, so that was a success. 

Jock Campbell was awarded the VC for his heroic defence in the battle, while Scott-Cockburn ended up commanding the records office High Barnet. Von Ravenstein was wounded a few days after this and Command of 21st Panzer  passed to Knabe, who commanded the infantry in the battle. 

That is probably the last of the NBC desert battles or now.  Although they work OK they are a little bit big for remote play and in future I'll focus on slightly smaller actions. It has been fun to run them sequentially though, and it is such a shame Frank Chadwick never published 'Decision in the Desert' covering 1942 although I expect I could bodge together some Gazala and Alamein scenarios. Many thanks to the players for indulging me, and for the fine array of hats on display! 


Tuesday 20 October 2020

Fontenoy

 John put on another eighteenth century game using his squared version of Brown Bess, this time incorporating a more significant wheeling penalty for units in line. The battle itself is one a bit less gamed as Marechal de Saxe had built a fortified position with a series of artillery redoubts echeloned behind the fortified village of Fontenoy. The Pragamatic Army (English, Dutch and Imperial) were faced with attacking this position, which was somewhat reminiscent of the German defences at Passcheandale.

Again my failing memory means I can't recall exactly who was who although Jerry was Louis XV, someone was De Saxe (possibly Pete?) and I was the Duke of Cumberland, third son of King George (Hurrah!). Tim G was the French cavalry, Simon the Dutch infantry and Tim C the Allied cavalry. My personal objective was to lead my troops from the front. Well how hard could that be?


The initial deployment. John had done a lot of work on his Powerpoint objects and icons and the whole setup looked very pretty. We gave out orders and John moved the units around on the screen and adjudicated the combat results.

As you can see from the image, the French infantry and cavalry are very easy to make out at the top of the screen and the Dutch, British and Austrians are all nicely colour coordinated at the bottom. 


Given the way the French were arrayed I thought out best bet was to march forward in a single consolidated line, chewing up the piecemeal French redoubts and units. We therefore marched straight up to Fontenoy, while the reserve units deployed behind. The right flank unit (Ingoldsbys briagde) seemed curiously reluctant to move forward against the French skirmishers in the woods so I sent a brigade to reinforce them.  

Our chaps in front of Fontenoy took some defensive fire losses but then opened withering musketry from three squares against the French.


Our left flank was looking pretty good as the cavalry moved into position but the Dutch decided to launch an assault on the French defenders in Fontenoy. This was rather premature as the attacking unit was seriously disadvantaged against the fortified town and it threw away our numerical superiority as only a single unit could melee (whereas we could all shoot).


The French reserves also did some shuffling around. The wheeling penalty made this quite slow for infantry units. Their cavalry also got hung up in a bit of a traffic jam against their own fortifications and the River Scheldt. They tried to throw a lot of weight onto their right.


The Dutch retired from Fontenoy and the remaining French garrison was shot out of the town by the British and Dutch brigades on each side. It turned out one of the Duch objectives was to launch a hasty assault on the town, which they had done, and not too much damage done to us. Ingoldsby had also finally moved up into the woods (he'd just needed a bit of encouragement) on our right.


Things suddenly hotted up. Ingoldsby managed to not just push back the French lights, but to wipe them out. The French were hideously unlucky in this case as normally light infantry can just fall back before formed troops. Cumberland stepped forward another row of squares, but the perfidious French re-occupied Fontenoy. What a rotten trick! The British infantry were now next to some French infantry though, and with 'superior' infantry and a General vs 'raw' infantry it was only going to go one way... 

The French cavalry were meanwhile performing no end of strange manouvres to be able to deploy, and their whole cavalry line sort of sidestepped one row south as the French infantry scattered in front of them.


The left flank eventually erupted into a scrappy cavalry melee, which had been building up for some time. The Dutch infantry moved up in support against the next French line and Cumberlands men easily blew away the French infantry in front of them (I was being careful to stop and reorder the line after each firefight).   The defenders of Fontenoy were looking increasingly isolated, while the French infantry reserves about faced and marched back in the opposite direction to face the British. Proper Duke of York stuff.


The caavlry melee continued as both sides fed in fresh units to replace those damaged or routed. The French were having the worst of it though. Fontenoy was now almost surrounded. Cumberland meanwhile straightened his line and poured musketry into the French inits in front. 


The French left was now looking quite ragged, and in a surprise move the defenders of Fontenoy sallied forth into a hail of musketry. Over on the right the French concentrated their fire on Cumberland and the Guard Brigade, and only the Generals presence keep the Guards from breaking (and he also survived several leader risk rolls). The crisis of the battle had arrived. 


A number of units on the French left broke (the cloud symbols), and the Fontenoy garrison was also routed. The Hanoverian brigade moved up to support Cumberland whose line was buckling under a furious French assault, but there were now four British brigades in a close supporting line. 


The French Army finally collapsed as the British cavalry pursued to the banks of the Scheldt, Fontenoy was cleared and the remaining French brigades facing Cumberland also disintegrated.

Phew! that was a close run thing, and a somewhat better result than Cumberland achieved in real life.

That went really well, and the simple restriction on wheeling made the game feel a lot more linear than Dettingen. Fontenoy is actually covered in the One Hour Wargames scenarios as the 'Fortified Defence' scenario, the play balance approach in that scenario is that the attackers get to replace their entire Army with fresh units once per game (!). So I think the Pragmatic Army did quite well to successfully assault such a strong position. irl Cumberland pushed fairly deep into the French position, but surrounded on all sides by French artillery redoubts, decided to save his army and withdrew again.

In the game, the French cavalry could have intervened earlier if their deployment had been prioritised by having them to interpenetrate and disrupt their supporting guns and infantry, but by the time they did get into action, the French first line had largely been destroyed. The personal objectives and unit specific (secret) rules added a lot to the flavour of the scenario and worked very well, although I'd convinced myself that Cumberland was killed in this battle,  in fact he survived and went on to defeat the Jacobite uprising later the same year. Well you learn something new every day.

The only real rules discussion we had was around our old friend - the treatment of diagonals. There were some odd instances of diagonal firing (which is fine) apparently through obstacles and friendly units, which isn't really. It partly depends how you visualise the units in the squares as to what is logical and what isn't. It is just one of those things when using grids unfortunately.


Sunday 18 October 2020

I have been to... Norfolk

We were supposed to be on a cruise around the Black Sea in September,  but thanks to Covid 19 that didn't happen, so instead we had a week in Norfolk and enjoyed the glorious sunshine. Along with swimming in the sea and eating too much, I managed a trip to the Muckleborough Collection up the coast, which is based at Weybourne Camp, used for anti aircraft training in WW2 up until the late 1950s.


There is a magnificent diorama of the base in use in WW2, packed with 1/72 scale models. 


Plus a photo history of the base including information on the various types of guns. My grandfather served in a Heavy AA Regiment as a signaller, so that was very interesting. 


I was very taken with these heavily camouflaged bicycle infantry. 


One side of the diorama featured a model of a real plane shot down nearby. German aircraft tended to avoid the base due to its AA defences. 


There is an extensive small arms collection. 


And various vignettes.. 


It is also host to a Yeomanry museum. 


Copenhagen! 


Yeomanry uniforms and equipment including this nice 7pdr RML. 


The vehicle display hall has some nice airship models. 


A lovely 2pdr.


5.5" This is a big gun.


17pdr, also huge. Easier to get at the breech than the example at the Cobbaton collection. 


6pdr in desert colours. 


18pdr. Yes the wrapping on the recuperator really is white. 


4.5" howitzer on a carriage for motorised tow. 


25pdr, limber and tow, including great views of the wierd 25pdr ammo boxes. I wonder if Serco had the contract for those? 


13pdr limber. A much more sensible arrangement. 


13pdr


A slightly different Quad tow for the 25pdr, a Morris C8. 


2pdr portee (not sure I fancy firing that over the windscreen!) 


AMX13 on a transporter. 


Scammell tow lorry


Bloodhound! Where is the guy with the dog... 


Leyland Hippo


Centurion and Chieftans, in slightly odd brown/black camo. All the tanks are runners. An amphibious jeep is in the foreground. 


That 120 is a big old gun. 


FV432 and Scorpion. 


Completing our BAOR Combat Team, Abbot. 


I'm not usually a huge fan of plane paintings but there were some pretty good ones. 


There was also a huge collection of models. 


I'm not entirely convinced that this is actually Carthaginian. 


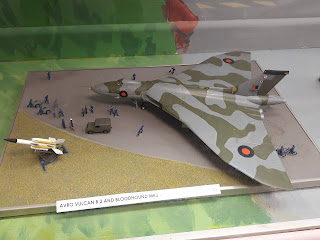
If you look carefully, the guy with the dog is there. Makes you realise what a big plane Vulcan was. 


Daimler armoured car. The dummy is wearing what appears to be original battledress. 


Dingo


M3 Scout Car in a great desert scheme. 


Saracen APC


Saladin Armoured Car


Ferret Armoured Car


We are suddenly in my old AK47 Army. The back of the Saracen is quite roomy. 


Ice Cold in Alex. Austin K2 Ambulance. 


Rapier. 


A nice 88 although I'm not sure they would have camouflaged the underside of the legs. 


Cymbeline counter mortar radar. 


Carrier with top mounted Boys ATR. 


Stuart (and Chaffee) 

T34 and its descendant, T55. 


Chaffee


A very imposing cast Hull Shermans in OD/Black camo. Named as Fury,  but of course Brad Pitts ride was a 76mm. 


Inside a Sexton. Don't often get a look inside one of these. 


M15 AA halftrack,aka the Meatchopper . 


Comet


That Sexton again. 


There a load of Nissen huts with various battered AFVs parked around them under tarps. 


US 155mm Long Tom


ZPU4


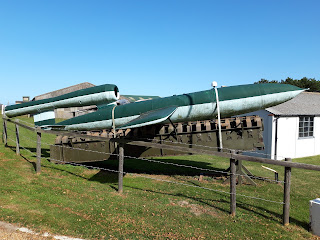
A nice replica V1


And a Harrier which has seen better days. 


This radar site is still operational, the last bit of the base still functioning as part of the RAF. 

That was a really good morning out, well worth the entrance price, and my tatty pictures don't do it justice. They also do 'tank rides' where you can drive an FV432 around, but they weren't running due to Covid restrictions. Recommended.