Saturday 25 August 2018

Fort Mardonius

A little while ago Tim treated us to yet another ancient wargaming adventure based on Herodotus and covering the formation of the Persian Empire. This one being Mardonius' expedition to Thrace, in (iirc) around 580 BCE, so almost modern! Some chap called Darius ruled the Persians at this point, but he was busy elsewhere.

Mardonius had landed in Thrace and built a fortified camp around his boats prior to setting out. Some of the locals (the Bigye) weren't too pleased about this and set to to attack the camp under cover of darkness, negating the Persians advantage in missile troops. The whole setup reminded me of a Wild West fort, hence Fort Mardonius. I got play Mardonius, and John and Graeme got the the Thracians.


Mardonius's beachhead. Lots of angry Thracians surrounding it, including a number of warband, which was a bit alarming considering the high proportion of Persian light troops. The Persians did have a couple of medium units (cavalry and Immortals).


Some very angry Bigye hammer men. This lot were rated as Warband.


Their nameless commander, named Bigye for game purposes, who was a rather magnificent figure.. Some scythe wielding Auxiliaries in support.


The initial Thracian assault inflicted losses on the Persian centre, but one notable casualty was the Thracian commander who fell to a single hit from the Persian auxiliaries.  Very bad luck there. 


The Thracians then attacked the northwest corner of the fort, again, hammering the defenders with few losses in return.


And after a while, they broke into the camp. A particularly aggressive warband unit wreaked havoc against the Persian light troops. Things were looking a bit sticky at this point as Mardonius had already had to lead one counterattack to support his centre, and now the left wing had collapsed.


 Mardonius personally led a counterattack with the Immortals and Persian cavalry which drove the tribesmen back out again, although the rampart was rather thinly manned now.


Emboldened by this success, Mardonius led an attack on the Thracians outside the walls, and succeeded in eliminating enough of them to drive the rest away.

Well, that was exciting. Historically Mardonius drove off the Bigye and went around pacifying the countryside, but was forced to evacuate back to Persia after a storm wrecked his fleet. Herodotus duly recorded the entire campaign as a crushing Persian defeat.

Saturday 18 August 2018

Amiens 1918 (2)

The briefings and setup can be read in my earlier post from last week.

We assembled a fair amount of kit for the game, many thanks to John and Tim for the loan of tanks, artillery, aircraft and airfields. We played it predominantly using my 20mm stuff, although the artillery was supplemented with some 15mm pieces, and the aircraft were all 1/144th Wings of war planes.


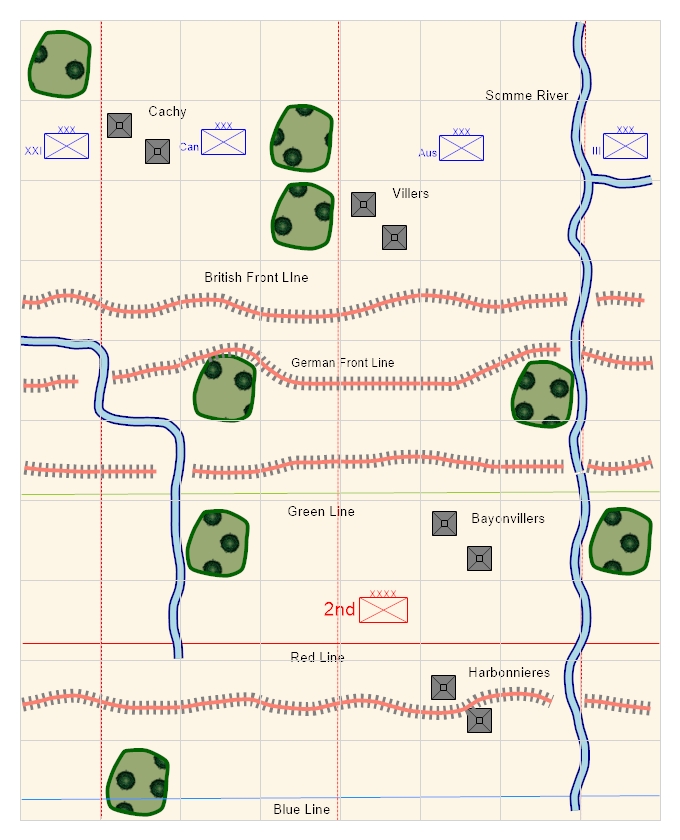
View from the German side. The Canadians have brown tanks and the Australians green ones to make recognition easier. The French were supported by a battalion of Whippets, and John produced his magnificent 20mm Whippet carved from wood! Each tank model represents around 40 real vehicles, and each square is around 2km (giving each Corps an assault frontage of around 6km).


The British command team. Dimly visible in the far right is the Allied airfield, packed with aircraft. John took the role of Rawlinson, 4th Army commander, Tim the Australians, Robert the Canadians and Jerry the RFC.


View from the British lines. Each of the assaulting divisions has eight stands of infantry, split into two waves of four each. For ease of recognition the Canadians had Lewis guns and the Australians had Vickers guns. The Cavalry divisions each have four stands of mounted infantry and a Whippet or Armoured Car attached. III Corps on the far left was represented by a single tank and a few stands of infantry.


Allied reserve artillery waiting to be deployed. Each field gun  represents about 100 pieces, while the heavy guns are around 50 guns each. Plus about a million rounds of ammunition.... 4th Army commander decided to split the reserve field guns evenly, but allocated the bulk of the heavy guns to the Australians. In return, the Canadians had greater call on the resources of the RFC.


The action opened with air and ground recce. Foot patrols probed the German front line, while the RFC went looking for German guns. There were three rounds of recce, followed by a round of 'artillery recce' ie some of the Allied guns opened up in the hope the Germans would reciprocate.


The ground recce went quite well and elements of three Germans divisions from two different Corps were identified. The air recce was less successful and only a couple of German divisional artillery regiments from IX Korps and one Corps regiment were located. The Germans had deployed with IX Korps covering 8km of front with three divisions, and 51st Korps covering 4km of front with two divisions with an artillery density of roughly 40 guns per km. The Canadians were facing a somewhat higher troop density than the Australians. 


This didn't greatly impeded the assault which went in behind a monumental rolling barrage under cover of early morning mist while the identified German artillery was pounded by CB fire from the heavy guns. One of the Australian divisions came unstuck when its leading waves were decimated  by fire from unsuppressed German artillery supporting 108 Division (IX Korps). This would cause problems later. The other divisions took the forward German trench lines with moderate losses.


The German guns were all unmasked now as they opened fire. Only the forward batteries were in range of Allied counterbattery fire. The defenders of the German main line (roughly one regiment per 2km sector) are now emerging and the Canadians faced a nasty assault against 51st Korps over and into a defended stream and wood respectively. IX Corps artillery is concentrated around Bayonvillers.


The RFC strafed the more distant artillery positions whilst reserves pushed up to reinforce the leading brigades and replace their losses. In all the excitement I completely forgot about the German aircraft, oh well, it wouldn't have made much difference. 51st Korps heavy artillery was silenced by the air attacks and counterbattery fire pounded the field artillery regiments of 117th and 41st Divs.


The Australians eventually blasted their way forward and broke IX Corps opposite them. Unfortunately they had suffered such heavy casualties in taking the trench lines (they had never really recovered from the  artillery losses in the initial assault) at this point that the Corps became exhausted, which restricted its combat ability and prevented any further ground assaults. This was unfortunate as there were almost no Germans left in front, apart from some increasingly ragged looked gun emplacements.


Over on the other flank the Canadians crashed forwards in fine old style. The Green Line had now been captured almost in its entirety, and the German infantry on this flank (51st Korps) was also broken. Unlike the Australians, the Canadians still had some offensive capability left and the German field guns in this sector were thoroughly suppressed now. Armour losses to this point had been moderate, a combination of breakdowns and casualties from combat.


A certain degree of consolidation took place on the green line. Reserves moved up to reinforce the front line units and the cavalry began to move up for the next phase. Pockets of Germans resistance were obliterated with artillery fire and some field artillery moved up in close support.


The armoured cars supporting the cavalry had to be assisted across the abandoned trenches.


And then it was off to the red line! The exhausted Australians could only advance by blasting the way forward with artillery, and eventually the German field guns were cleared away and Bayonvillers was captured. The Canadians were able to be more aggressive and easily overran the few remaining German gun positions with light losses.


They rapidly reached the red line on  a broad front as German prisoners were escorted to the rear. The only problem now was that the leading troops had outrun their communications. The reserve line in this sector was relatively strongly garrisoned, although these Germans were very disheartened by the carnage in front of them and their combat effectiveness was considerably reduced.


The Australians were a bit stuck as they were unable to assault, so they were held up by a very thin German gun line. Help was on the way though in the form of the two fresh cavalry divisions and their Whippets who were now nearing the front. Leading elements of the Australians pushed up to the red line on a 2km front between the remaining German gun positions.


After a bit of reorg and reinforcement the Canadians pressed over the reserve line. The surviving German infantry surrendered and the German 51st Korps HQ was revealed which rapidly withdrew from the field. The losses they had incurred to this point and the extra ones suffered storming the strongly garrisoned reserve line now rendered the Canadians exhausted too. The cavalry were still fresh and close at hand though.


Over in the Australian sector , dismounted cavalry and Whippets wiped out a German field artillery regiment and pushed up to the Red Line. Lights tanks and cavalry, the weapon of the future.


The now exhausted Canadians rolled up to the Blue Line and halted on the objective while the cavalry and armoured cars crossed the abandoned German trenches.


Over in the Australian sector, a somewhat unwise mounted cavalry assault  supported by Whippets was bloodily repulsed by the few surviving German gunners. The garrison of the reserve line was much weaker here (a single regiment on an 8km front!), but it was enough to stop the exhausted Australians who had outrun their artillery support.


The Germans defence was unhinged by cavalry and armoured cars who went on a rear area rampage, threatening IX Corps HQ and thoroughly isolating the remaining German defenders while the more cavalry and Whippets crossed the reserve line.


At the end of play the Australians were hard up on the Red Line and one of their supporting cavalry divisions had pushed through the reserve line. A penetration of the German lines of around 8km on a front of 6km. Over on the far right, III Corps north of the Somme had pushed forward about 4km in the face of ferocious resistance and German counterattacks.


On the left the French XXXI Corps had methodically fought their way forward 6km, and the Canadians had pushed right up the Blue Line, while their cavalry rampaged through the green fields. An overall penetration of 12km deep on an 8km front, an amazing achievement. 

In the process of pushing forwards, the Allies had destroyed the best part of five German divisions and captured hundreds of artillery pieces. Both Corps were exhausted, but overnight reorg would restore their offensive potential, and tank losses had been moderate. They had also achieved the Blue Line on a front of around 8km, which neatly mirrored the historical result albeit in reverse as irl it was the Australians who made it to the Blue Line, not the Canadians.

Johns plan of reinforcing the Australians with extra artillery was sound, particularly as they faced less opposition (seven regiments) than the Canadians (eight regiments) and the latter had to fight their way over a river too. Unfortunately the unlucky air recce didn't locate enough German guns to suppress in the opening attack, however despite becoming exhausted early, Tim made excellent use of his cavalry divisions to keep the attack moving. Robert rolled the Canadians forward in a very professional fashion though, and they richly deserved their breakthough into the green fields beyond.

Many thanks to all the players who made it such an enjoyable game, and I am delighted that we managed to replicate a broadly historical result and that it was a suitable tribute to the people who did this for real 100 years ago.


Saturday 11 August 2018

Amiens 1918 (1)

This week it was the 100th anniversary of the Battle of Amiens, the decisive battle which broke the German Army in the west and marked the start of the 100 days campaign which ended the war. There has been much coverage in the news media, and by great coincidence, 8th August 2018 happened to be a club night, so I was determined to put on a genuine 100th anniversary game.

I have been planning (on and off) on doing Amiens for at least 15 years since I put on a Cambrai game at the club and at COW. I wanted to do it justice and do as much of the battle as possible, but it was a much larger affair than Cambrai. At Cambrai the tactical commanders were division commanders, which with half a dozen assault divisions vs a couple of defending Germans divisions was quite manageable, but at Amiens there were in excess of twelve assault divisions and a big chunk of 2nd German Army opposing them, a much larger affair.

After many years of considering various options, in the end I plumped for doing it with a very streamlined version of my late war version of OP14 with the players in the role of Corps Commanders. Even with 2km zones this is still a huge battle, so I stripped it down even more and set the flanking Corps (III Corps and the French XXXI Corps) to be system run, while the players concentrated on the Canadian and Australian Corps. I also took out all the reserve divisions and just modelled their artillery, but even so the player controlled forces comprised no less than eight infantry and three cavalry divisions. Unlike Cambrai, the penetration was also much deeper (six zones as opposed to four).

For the rules themselves I reduced everything to a D6 rather than mucking around with different kinds of dice and factored quality differences into the strength points. Using a D6 also altered the calculations for artillery SPs so it became 1SP per 36 field guns or 18 heavy guns. I reduced the German Corps strengths quite considerably as many of the divisions holding the line only had 4000 or so infantrymen, rather than their authorised strength of around 6,000. I also amalgamated the British field artillery brigades into Corps level groups (so each represented the artillery of two divisions) but it still produced an impressive twelve field gun brigades. The Germans I left was weaker divisional and Corps artillery regiments, scattered around the German artillery deployment area. I also re-wrote the standard tank rules to eliminate all the card drawing. Instead AFVs could take four hits, suffered from combat in the same way as infantry and from each successful artillery anti-tank shoot, but also for each Corps with a moving AFV, roll a D6 equal to or under the number of movig AFVs and one suffered a breakdown loss. That is considerably more generous than the rules as written and the same system I used for Cambrai many years ago. AFVs still operated in combat as the standard rules, suppressing MGs and eliminating wire, regardless of the number of models. I also wrote some quick recce rules, based on those in Megablitz, for the pre-assault setup (essentially infantry patrols, air recce and some limited artillery recce).

Overall the Allies had 64SP of infantry, 12SP of cavalry, 44SP of tanks and a whopping 60SP of  artillery (plus 15SP of aircraft). The Germans had 30SP of infantry, 14SP of artillery and 6SP of aircraft but were in a prepared position. The overall force ratio was 4:1, which according to the Dstl force ratio: risk tables gave the attack a basic 60% chance of success (prepared attack vs prepared defence) but at the point of contact for the leading brigades the odds were a more satisfactory 7:1 giving 80% sucessu probability,. As always on the Western Front, the command challenge was maintaining that ratio through the full depth of the defence zone as losses and confusion mounted.  The base exhaustion level for each if the Allied Corps was 8, and for the German 52st and IX Corps, 3 and 5 respectively.  Once losses reached that level, any additional losses risked the formation becoming exhausted. 

For planning the layout, this map from the Canadian War Museum was particularly useful, as well as various Canadian and Australian websites and the rough sketch Guderian drew in Achtung Panzer!


The battlefield was abstracted as above, the top is west, the bottom is east (so the Somme runs top to bottom). I did have a think about modelling the salient in the Canadian front line but in the end I decided it didn't make much difference to the final operation so I left the front lines as linear ones.

The objective lines (green, red and blue) are marked, as are the Corps boundaries, and I adopted my usual 'straight ahead' restriction for the committed assault divisions, at least within the trench systems. There is actually a fair gap between the Germans front line system and the old Amiens inner defence line, but I just absorbed it into structure of the zones.

Even with more generous stacking limits there is barely space in the Allied deployment area to fit all the troops, guns, HQs and reserves. The Germans had the thick end of two Corps defending the area, albeit at reduced strength and fairly poor quality units. As being run over by hundreds of tanks is a fairly dismal prospect, I ran the Germans as an umpire, and set all the players to running the Allies. I planned out a multi-layered defence for the Germans (essentially a regiment per zone,with the divisions deployed in great depth). The German infantry were rather thinner on the ground in the Australian sector, whereas in the Canadian sector the reserve line was fully manned. The German artillery was deployed chequerboard pattern to provide a backstop to the front line and battle zone.

Allied briefing below.

General Briefing
Operation Micheal, a major German attack in Spring 1918 finally petered out in front of Amiens and the front solidified along the Somme River. The Germans left the sector in the hands of static divisions who built up their defences based on the old Amiens defence lines abandoned by the British. Haig was determined to mount a major counteroffensive in the sector, using techniques perfected during the Battles of Hamel and Cambrai - a surprise mass tank attack with no preliminary bombardment.

Extensive deception measures were implemented which allowed the secret relocation of the entire Australian and Canadian Army Corps to the front south of the Somme in front of Amiens. These Corps would bear the brunt of the attack, supported by III Corps in the north and the French XXXI Corps in the south. Over 500 tanks and 500 aircraft were allocated to the attack, as well as 1300 field guns and 600 heavy guns. The Cavalry Corps (supported by Whippets and Armoured Cars) was held in reserve to exploit any breakthrough.

British Briefing

Friendly: Preparations for the  attack are still apparently undetected, and there will be no preparatory bombardment to maintain surprise. Extensive air recce is available to pinpoint enemy gun positions to neutralise with counter battery fire. Each assault wave has tanks designated in support and it is important to keep reserves close up to maintain the momentum of the attack.Our troops are now expert in platoon level tactics using Lewis guns, rifle grenades and trench mortars to fight forward.

Enemy: The enemy forces comprise several weak infantry divisions holding rudimentary trench lines with little wire or deep dugouts supported by around 500 artillery pieces. Enemy storm troops and tanks all appear to have been withdrawn apart from one division north of the Somme.

Objectives: There are three designated objective lines to capture by the end of the day, these comprise:
Green line: the enemy forward trench positions.
Red line: the enemy battery positions.
Blue line: the enemy reserve position.

Forces: 4th Army (Rawlinson).
III Corps (Lt Gen Butler). 18, 58 Div plus one battalion of tanks. Flank attack north of the Somme.
Australian Corps (Lt Gen Monash). 2,3,4,5 Div plus two battalions of tanks.
Canadian Corps (Lt Gen Currie) 1,2,3,4 Div plus two battalions of tanks.
French XXXI Corps.  62,63 Div plus one battalion of Whippets. Right flank protection.
Cavalry Corps (Kavanagh)
2 x Cav Divs plus 2 x Battalions of Whippets in support of the Australians
1 x Cav Div plus 1 A/C Battalion in support of the Canadians.

Each Corps has its integral artillery brigades (approx 300 field guns and 50 heavy guns each), in addition there are a further 600 field guns and 300 heavy guns available. Huge amounts of ammunition have been dumped which is required for the field guns to fire a rolling barrage and makes the heavy guns and much of the field artillery immobile.

500 Aircraft are available for recce and strafing.

Terrain and weather
The terrain is generally gently rolling good going, the woods, streams and villages are obstacles to movement. The watercourses may only be crossed by wheeled transport at bridges. The trenches are obstacles and bad going for armoured cars, light tanks and field artillery. The weather is warm and dry with morning mist. Dawn is at 0600 and nightfall at 1930 (9 turns).

Next time, the battle...

Saturday 4 August 2018

Talavera 1809

John is steadily working his way through his Peninsular War scenario book, and this time we got to do Talavera. Woo  hoo, result! I've never done Talavera before, although I've done quite a few of the other big Peninsular battles. This one makes me think of the wargames in the old Callan film.

As ever, we played it with Johns 15mm toys using Brown Bess. As this was  a big battle, the units represented divisions, and I volunteered for the role of Cuesta so I could wear my Really Big Bicorne.


The Frenchies line up over the way. There seem to be an awful lot of them, and not much sign of the historical 'piecemeal attacks' this looks more like Wagram!


Wellesly and the British hold the centre.


While very sensibly my chaps lurk in and around Talavera itself.


Ooer, what is this? Some of my chaps run away at the first shot! There were some special rules covering the the unreliability of the Spanish  in this battle (a special morale test the first time a unit was in action). I duly let off an army level musketry barrage at excessive range, and we were all suitably amused when some of the Spanish infantry ran away from their own shooting. Better to find out now than in the thick of the action I thought.


No such hesitation on the part of the Spanish light cavalry who head straight for some French guns who seem a bit short of support. The yellow marker indicates they haven't taken their 'special' morale test yet.


The other Spanish cavalry head for the French lancers. Might as well use them or lose them.


Some French dragoons pull a very dodgy looking flanking manouvre. They never taught us that in Seville.


Sadly my cavalry on this flank turn tail, but not before throwing the French right into disarray by forcing infantry into square and making the French commit a cavalry division to drive them off. 


Over on the other flank, my chaps leg it too, pursued by the Lancers. Things could be going better.


Cuesta rides over to help rally them, but is cut down in the melee as the Spanish cavalry are wiped out. It is probably for the best.


Meanwhile the French crash into the British line, suffering heavy losses in the process.


And the British light cavalry also take on the French.


Although some French divisions are driven off in disarray, sadly the Guards break and Wellesleys flank is left hanging in the air.


Meanwhile my chaps form square in the face of masses of French cavalry, which also proves to be a handy place for my gunners to hide. Unfortunately the cavalry have infantry support.


Things aren't looking too good over here, the British cavalry are routed and the French start to wheel around. The British troops holding the far end are looking rather isolated.


My squares proves to be extremely resiliant though, the morale bonus makes up for the increased vulnerability and they dish out death and destruction on all sides. Unfortunately they are effectively pinned in square now and will have to do or die in place.


Things could be going better in the centre as the British are outflanked.


My lead square begins to collapse and the French get started on the next one.


Up on the hill thought, the thin red line manages to stave the French off a bit longer.


The left flank looks OK, shame about the huge hole in the centre!


British resistance in the centre collapses and Wellesley is carried wounded from the field, and with that the day went to the Frenchies,


The Spanish are still hanging onto Talavera though, while the surviving Spanish light cavalry have a quick drink at a bar in town.  As the British have let us down, I suppose we'll have to withdraw overnight and come back and beat the Frenchies another day.

This was brilliant fun, and I really enjoyed role playing Cuesta. It perhaps wasn't the most greatest idea to give the British to our least experienced member, certainly not when faced with a flint eyed Tim C playing Marshal Victor, a veteran of the Napoleonic Wars if ever there was one. Well played to the French, and one we'll have to come back to and see if we can manage the historical result.