Thursday 24 December 2015

Combat 330

Some years ago I played Ian Drury's 'Combat 300' at COW, that particular game being a brigade level western desert game, 'The Defence of the Knuston Box'. I was rather taken with the game system, and have variously tinkered with it over the years with a view to battalion/brigade level WW2 games. The original rather showed its heritage from the Minschlacht/Red Square/NBC/OP14 series of games with card activation for each element, and differing dice to differentiate quality. Some elements of those mechanisms can be bit cumbersome for larger games, and even for smaller club night games. Both Ian and I have, in parallel, been working on some streamlining of the systems, and although some of the mods are similar, in other cases we have gone in different directions, so I christened my version Combat 330, as 330 yards is roughly the same as the 300 metre hexes in Ians game.

I'd playtested it at home a few times, and for its first outing at the club I pulled out my old 'Castiglioni' scenario - a British battalion assault on a German blocking position on a road to Rome following the fall of Monte Cassino. Historically it was a US infantry battalion attacking,  but I don't have 15mm US troops. The players (John, Tim and Jerry) took the British and I ran the German defenders. Units are infantry companies or tank/artillery platoons/batteries, with various types of support platoon around. 330 yard hexes and 15 minute turns. Recce troop has reported the road ahead to be mined and covered with mortar fire, so the plucky South Essex have been sent to clear the way.

View from the German side. The wicked Germans have hidden themselves well. Minefield dimly visible on the road in the defile. This game was also the first outing of my hexon fields (made up on plastic templates) and the new stream sections I'd made.


Air recce buzzed the town and spotted signs of entrenchments, in particular what looked like a mortar position to the rear of the town, and possible AT guns amongst the buildings.


Two British rifle companies went left flanking to link up with carrier section from the recce troop, accompanied by a troop of Shermans. The stream did not prove to be much of an obstacle.


Later in the game, the town is fairly thoroughly enveloped from both sides. The British left flank has bogged down in a prolonged firefight, but on the right the German defences have been pulverised by a regimental 25pdr shoot.

The German left flank is overrun by a rifle company supported by the carrier platoon. On the German right the Allies gradually gained fire superiority.


The German defences collapse and the survivors stream to the rear. In the end about half the Germans got away, including their mortars and AT guns (which had pulled back earlier) and the many of the remainder surrendered. The British casualties were fairly light, although one company was rendered ineffective by losses.

All in all it was quite a successful playtest, got through 16 turns (four hours irl) in an hour and a half. Most of the mechanisms worked OK, but the game highlighted some areas where things creaked or were unclear or were too complex to remember so it still needs a few tweaks. Hopefully be back in the New Year as I have a mini-campaign in mind, but I think it needs another decent playtest first before embarking on that.


Saturday 24 October 2015

Reclaimed hoplites

This week I have mostly been recovering from last weekends shenanigans and sorting out the stuff for my forthcoming 100th Anniversary Loos game. I did however come across some photos of yet more figures recycled form other peoples collections.These are Hoplites from the collection of the late Robert Plumb. 

Metal figures, no idea of the manufacturers, and which required very little tarting up.

Assembled hoplites.
As usual, I put them on my 60x20 25mm DBx bases, and managed to assemble/repair enough of them for five elements. A few of the figures were in a sorry state with missing bits and needed a moderate amount of work.

Cloaked hoplites.
This batch all seemed to be identical castings, with small plumes and big cloaks.

Odds and sods.
These were more of a mixed bag, with various styles of figure which I had to mix up on the bases.

The lonely ones
This bunch were also similar and made up an element on their own, although a couple of the spears needed replacing.

Slingers, you can never have too many.
These venerable figures came via Mr Gow, and are I believe from the collection of his late friend JR.

The paintjobs on all these figures were pretty good, all I did was give them an ink wash and highlight some details after repairing the broken bits. I am sure they will give sterling service in the years to come, and I hope their original owners would have been glad to see them going on being used.

Finally....
Baa!
These goats have been in my painting box as long as I can remember. They are 20mm Irregular, and I think I originally got them to to a DBx camp element. As I was fixing up the hoplites and slingers, I took the opportunity to finish these off too and did them as single based so they can be scattered around in a scenic manner. Like the slingers and hoplites above, I am sure you can never have too many goats. There are a few other interesting things in my painting box, including a maxim gun mounted on a mule. Well, maybe one day....


Sunday 18 October 2015

Operation Iskra

This weekend I've been dressing up and wandering around the woods, as I do from time to time. This particular outing was a trip to the Siege of Leningrad in early 1943, which was played at the excellent Close Action site at Grafton Underwood (an ex USAAF airbase, now heavily overgrown). I helped organise and run it, but apart from laying out the props, the game largely ran itself and all we had to do was avoid getting lost and  keep the mission timings on track.

Milling around in the car park.

The Red Army moves out.

German infantry cautiously move up the tracks.

Enemy ahead, possibly.

Advancing across the cornfields. Well it is Russia...

Commanders relaxed before the next Russian onslaught.

The mighty 75mm infantry gun in action as a Soviet prisoner looks on.

Tired Germans slumping in the afternoon.
This was the third game organised by the 900 Days group. We aim to put at least one game on a year, and they are all set on the Eastern Front around Leningrad, so people who have invested in Russian kit get a chance to use it. If you fancy having a go just sign on the  WW2 Airsoft Forum, and we've got kit to lend out for people who haven;t got any Russian gear.There is also a Facebook group, imaginatively called The 900 days.

Saturday 10 October 2015

2mm ECW

A period I have been interested in, yet never taken the plunge, is the English Civil War. Mainly the same reasons as it took me 30 years to finally do WSS, I was never interested enough to do serious uniform research for larger scale figures. However, a chance purchase from Mr Gow of some 2mm pike blocks got me thinking. I already had a load of 2mm WSS foot and horse, and in this scale no-one could actually tell what uniforms the units are wearing, so coupled with a few more pike blocks.....


The resulting mayhem.


The elements I had were supplemented with a few/several/quite a few extra pike blocks from Irregular (and some more horse and guns, well you can never have too many can you?). Sorting out the proportions of various types was fairly easy as once more Neil Thomas had ridden to the rescue with an eminently approachable set of pike & shot rules, coupled with vast army lists. Just to be on the safe side I sorted out enough stuff to do not only the ECW, but also the Thirty Years War (also a long abiding interest) and the oft neglected Franco-Spanish War.

I based all the elements the same as my existing WSS figures, on 30x15mm bases with multiple strips of foot, horse or guns. Some elements (like Tercios and some very big pike blocks) I put on 30x30 to use as double size bases. As Neil Thomas's units have six bases (twelve for Tercios and TYW units), I also made up a load of magnetic movement trays in various denominations as the tiny elements are so fiddly to move otherwise.

For a scenario I chose Edgehill and took the terrain, OB and deployment from Richard Brook's excellent 'Battlefields of Britain'.

A some what blurry shot of Edgehill. The lower slopes are on the right, tributary of the river Dene at the top. Parliament on the left, the Kings Army on the right. Rupert is leading the Royalist horse forward at the very top, and at the bottom, Parlimentary horse have driven back their opposite numbers. The infantry centre is engaged in musketry.
Push of Pike in the centre. The Royalists have suffered brutally from the more effective Parliamentary musketry.
 The game was run at the Sheffield club, the overall battlefield was 80cm x 80cm (I reduced the suggested ground scale slightly as I use 30mm wide bases, not 40mm) and the armies broadly used the historical deployment although Parliament decided that their left flank was a lost cause against Rupert, so reinforced the horse on their right.


Deciding moment of the game, the weakened Parliamentary horse manages a spectacular saving throw!


The battle folowed the broadly historical course,much to my delight. The centre engaged in a dour slugging match, with parliament gaining the upper hand due to their superior equipment, however Rupert routed the Parlament left, and promptly left the battlefield to loot the baggage! This prompted half the Parliamentary centre to head for the hills, and suddenly things looked a bit brighter for the struggling Royalist pikemen. However over on the right, the parliamentary horse won a spectacular victory over their Royalist counterparts despite being completely outmatched, and in turn they overran the Royalist artillery and also headed for the baggage. The weakened Royalist centre broke, leaving both sides utterly exhausted and with an honourable draw.

I was really rather pleased with how it went. The toys were a bit fiddly, but the movement trays helped a great deal, and the rules (which looked a bit dubious at first) produced an exciting and fast moving game which was over by a thoroughly civilised 9pm. Neil Thomas triumphs again! I wish I had his rule writing skill. For the next outing I'd like to try the Thirty Years War, but although I studied it at school and University, my memory is hazy and I'll need to do a bit of reading. Which is lucky, as I've just bought 'Europes Tragedy' by Peter Wilson.


Sunday 27 September 2015

Simulating War

I recently re-read 'Simulating War' by Professor Phil Sabin. It is a couple of years since I last read it, and it was interesting how much more I got from it this time.


The first time I read it, it was largely a matter of confirming my own prejudices about how badly many/most/all wargames rules model the realities of twentieth century land warfare, in particular the fallacy of the Lanchester square law which holds that combat power and losses are a square (and inverse square) of force ratios.   This is demonstrably not the case in even the most trivial of real life examples, as otherwise simply throwing more bodies and tanks into the fray would be the solution to every tactical problem.

Anyway, I digress. This time around, one of the main things I got from it was a better understanding of the difference between  wargames as command simulators and as a mechanism to explore a historical narrative of events. In the former case, quite different mechanisms need to be involved, generally modelling various degrees of friction and fog of war (and all those mechanisms like cards or hidden movement which wargamers love or hate) whereas for the latter, a much more open approach is possible and generally much closer to traditional open wargames with high levels of knowledge. Trying to both at once has the potential to cause great confusion, and may explain many of my abortive attempts to come up with 'perfect' sets of rules.

Such thoughts did set me thinking abut how the general approach in Phils 'Korsun Pocket' game could actually be applied as more generic operational Eastern Front set of rules, with the grandiose scale of the stands representing entire Divisions and Corps - a step up from my own Panzergruppe rules. Re-reading David Glantz's 'From the Don to the Dneipr' produced lots of examples where the combat model and scale of representation fitted rather well.  Anyway, various half baked ideas emerged over the summer, so that one is a work in progress.

It also got me thinking about my favourite WW2 level, brigade level games with platoon(ish) sized stands. My last outing in this arena was a bit of a disaster, too much stuff with mechanisms which were too slow. Inspiration has once more struck, so again, a work in progress there.

In the meantime I have been doing some painting, and interesting foray into 2mm Pike and Shot thanks to an impulse buy from Mr Gow at Triples, as well as finally painting the 15mm Early WW2 Germans I got last year. I have also been very gratified to find people like my One Hour Wargame rule variants, so I seem to be on the right track with some of this stuff at least.

Friday 21 August 2015

One Hour Wargames variants


I am quite a fan of Neil Thomas's rules, in particular his One Hour Wargames, which include not only sets of rules covering everything from Ancients to moderns, but also 30 scenarios, and army generator etc. The rules are so simple it is easy enough to tweak them and bolt bits on, although one much be careful not to completely obliterate the original mechanisms.

I've put a few variants up on the AMNW yahoo group, but following Bobs kind remarks about the WW2 version his blog One Hour WW2 AAR I've put the WW2 variant up here too on the downloads page.

Direct link here One Hour WW2 rules (hex) it is a good idea to have the rulebook too so you've got the scenarios etc.

I've also added the WW2 naval rules referenced in my COW report (look for Mini-Jutland) report, again direct link here:  One Hour WW2 Naval


Sunday 9 August 2015

Operation Charnwood (1)

At something of a loose end one week I decided the time was ripe to plug on with our Memoir 44 Normandy Campaign. Avid readers may recall that the Battle for Hill 112 all went a bit pear shaped for the Germans at the last minute despite some early successes, so Monty is now in a position to press on to Caen from the north a bit earlier than historically.

The Operation Charnwood mini-campaign only has three battles, and consists of the Canadian Corps attacking Caen on the north bank of the Orne after a massive RAF bombardment. The city is defended by the elements of 12th SS Panzer Div and 16th Luftwaffe Field Div. Historically, although in theory three Allied divisions supported by three entire armoured brigades attacked, in practice they only committed a brigade or two each, who in turn only committed a battalion or two...

As always, this was played on Hexon terrain  using my 15mm toys with my Memoir 45 modifications. All the tanks and halftracks used in this scenario were plastic PSC ones. Memoir 45 is available from the downloads page.

The battlefield from the German side.
John took the Allies and Jerry the Germans. The Germans were dug in with a fair number of wire and entrenchment markers and lots of buildings. The RAF bombing had however blown a huge hole in the middle of the fixed defences, although German armour and panzergrenadiers were in evidence in depth behind the hole.

Shermans and some infantry pushed into the gap.

German defensive fire inflicts some losses and pushes back one of the Shermans.

Undeterred the Allies press forward in an 'armoured assault'

The Germans promptly counterattack with the same card and it all gets very messy!

The battle continues to rage.

The panzergrenadiers pitch up to help as British infantry assault the trenches.

Although some of the fixed defences are cleared, sadly even the intervention of RAF Typhoons is not sufficient.

So a fairly resounding victory for the Germans in holding off the initial assault. As so often seems to happen in Memoir 44, the action was mainly resolved by an armoured slugging match, although the Allied tanks in particular were almost completely ineffective against the German infantry dug in amongst buildings. Both sides had 'armoured assault' cards which was almost certainly going to provoke a big tank battle, although the Germans showed great restraint in holding their armour back while the fixed defences took their toll of the allied attacks.

Despite this being a pretty fast and furious game, I am still pleased with the Memoir 45 modifications. They seem to produce a more satisfactory game inline with later CnC games in the series but without the vast raft of special unit types bolted on to the original Memoir 44 game.

So, on to the  next battle in the series. Despite their success, the Germans have been ordered by Army Group B to conduct a fighting withdrawal cross the Orne, which will be interesting.

Saturday 25 July 2015

COW 2015 - Sunday

Sunday was a bit quieter than Saturday. Everyone was tired and there was nice Sunday lunch to look forward too. I'd signed up for a couple of sessions though.

Kriegspiel 1914

First up was Kriegspiel 1914, one of Phil Sabins games and the original version is available from the Connections 2014 website:. Kriegsspiel1914 It covered the German August/September offensive into France in 1914. I gather this had manly been played face to face before, but this session was set up as a double blind map Kriegspiel game. Bob had lightly tweaked some aspects of the scenario and rules, including the introduction of a 'probing attack' rule, a sort of recce in force.


The game is very high level indeed, each hex is 100km across, the turns are weeks and the counters represented around six divisions each (the entire BEF and Belgian armies had one counter each). I had signed up to command the French and I was paired up with the mighty duo of Tim Gow and Wayne Thomas , taking the Belgians and BEF respectively.


The game starts with a gaping gap on the Allied left, just the Belgians in Antwerp and the BEF moving up through Ypres, with a French reserve army further back. Although we knew what the German starting forces were, thereafter we wouldn't have a clue what they were up to apart from what we gleaned from battle reports etc. The  movement and combat systems are very simple, but relatively bloody for all involved as all combats generally resulted in losses for both sides. Each 'Army' could take two hits, but only full strength (fresh) armies could attack.


After ruminating over conducting an attack into Alsace, we eventually concluded that we need to throw all our available forces into a forward defence of Antwerp and Le Cateau, an dotherwise conduct a static defence of the Rhien and Meuse. It so restricted the hexes the Germans could attack from, that as long as we kept shovelling reserves into the charnel house of Flanders, the Germans weren't going anywhere. This plan worked spiffingly well, and we carefully constructed a mini-Maginot line of armies, shuffling reserves around the points of greatest threat. Casualties were extremely heavy, far heavier than our replacements could keep up with, and we had to gamble on thinning some parts of the line out. This came a bit stuck late in the game when we lost Sedan, but in the event we had four fresh armies immediately available (many of whom had just left the hex, oops) and wiped the German bridgehead out with a massive counterattack. The game went into extra time, but we threw the wicked Prussians back time and again.

So, a highly satisfactory outing. I gather in the original game the BEF, French and Belgians aren't allowed to talk to each other (not at first anyway). This would most likely have made our defence of Antwerp completely untenable, as without the verbal assurance that the entire French army was on the way, King Albert would have been much  more inclined to retreat, which in turn would have unhinged the front on Flanders.

Looking forward to seeing a published version of this, as I can see it working very well for a number of situations, particularly the Eastern Front in 1914 (although the core rules are available from teh link above).

Brave Admiral Benbow

Another outing from Ian Drury, and another excuse to get the pile of silly hats out. This time fleet actions in the late seventeeth century (I didn't even know we were fighting the French in 1690, but hey ho).


Silly hats galore. The excitement has made the photo blurred.

It is a very cut down naval combat system with individual ships  played on a hex mat, and relatveily generous move rates. The ships have fairly traditional hull box/critical system type step reduction system, but combat is resolved by a single D6 throw for the entire ship. The sailing aspects seemed to be fine, fairly simple to run but with reasonably realistic effects on speed and manouverability. I did like the special treatment of 'crank' ships who tended to drift to leeward with dire consequences for all and sundry.

The rearmost English 'gaggle'. I hesitate to call it a squadron, all very untidy.

The scenario featured the wicked French  landing soldiers in Ireland and trying to drive away the blockading English fleet. The French had the weather gauge, a typical shabby French trick. We had three or four commanders on each side and literally masses of ships. I lost count of them, although I did note one of my ships appeared to have Admiral Benbow aboard.

The huge melee. Nice neat lines of English ships engage raggedy Frenchies.
Despite being at a disadvantage due to the wind, the English formed a very creditable battle line and we engaged the untidy French rabble very smartly at lethally close range. A bit too lethal for poor Admiral Benbow who lost his head to a close range roundshot, and the exchange of fire left a number of English and French ships ablaze and everyone else in the tangle of rigging and hulls nervously awaiting a magazine explosion.

This seemed to run along splendidly, the movement in particular was rapid and decisive, no inching along one hex at a time like Wooden Ships & Iron Men. Combat was a bit slower, but that was inevitable given the number of ships involved, and it is very hard to realistically represent sailing ship era combat without some sort of attritional damage model, which inevitably takes time. A very satisfactory session and many thanks to Ian.


Saturday 18 July 2015

COW 2015 - Saturday

Saturday at COW was a pretty busy day (as it always is). I was helping run two games, and there were also a load of sessions to go to. As usual, it was a glorious sunny day. The sun often seems to shine on Knuston.

Little Cold Wars

This was another outing for Tims Cold Wars era lawn game rules, played with a mixture of 54mm figures, 1/48th scale vehicles and 1/72nd scale aircraft. The rules have been much refined and playtested since last summer (we've done a fair few games at the Sheffield club to try things out). They owe much to H.G. Wells originals, and contain a number of physical mechanisms (firing matchsticks, throwing balls of rolled up paper etc), but some things do use a more traditional D6.

LCW had actually already been to Knuston back in June with a gigantic tank battle on the lawn featuring two full Motor Rifle Regiments in a game lasting all day. The outing at COW last year had also featured something of a conventional Warpac Regiment vs NATO Battlegroup type thing, so for COW this year it was time to try something different - Air Assault! We'd run a few smaller games at the Sheffield Club, including a helicopter assault on a defended bridge, but Tim had since acquired some more toys so we could put on something a bit more grandiose for COW.


The main objective was an airfield (which I believe had featured in the June game too), the target of a Forbodian helicopter Air Assault battalion, reinforced with a company of airborne assault guns and supported by attack helicopters, long range artillery and fast air. Somewhere in the vicinity lurked NATO defenders, but even if the defences weren't very obvious, the huge Bloodhound missiles parked on the airfield were. Meanwhile in the distance suspicious Soviet and NATO flags marked relief forces racing to the rescue (and marking the passage of time and game end). The wooded areas were indicated with bits of old Christmas tree stuck in the ground.


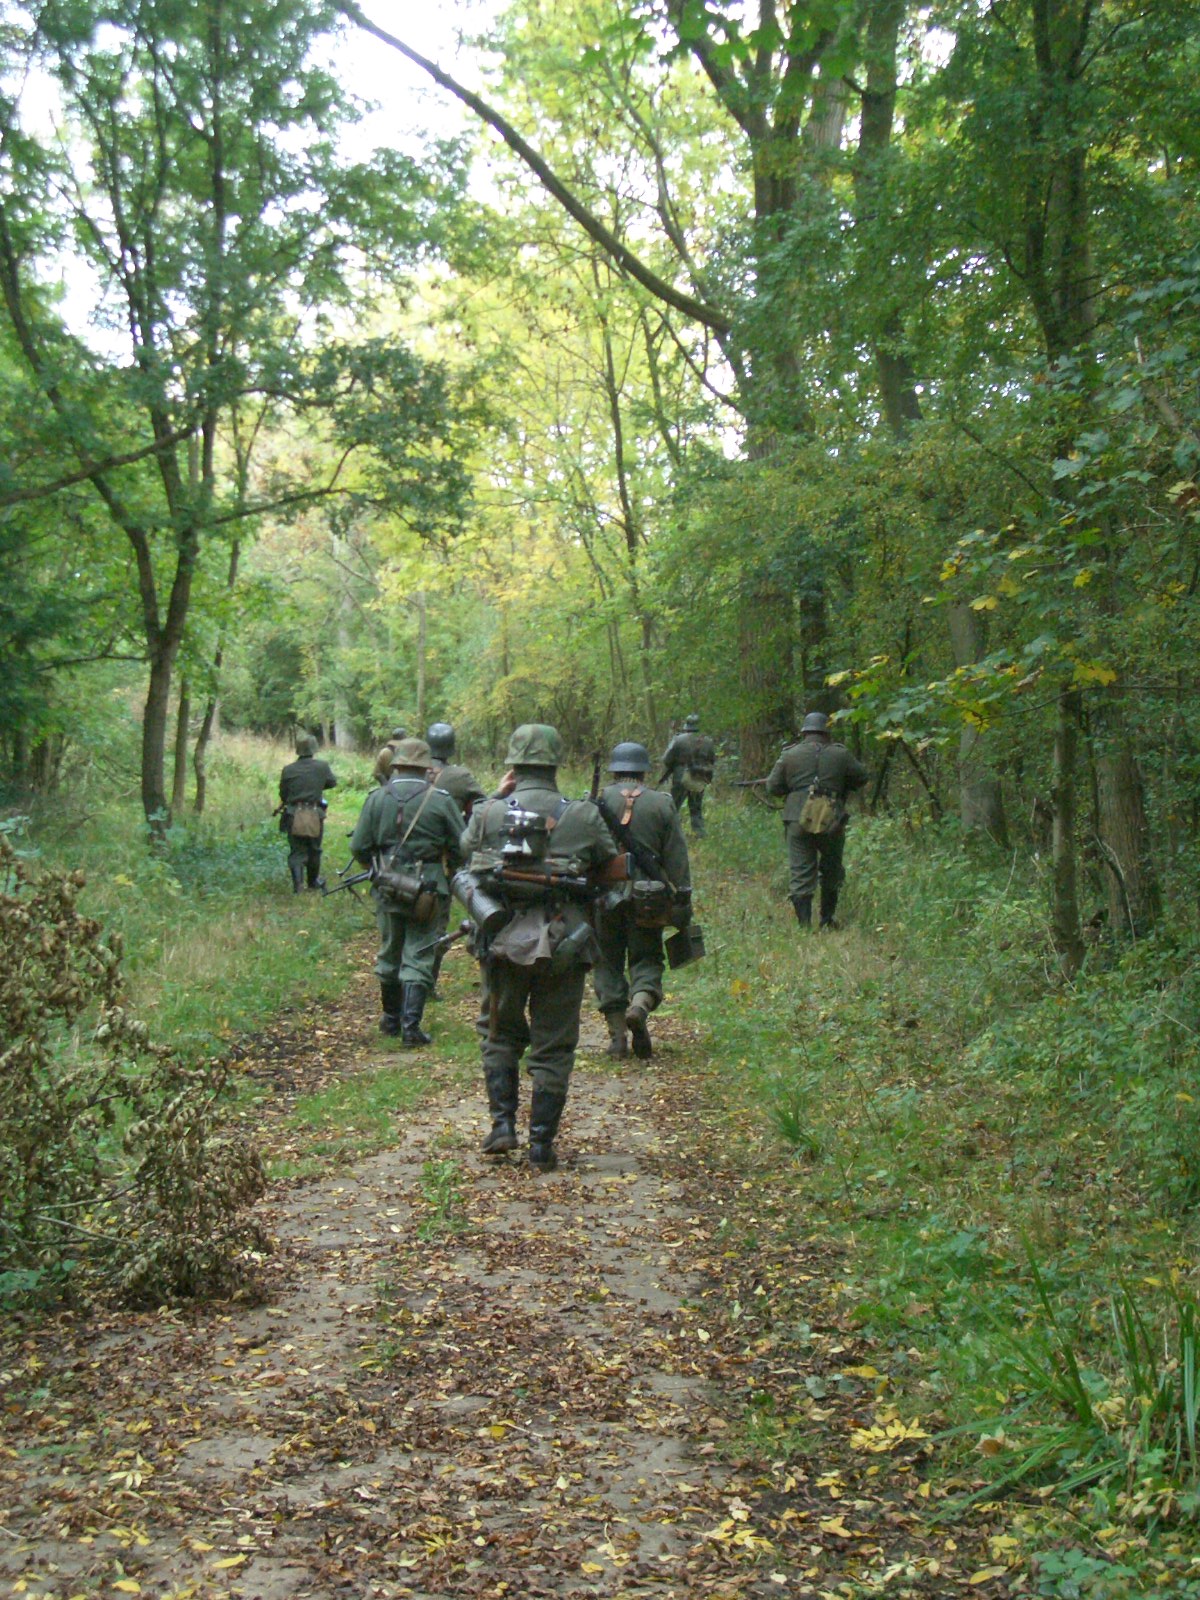
Tim and Anthony had assembled piles of kit for the game. One of the downsides of using larger scale toys is they sheer volume of stuff to move around. It was a glorious, sunny afternoon, just what you need for a lawn game although it proved a little too warm for some of the participants.


A fair number of participants turned up. Silly hats were available for those without headgear, although some kept the sun off better than others.

Forbodian choppers inbound.  We took them off the flight stands as it was a  bit windy.
The Forbodian team was under the command of Russell King, while a smaller NATO contingent distributed their brave defenders. The Forbodians main problem was figuring out a loading and arrival schedule for their paras. The support platoons and equipment consumed lots of lift capacity and there wasn't enough lift available to bring in the entire battalion with all its attachments. The planes carrying the assault guns had somewhat different movement characteristics to the helicopters, something which seemed to get forgotten in the rush.

NATO eyes up the approaching hordes.

Helicopters touch down under AA fire.

The Forbodians adopted a somewhat direct approach to capturing the airfield,simply assigning the runway as their LZ. The also conducted a flak suppression airstrike against the Bloodhounds, which unfortunately missed the missiles, but fortunately missed all the runways they were supposed to capture intact. The transport waves than went in, the aircraft outpacing the helicopters by a huge margin and for a moment it looked like the the planes were gong to conduct an assault landing on the airfield all on their own. Luckily for them a French AA gun opened fire from the village and forced them to abort the mission.

The helicopters duly landed on the airfield under AA fire from the village, losing one of their number to the dug in airfield defence Scorpion. The surviving VDV then set about clearing up the immediate defenders (a platoon of RAF Regiment troops) and knocking out the Scorpions.  The supporting attack helicopters engaged the AA gun over successive turns but it eventually succeeded in shooting both of them down as well as an artillery observer helo.


Airpower clashes over the a battlefield. The French are on the ground to the right of the Phantom.
The AA gun proved to be a constant thorn in the Forbodian side, but rather than push out to destroy it, the VDV contented themselves with sitting on the airfield and contenting themselves with trading shots with the French from the village. The latter had pushed out in company strength to make sure the AA wasn't attacked, but when they realised the Forbodians weren't advancing, they fell back again leaving a couple of burning Panhards behind - victims of the last attack chopper before it was shot down.

The transport aircraft eventually appeared, but went down in a blazing catastrophe as they crashed onto the runway under AA fire and into the wrecks of helicopters littering the airfield. The whole company of assault guns went up in flames with them. The game ended as NATO and Forbodian armoured columns closed in on the area from opposite sides. The Forbodians were certainly on the airfield, but it wasn't exactly secure as it was under fire, nor was it useable as it was littered with destroyed aircraft.

Mini Jutland
John and I are both fans of Neil Thomas's 'One Hour Wargames' rules. These are very simple one brain cell land warfare rules, and they really do give a game (including setup)  in under an hour. On the Neil Thomas rules yahoo group (the AMW group) somone had posted a WW2 naval variant, which was an interesting idea for a land set, but similar in many ways to what Colin Standish did for pre-dreadnoughts with DBA. John worked this up into a WW1 set and I took John mods and retrofitted them to the Russo-Japanese War, and between us we ended up with the set here.

A couple of things I was keen to get in were:

1. long lines of ship slugging away at each other
2. encouraging players to distribute their fire evenly along the enemy line (as opposed to 'ganging up' on single targets)

The former was achieved by allowing ships to manouvre as groups in line astern formation (the move/turn sequence makes it hard to manouvre individual ships sensibly), and the second by simply halving the effect of fire against targets already shot at. Otherwise it was a fairly conventional attritional damage model similar to Fletcher Pratt, GQ etc with some modelling of the significant differences between the five ship classes represented.

One decision we made early on was to keep the total damage capability of all ships the same (it varied in the WW2 version), so in effect the smaller ship models represent ever large numbers of ships, so one battleship might represent two or four real ships, but a destroyer model 10 or 20 or 30 real ones. This fitted in with the basic rules philosophy, and kept the ship count down as we found it started to creak for very big battles with lots of ships on the table. The rules have been playtested with Jutland (twice), Coronel, the Falklands and Tsushima with ship; ratios ranging from 1:1 to 1:very many indeed.

A few ideas were tried an discarded (like ramming) and we struggled a bit with the treatment of light ships, but in the end simplicity won. It is always easy to add more rules.


A moment of hilarity, whose precise nature has escaped me now.

For the game at COW we had a pretty good turnout, four players took Beatty, Jellicoe, Scheer and Hipper, supported by a crowd of onlookers. The action opened with the respective battlecruiser squadrons entering, followed a few turns later by the rest of the battlewagons and their attendant escorts. The game victory conditions were essentially to sink more capital ships than the enemy, although the British could claim a moral victory if they held the battle area at the end of the game. More on that later.

Something wrong with our ships today. Beatty goes down.

The game resolved itself as a duel between the battle cruisers, although by dint of clever manouvering the Germans managed to get the Hochseeflotte into a support position, while the Grand Fleet bumbled a bit. With the extra firepower (and by dint of good dice rolling) the Germans managed to sink Beatty's squadron, and then scuttled for home claiming victory.

The RN steers to glory as the Germans run away like a bunch of sissies.

This of course left the RN in possession of the North Sea, so both sides won. The Germans declared that it would have been mad to stand and fight, and in fact this was borne out by our earlier playtests when the High Seas Fleet was blown out of the water by the British on both occasions when it fought it out to the end.

This session went pretty well , and we had plenty of time for a discussion afterwards. In particular we had a chat about light forces and the influence that the (imagined) threat of torpedoes had on fleet tactics. John D Salt made the eminently sensible suggestion that one way to represent this might be for destroyers within, say, 3" or a capital ship to force it to turn away. This would encourage players to use their light forces for screening, without over-powering destroyers (a real issue with e.g. Fletcher Pratt where the 'destoyer charge' is a game winning weapon). I'd be a bit hesitant to make this automatic, but making it dependant on the destroyers scoring a hit in some way might be the way to go.

Thanks to all the players for taking part and entering into the spirit of the thing. The game isn't exactly Harpoon for WW2,  but it does what it says on the tin and produces a reasonable game in a relatively short period of time for a limited investment in toys. And frankly, these days that is all we are looking for in a club night game.

The Slim River

Tom put this session on for first thing on Saturday. It covered the historical Japanese tank attack across the Slim river in the middle of the Malayan jungle in 1941. Perhaps not ideal tank country, but hey, what do I know? The game used a control panel approach with each tank in the company commanded individually by a player. The tank crews had varying levels of skill (driver skill proved to be important, mine was a klutz) and we could select the ammo loadout from a selection of coloured dice. The company also had a bunch of equipment (spare fuel, ammo, track links, tools etc) to allocate, so I chose to load up on track repair stuff and axes and saws to cut down trees. Finally each crew was given some 'Chi' to expend in difficult situations to modify dice throws.

The company was led by Russell King, and we all tore off helter skelter down the jungle track. We fairly rapidly discovered that driver skill made a big difference, and my tank with big L plates on the back soon fell back to the rear. Very wisely as it turned out.

Tom outlines the campaign.

Tank control sheet. Piles of ammo, equipment and crew cards.

The first obstruction the column came to was a road block across the road with a gap in the middle. Major King drove his tank in the gap, only to discover it was mined. Well that was fairly obvious. Behind the mines, some groups of British infantry opened fore from trenches either side of the road.

The battle for the first roadblock.
This was an excuse for the leading tanks to light the jungle up, and having suppressed the defenders, figure out a way to traverse the roadblock and extricate our brave Major from his predicament. A combination of shooting at the roadblock, tanks bulling their way through or bypassing via the jungle eventually managed to get some tanks moving (and cleared some of the blocked hexes too).  It also left a tangle of disabled tanks, which we all got back into working order eventually. Meanwhile Chris Ager had set off at high speed charging down the road on his own.

The battle for the bridge.

The next significant obstacle proved to a bridge, with a ditch dug on the reverse side. Chris's tank was going so fast it literally flew over the ditch and he disappeared into the distance. The next gaggle of tanks discovered that the obstruction was covered by dug in infantry, Vickers guns and a couple of Bren carriers sporting very unsporting Boys anti-tank rifles.

The leading tank group brassed the positions up, while the carriers claimed a couple of victims - damaging the gun on one tank and disabling Major Kings tank (taking his head off in the process). This group of tanks then set off after Chris Ager, leaving us tail end charlies or deal with the carriers, who were duly despatched with AP shot, and mop up the infantry (carried out with glee by Maxine).

Chris Ager drives to glory.
Chris had meanwhile overrun an entire Indian battalion in march column on the road and they fled into the jungle. Finally he came across the Argylls halted for breakfast in a jungle clearing with the CO shaving by the road. The Colonel fired off a few shots with his Webley, but more usefully one of the battalion carriers immobilised Chris's tank. Chris then dismounted and charged the Colonel with his sword, killing him in a melee. With that the Argylls surrendered as more Japanese tanks arrived on the scene. 

This really was an excellent game. Tom said we'd done much  better than any other group and had actually achieved much nearer to the historical result. One thing I noted was that the bulk of the killing was done by a couple of crews, whilst a sizeable group made a marginal contribution, and another contributed nothing much at all. Proportions which chime with e.g. David Rowlands operations research on tank battles.

The tank management was very simple but worked well, the game accommodated a large number of players, and we were all productively employed and had lots of fun. Brilliant!

Year of the Hangman

This was Ian Drurys campaign game of Burgoynes campaign in America in 1777, which historically ended in disaster for the British. It was run as a multiplayer game using area movement with the move boxes superimposed on modern maps of Canada and the USA. Silly hats were issued and the players given individual briefings. The move and combat systems were extremely simple, but most critically, you never know what size forces the enemy had, only a vague indication after a battle. This is based on Jim Wallmans mechanisms for the 1814 campaign in Europe, and induces a good degree of historical caution about taking on the enemy in a scrap. Very simple, very effective.

Modern maps with movement box overlays.


I got the role of Colonel St Leger leading a piratical column down the Lawrence River to raise the Mohawk Valley so as to distract the rebels from Burgoynes main attack via Fort Ticonderoga towards Albany. General Howe decided he wasn't going to support us at all and marched overland to Philadelphia, while Clinton bided his time in New Hampshire.

The fighting for Albany (view from the north). Burgoyne is the big pile of counters on the left,my MOhawk army on the right.
Burgoyne struggled in his advance, and although I did manage to raise a (huge) force of Mohawks, and we broke through the valley towards Albany, we never did distract large rebel forces to our front. Having defeated them in the single large attack they mounted, they were content to fall back before our advance, and the snow was already falling as the game ended.

The game system worked very well indeed. We got through several months of campaign time in an hour and half with seven players participating, a real tribute to the robustness of the game mechanisms. Although most of the game mechanisms were very open, the sheer size of the maps, coupled with the hidden combat resolution and pace of the turns actually meant players very soon got tunnel vision. I'm looking forward to seeing the published rules, as the basic mechanisms would obviously translate well into other theatres and campaigns.

Sink the Bismarck

I called in briefly to observe this session after Mini-Jutland. Phil had developed a naval wargame with some pretty innovative mechanisms. It was clearly more detailed than our game, with individual ship damage etc.

Phil explains things to the multitudes.

The little red cards are the critical systems cards.

Hood and Prince of Wales close in on Prinz Eugen and Bismarck.


The main innovations were the use of relative range rather than a more conventional move system (the sort of thing seen in AHGCs Pattons Best or Richard Brooks game of Tsushima) and a novel combat system. The combat system resolved around the play and elimination of 'critical systems' cards, rather than the more tedious and traditional Flecter Pratt/GQ 'cross off hit boxes' approach. A frequent criticism of FP is lack of critical hits etc,  but this game system was centered entirely around them. The critical systems cards were used to do stuff (like shoot, or see things), but it was also those which were removed when damage was incurred. It reminded me a little of the old boardgame Starfire (although that also had a lot of tedious box ticking).

It was also, as always with Phils games, beautifully presented, with banks of 'fog' drifting across the ocean.

Waterloo Revisited

Jim Roche had themed his now regular Staurday night sing song around Waterloo. It started with a belting version of Abba's 'Waterloo', which proved surprisingly hard to sing, as well as a number of period songs such as 'The Wild Rover' and old favourites like 'Tis to Glory We Steer. One shocking dirge was the Imperial French National Anthem, goodness me, absolutely awful. I'm not surprised they brought back the Marseillese.

Great fun, if a little tuneless, but what do you expect from a bunch of (mainly) middle aged blokes.