Having overdone NBC a bit, I thought I'd dig out my One Hour WW2 rules variant again. Simon had found an interesting Arras scenario on the interweb aimed at a variant of KISS Rommel, itself based on Bob Mackenzies lavish Command Decision scenario covering the same battle. I thought about doing it with NBC, but with half a dozen battalions on each side, it was a bit on the big side, so One Hour WW2 came to the rescue. We've done Arras before with my Memoir 45 variant of Memoir 44, so I had all the kit, although for this one I'd got the proper French tanks (Somuas and H-39s) instead of a Char B in German colours and my SCW FT-17s!
The scenario was done using an 8x6 hex grid so it would have been easy enough to convert to NBC but I squished it into a standard 3'x3' OHW table with a bit of lateral compression. I also made up some new air support rules, the Germans had two Stuka attack dice from turn 5, but if an attack rolled a '1' the stuka was removed (shot down, ran out of bombs or whatever).
Tim G was back from his travels, so we had a respectable turnout. The British were Tim C and John (with a tank battalion and infantry battalion each) and Jerry got 3 DLM (a tank battalion and a battalion of motorised infantry). Tim C was in overall charge so got to direct the Royal Artillery as well.
Tim G and Pete were 7th Panzer Div, having a rifle regiment each. Pete also had II/25th Panzer Regt and Tim G filled in the role or Rommel so also go the divisional artillery, Flak battalion and Stukas. Tom played those nasty SS Totenkopf chaps.
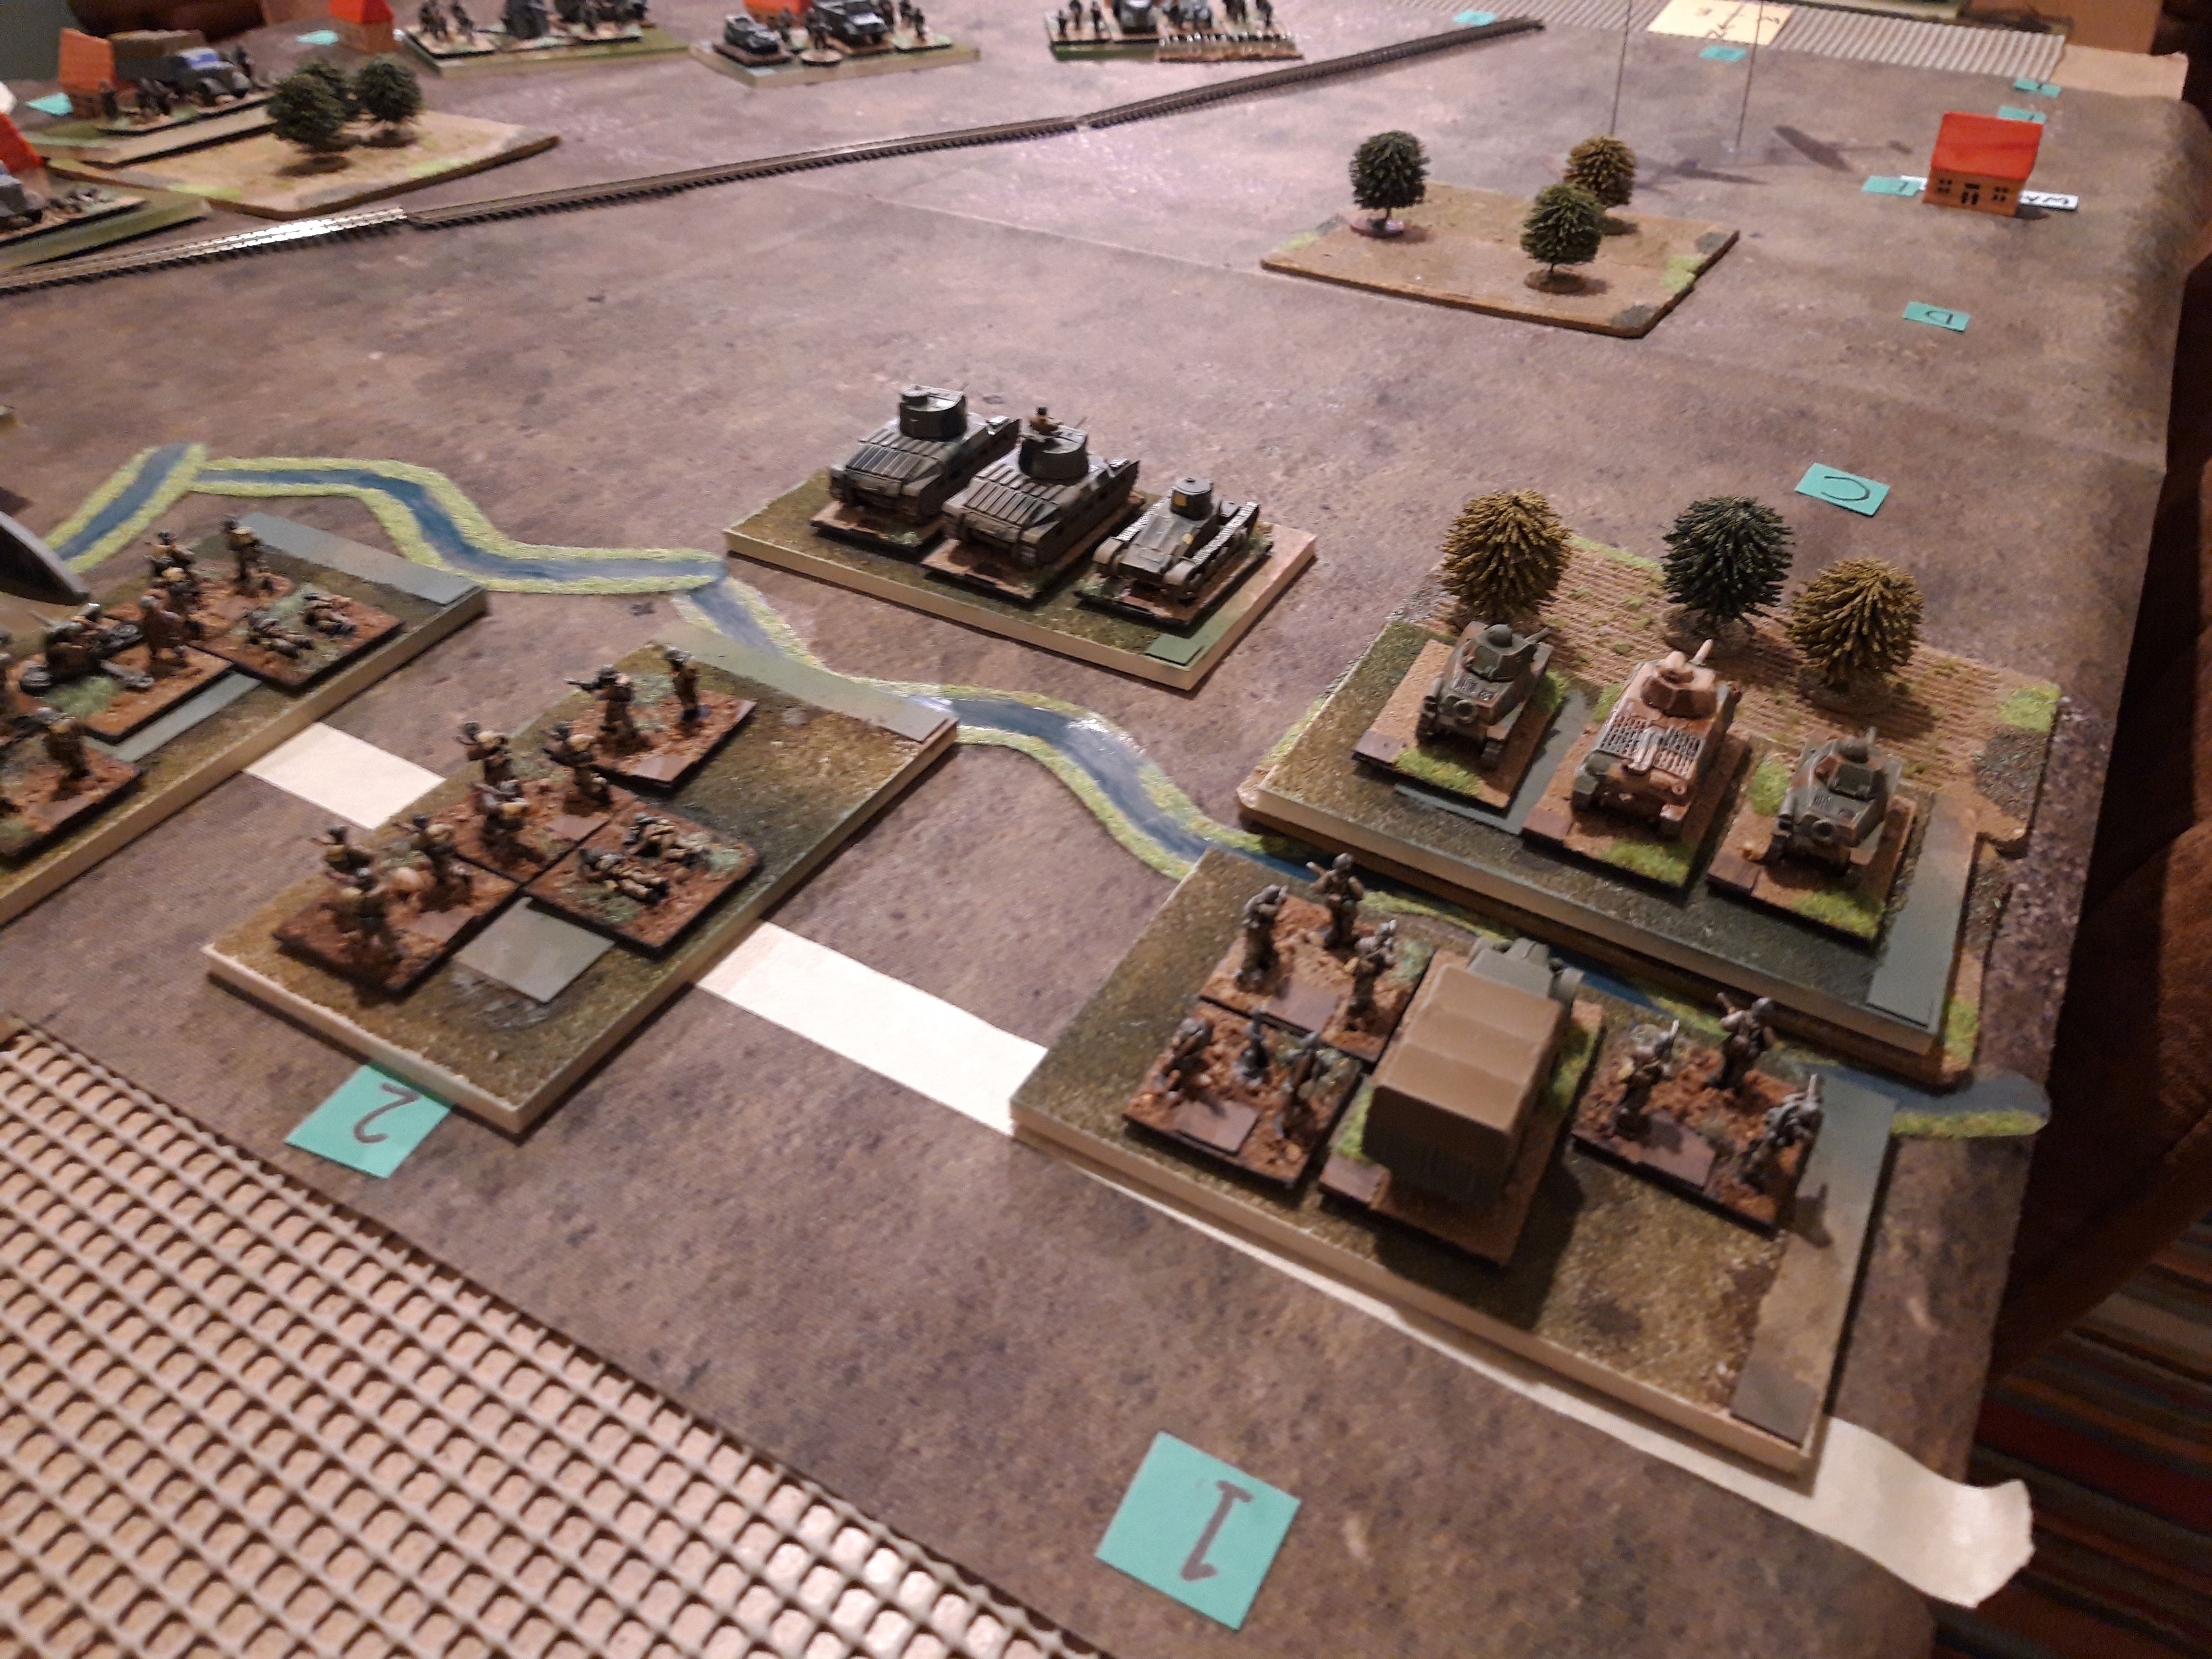
The Germans. L-R. 6th Rifle Regiment, 7th Rifle Regiment, II/25 Panzer and SS Totenkopf behind. The divisional artillery is to the rear, Rommel and the Stuka FAC in front and the 88s are attached to a a battalion of 7th RR.
The Allies. L-R. 3DLM with a cavalry tank battalions (Somuas and H39s) and motorised infantry battalion. Right column (Tim) with 7RTR and 8 DLI, then Left Column (John) with 4 RTR and 6 DLI. The column order is backwards as the British are approaching from the north and we are in the south, if you see what I mean...
Battlefield from the east. Arras is in the north east. The battlefield is fairly featureless with just scattered villages and small woods, irl there was a low ridge east of the rail line but I left that off. The British have to capture and hold just two of the numerous villages scattered across the map, with the caveat that only the French can take Waquentin in the far west, and only the British can take the rest. That sounds easy doesn't it.
Arras. This is treated as impassable for game purposes. It is well garrisoned and both sides avoided it during the battle. It just modelled it as surrounded with wire and with some 2pdrs and Bofors guns inside. The village of Achicourt due south.
The RAF and Luftwaffe duel over the battlefield. Tim helpfully pointed out that this is a BF-109F and a Spitfire IX. So at least we had a good video link!
View from the northwest. The table was notional gridded up into 6" squares to aid with the location of terrain features and reinforcement entry points, but I was going to run the the game using free (ruler) movement. It just seems to work better that way.
The opening moves. The leading German motorised battalions came on from the east and south respectively. Rommel was in the centre with 7th RR, Totenkopf over in the south centre.
The Allies brought all their tanks on (both sides were restricted to three units entering on turn one). 4 RTR swung though 90 degrees and headed for the bridge, although the stream was only a minor obstacle. The Allies were facing the slightly tricky manouvre of having to swing their whole front through 90 degrees as they manouvered around Arras, very easy to end up with one wing lagging behind.
The German line began to form in an arc running south from Arras then southwest to Totenkopfs position at Betencourt. Already the leading units had their entrenching tools out.
The 88s move up on Rommels right. I modelled them as being attached to one of the rifle battalions to keep the unit count down. Having an entire Flak battalion attached was sufficient to make this unit count as 'heavy infantry' with heavy AT guns too. Nasty! I discounted the 7th Panzer AT battalion (which was present) as the 37mm guns were completely ineffective against the Matildas and fairly useless against the Somuas too.
The Allies brought on their infantry. The stream wasn't much of an obstacle, but the French also had to negotiate some woods. The Allies knew the Germans panzer regiments were off to the west so the French had to provide a modicum of flank security. By this time 7th Panzer had not only its own regiment but another one, 25th PzR, purloined by Rommel from another division. 6DLI has some attached 2pdrs. In the real battle they spent most of their time shooting at the French as the gunners didn't recognise the tanks.
4 RTR and 6 DLI negotiate the bridge and head for Achicourt.
7 RTR forms up in the centre while the French push on through the woods.
One lonely battalion of 6 RR faces off against three battalions of British. Unfortunately instead of a massed attack the British are now feeding their battalions in one at a time. A couple of turns spent forming up in the centre might have been useful.
Both sides exchange artillery fire. The exposed infantry take losses and are disorganised by the shell fire.
Meanwhile the rest of the German line is busy digging in. Rommel moves to join the 88s. He imparts both a morale and combat bonus, at some personal risk.
The German front is starting to look quite solid.
But sadly the German infantry in Achicourt are shelled by artillery and assaulted by the Matildas before they have time to dig in properly. They become exhausted and are removed as they are combat ineffective. In better news for the Germans, 7th RTR strays a bit too close and is badly shot up by the 88s. The German FAC has now joined the other battalion of 6 RR in the woods,
The French cavalry have nearly taken Waquentin.
Rommel acts, and moves his battalion with the 88s to support 6 RR in the woods. Every gun in range opens fire and the Stukas range down, but it doesn't stop 4th RTR making a devastating flank attack against I/6 RR which takes four hits despite being dug in. Ouch. Under a torrent of shell fire and bombing, 6 DLI have had enough take no further part in the proceedings (air and artillery are very effective against soft targets in the open).
7RTR starts to reorganise and is joined by 8 DLI.
The French take Waquentin. Vive la France! Having taken both Waquentin and Achicourt, the Allies have achieved their objectives. Now they just need to hang on to them.
8 DLI moves up to support 4 RTR and I/6 RR are also soon heading for back to Germany . 4 RTR comes under heavy fire and is disorganised though. The 88s aren't too bothered by the Matildas armour although they come under indirect fire from 25pdrs and suffer some hits.
The Stukas and German artillery remove 8 DLI from the fight but Rommel takes more hits. He survives (just!). 4 RTR are still in the fight as the heavily armoured Matildas shrug off loads of damage.
Oooer, whats this? II/25th Panzer rolls up right behind 7th RTR! If only the French had dug in to protect the Allies flank.... both sides exchange fire, the Pz 38s operating at a big disadvantage against the heavily armoured British, but the Germans score one hit, enough to disorder the already weakened 7th RTR.
Further south the French face off against Totenkopf and 7th RR.
The Germans are getting a bit short of troops in the north now that the whole of 6 RR has been removed. Only Rommel and his 88s hold the line.
Rommel steps forward for a better look as shells land all around.
SS Totenkopf. I included their 100mm artillery battalion as an integral component, making them into 'heavy infantry'. irl this battalion was overrun fairly early on and fled, leaving its guns behind.
The desperate fighting south of Achicourt continues as Rommel and 4th RTR pound each other, with every artillery piece and Stuka in range joining in.
II/25th Panzer moves to assault the Matildas a close range. A good move as flank and rear attacks are doubled, which offsets the Matildas armour advantage. As the British aren't pinned frontally, they will be able to turn to face in a future turn.
In a bloody climax, II/7 RR takes five hits and only survives as Rommel is with them. Rommel avoids an untimely demise by a single dice pip and one of the Stukas is downed. 4th RTR finally succumbs to the German fire and the plain in front of Achicourt is littered with burning tanks. The Allies still control two villages though...
The tank battle in the centre continues. II/25 Pz manages to inflict another hit on the Matildas (they were hideously unlucky in their assault). Meanwhile the speedy French cavalry tanks move rapidly up behind the woods in support.
German artillery and air rain down on the Somuas but the Matildas turn to face.
Caught between two fires, the result is predictable and the panzers are burning. They might have been better off disengaging and heading for the Allied supply trucks, but the opportunity to hit 7 RTR in the rear was a bit too good to pass up.
With an absence of observed targets, and an absence of units, the Germans bring their divisional artillery on to the table at Beaurains to help hold the line. irl it was only the gun line of the divisinal artillery and Flak which stopped the allied attack. 105mm LeFH were surprisingly good at dismantling Matildas with direct fire. Matilda Is were literally blown apart by direct hits.
The Allies respond in kind and the Royal Artillery position their 18/25pdrs to protect the supply head.
The Germans get their shovels out and frantically start digging in while the allies reorganise. The allies are a bit hamstrung as only the British can take the eastern villages, and they only have one ground combat unit left now (7th RTR). It wouldn't stop the French from taking them and handing them over though, but this idea doesn't occur to the Allied commanders.
Things take an interesting turn in the south! SS Totenkopf decides to take advantage of the allied concentration in the north and drives forward towards Waquentin. The French motor infantry retrace their steps and the French and SS engage in bitter hand-hand combat. Unfortunately this opens a big gap in the German line and 7 RTR is not slow to take advantage of it. The Matildas rumble southeast, bypassing the German gun line.
I/7th Rifle Regiment hastily undigs itself and moves into a blocking position, accompanied by Rommel himself. The SS and French continue to fight, the SS slowly getting the upper hand due to their superior firepower.
This interesting development is too little, too late however, and after an exchaneg of gunfire, time runs out before 7th RTR can try their luck against Rommels infantry (without any 88s this time).
As night falls the German gun line is left facing the French tanks in the distance in the north.
And Rommel is left to contemplate what might have been, although the chances of an infantry battalion in the open against a heavy tank battalion really aren't great.
So, as night falls, the remaining allied units fall back to their rally points and reorganise for the next day.
Gosh, well that was a close run thing. I thought it was curtains for the Germans at one point, but at the end of the day the honours were fairly even. Both sides had lost a tank battalion and two infantry battalions. The Allies had achieved their objective at one point, but then been pushed back again. I can't help but wonder what would have happened if both battalions of Matildas had attacked simultaneously with the infantry in close support, or if II/25 Pz had made a dash for the supply lines. Ah well, that is the joy of wargaming, and perhaps someone else could play it through and see if there is a different result.
I'd made a few minor modifications to the rules, partly to simplify the combat results (there are now only three different scores required, 3+, 5+ and 6, each being a halving of effect), and also to simplify rallying. This is now fixed at half current hits, fractions rounded down, per rally attempt. I also just halve combat effects for disordered units instead of dropping dice, the maths works better. The mods all seemed to work OK and I didn't forget anything this time.
I'll play a few more games of this as there are some tactical nuances the players need to get used to. It is set up to encourage the players to manage the pace of combat by choosing whether or not to engage at all (with short ranges) and also being able to choose whether to rally or not and pull back if needed. Managing that flow is a difficult balance between maintaining force cohesion and achieving the objective. It all worked OK though and I had a lot of fun running it.