'Bill Farquar' (aka John Salt) recently published a reworking of the old WRG 1925-50 rules on Lulu. Phil Barker allowed him to use the text from the later 1950-85 set, but retrofitted to WW2 equipment, so it uses the later rules unit activation sequences, suppressive fire etc and has an extensive reworked section on artillery fire.
A very familiar looking cover! Although Lulu can't print them, John has also done a QRS which is available on the Bill Farquar Facebook Group and on The Wargames Website. There is a rather more comprehensive list of weapons that the original version, also separated by ammo types and a large range of infantry anti-tank options too.
I used to play a lot of WRG back in the 1970s and 80s, so I was keen to give these a go. Naturally for an armour set, I managed to pick an infantry heavy scenario to start.... In my defence, in the original WRG rules, Phil Barker advised starting with an infantry platoon and a heavy weapons section. So naturally I started with a reinforced rifle company!
And here we go, Skirmish on the Duna from the 'Ghosts of Smolensk' Skirmish Campaigns book. This is a 6x4 table and I'm using a ground scale of 6" = 100m, (ie 1/600), the same that we used for John As 'Blitzspiel' as this is an infantry scenario . I scaled the listed scenario units up so that rifle sections became platoons, but I kept the count of AFVs and guns the same, as a lot of these scenarios are quite tank heavy.
This one has a weak German company (basically two big platoons) holding onto a potential crossing site over the River Duna in July 1941. The Russians are planning a company strength counterattack to drive them away.
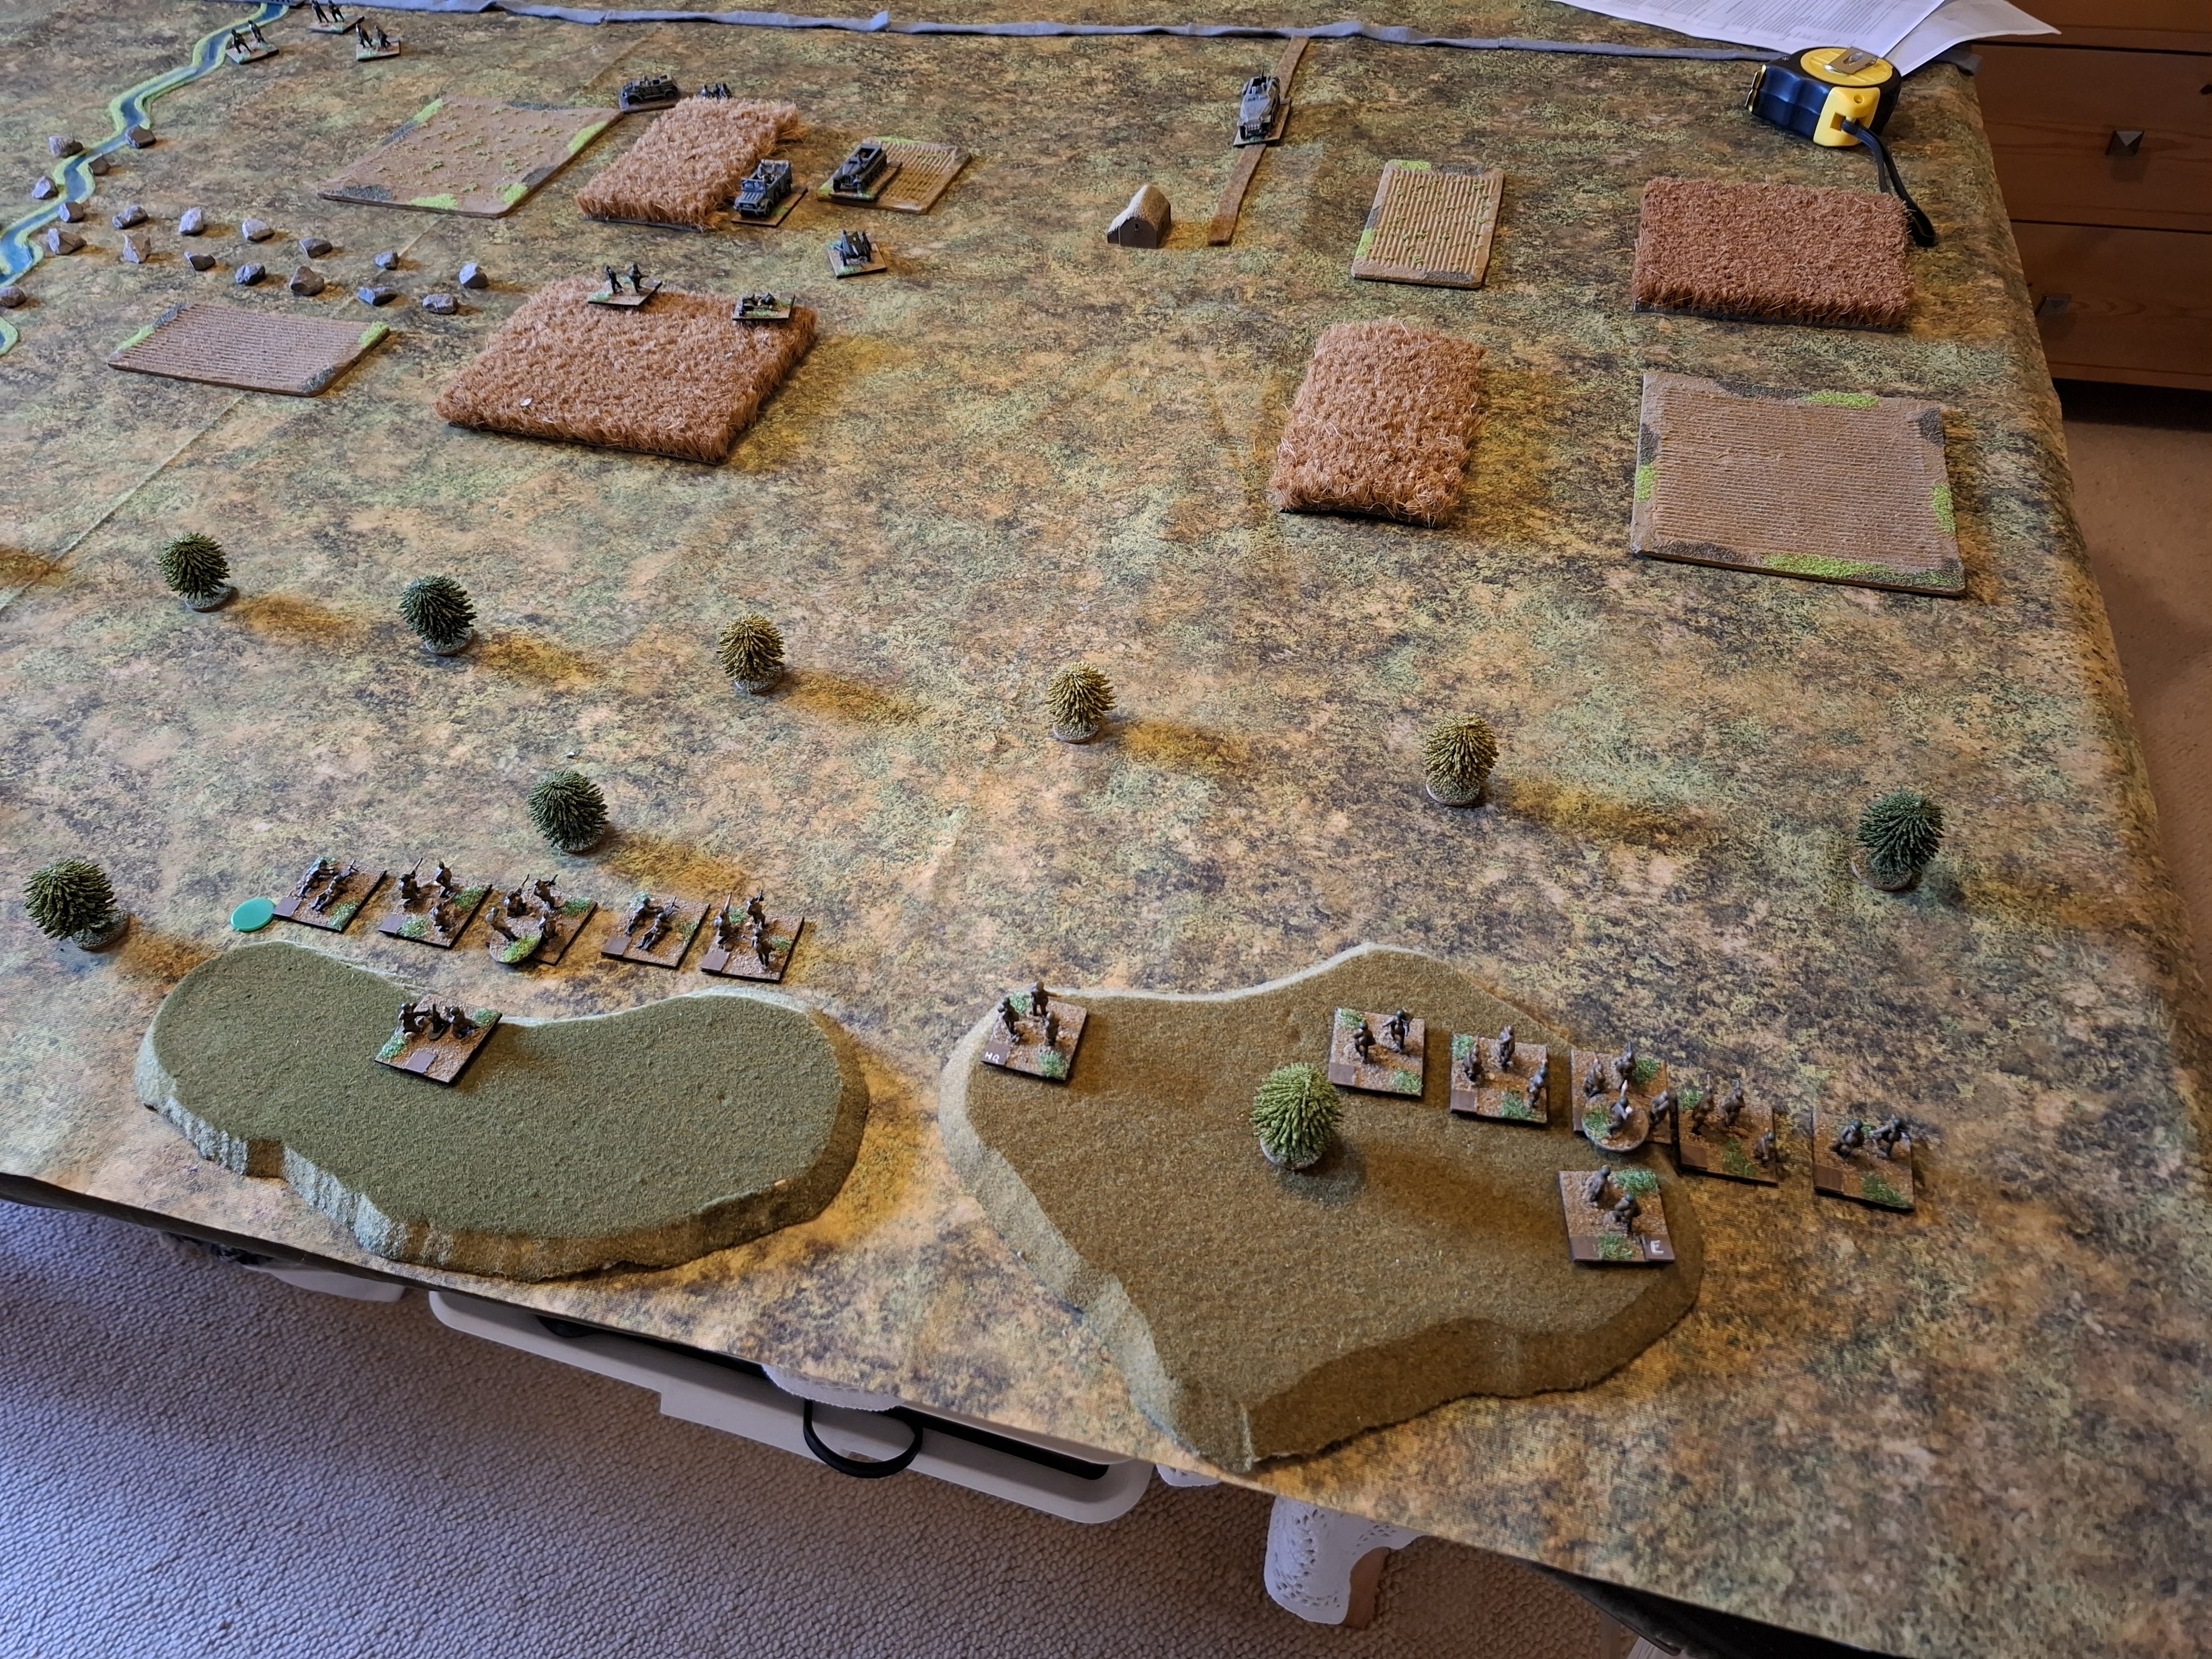
The table view is from the west, the Duna is visible in distance, crossed by a (destroyed) bridge. There are open woods to the north (left) and fields with tall crops in the centre. I'm treating the crops as obscurity g fiage, but without the maximum Los restrictions of woods. There is also a small barn joined by a dirt track to the highway.
Around the barn we have a small German recce group. They have an MG34 team and rifle/command group in a Horch and a Pak 36 towed by an Sdkfz 10. There is a radio in the Horch. The German company commander and his Kubelwagen can be seen lurking behind the fields further north.
The barn is a Russian objective and the Germans can only set up halfway across the table, so the plan is to deny the barn by fire from the fields, rather than put the infantry into the very obvious and isolated wooden building. (Buildings are fairly easy to locate and bring under fire). Interestingly in these rules, stationary infantry type targets in the open are essentially immune from KIA from small arms unless within 50m, although still liable for suppression. As John often said, real ground is very crinkly if you are an infantryman. Moving units hit by small arms are hideously vulnerable though, which is a big step up from the original rules.
In the original rules I would have laid down an MG beaten zone from the MG34 across the front of the barn, but apparently MGs don't have beaten zones any more, just suppressive fire, which is sort of similar.
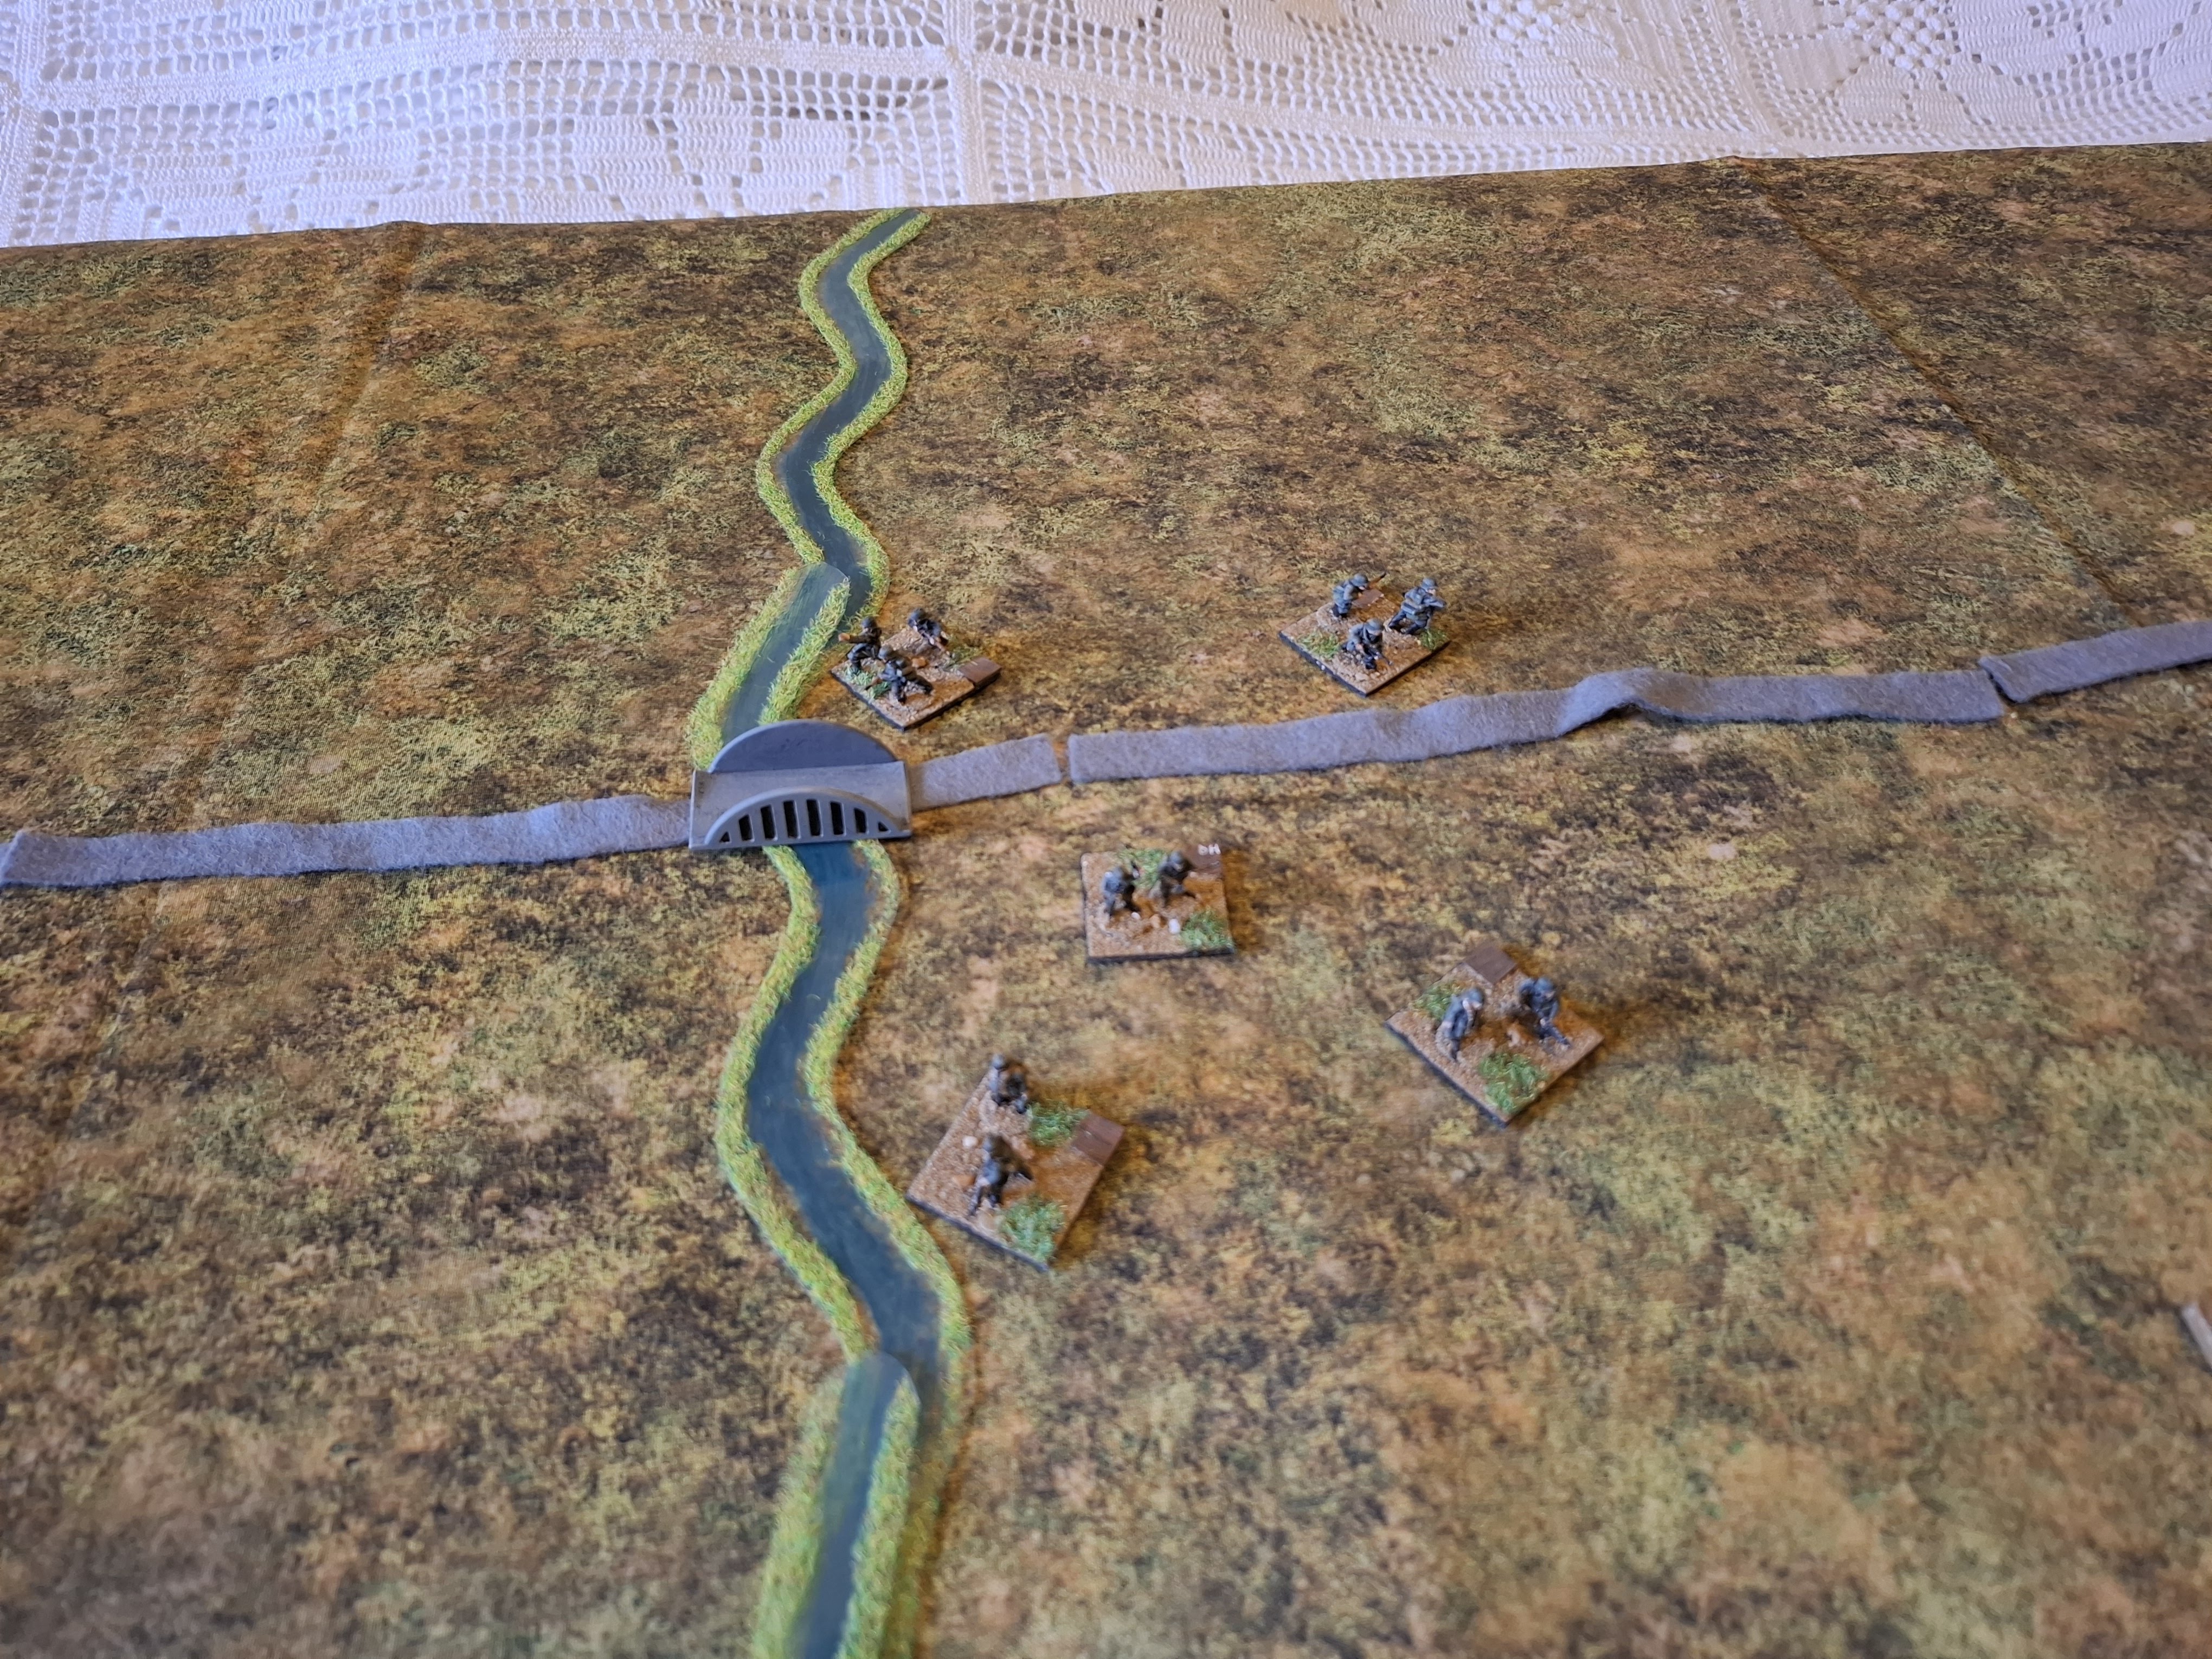
And around the damaged bridge with have a panzer pioneer platoon. The organisation given in the scenario book is some sort of fantasy TO&E, real PP platoons had seven (!) Sdkfz 251/7s and were pretty big. For this lot I've kept a single Sdkfz 251/7 and organised them as an HQ and three squads of a rifle group and a rifle/GMPG group (as the 1941 pioneer squad was large). One nice thing in this edition of WRG is that you can have combined MG/Rifle groups which keeps the element count manageable. I really hated those 12 element rifle platoons in the original rules.
The pioneers have to set up within 4" (66m) of the bridge and I've got the HQ and two squads dismounted while the third is mounted in the armed halftrack. These guys need to hold the bridge site, but the halftrack section has orders to patrol the road as far as the barn. The platoon radio is in the halftrack.
There are a few pre-arranged flare signals for things like rallying back etc but each German unit has a vehicle mounted radio, which should help with C2.
Riding to the rescue is a motorised infantry platoon. Again, the org given in the scenario was a fantasy, and these guys are on the April 1941 TO&E - four squads each of a rifle group and an MG34 group and platoon HQ with a rifle/command group and a 50mm mortar section. Each section has a truck and the HQ is in a Kubelwagen. There should be more transport but in 15mm it all gets a bit extravagent. These motor on up the highway on turn 4.
Attacking them is a reinforced rifle company. Company HQ plus an engineer squad with demolition charges and four rifle platoons.
I used the July 1941 (reduced) TO&E for these, so the platoons have an HQ, two rifle squads and two LMG squads. Two of the platoons have an attached 50mm mortar squad. As all the units are under strength in the scenario, I'm representing each squad with a single element (representing approx 6 men irl), so each rifle platoon has an HQ, 2 x rifle, 2 x rifle/LMG squads plus two of them have 50mm mortars. The company has no allocated HMGs or AT weapons, so I'm assuming the rifle groups have Molotov cocktails.
The Russians have a plan, and in the absence of any company or platoon radios it had better be a good one! The company is attacking in two echelons, two platoons up. The left hand platoon is the fire platoon, the right hand platoon the assault platoon. Initial objective the barn.
Once the barn is secure the reserve platoon and fire platoon will take the bridge while the assault platoon secures the barn area. The reinforcing platoon (which arrives on turn 4) will go left flanking and take the bridge under fire from the far side of the Duna. In the absence of radios, the company command element has to stay pretty close to its subordinate units and with no 2iC, the Russians can't afford to get the CC killed.
In the opening turn (each pair of bounds is around 1 minute of real action and approx 5 minutes of elapsed time) the German scouts move at half speed through the corn and try to spot the Russians in the Open Woods. I do like the double action mechanism, and there are some quite subtle things about what types of weapons can do what in each phase. I had to scratch my head a fair bit about exactly when target acquisition takes place, but I ended up assuming it is a component of a fire action, even if you don't actually intended to fire.
The section in the halftrack has motored over to the barn - halftracks were always ridiculously fast in WRG and this set is no exception. Making a full move precludes any other activity.
The remaining pioneers around the bridge just fanned out a bit, slowly (it makes them harder to spot) but maintaining the 50m distance required for intra-unit comms. Both the LMG groups were in front, HQ in the middle and riflemen supporting. Sorry they are hard to see against the base cloth.
As the Russians moved to within 100m of the woodline, they became potentially visible although still hard to spot due to all the foliage in the way. Now came the most unfamiliar part, target acquisition, which is dice driven. Mercifully the table of spotting scores and modifiers is quite short, but you still have to dice for every single element to spot every other element and then remember who has spotted who...
At first this was fine as the foliage got in everyones way and the infantry were moving cautiously. The Germans got lucky and managed to spot a single Russian squad, while the Russians only managed to see a couple of German vehicles - the recce teams Horch which had moved up to maintain contact with the infantry and the Sdkfz 251 which was barreling down the road.
The firefight started to develop as elements were spotted and came under fire. The Germans got lucky and managed to spot and hit one moving Russian LMG squad in the fire platoon who were cut down in a hail of MG34 fire. The Russians halted to minimise the incoming fire effects and maximise their outgoing fire. The assault platoon stayed masked and just moved slowly forwards through the woods. The damaged Russian platoon easily passed their reaction test, having the Company HQ within 200m was very helpful.
The Russian return fire was quite devastating, despite all the trees and crops in the way. They had originally planned to just do area fire on the spotted Horch, but being stationary many elements were able to locate the firing Germans. Only the Pak 36 stayed hidden as it hadn't fired and every single other element the German had was hit and suppressed. The infantry were immune to kills at that range but the Horch would be destroyed in anything but a 1, the Russians duly rolled 1....
The German morale was pretty low after this, but as with the Russians, the presence of the CC kept them in good order, despite 100% unit suppression. They would have been unable to advance otherwise.
The Russians didn't have anything capable of damaging the halftrack at range, but the Russian 50mm mortar engaged it and hit it, which left it suppressed. This is a huge departure from the original WRG where area fire weapons had a chance of actually knocking out open topped armoured vehicles (5+ to neutralise, then 5+ to KO). At least suppressing it stopped the infantry section from firing and impeded the operation of the mounted MG. (having re-read the rules later, it should actually have stopped the mounted MG firing at all). Larger calibre HE can still destroy OT vehicles, but not 50mm mortars.
Under cover of this fire, the Russian assault platoon cautiously moved into the open ground towards the corn field. They were moving half speed to reduce their chance of exposure and also managed to spot most of the recce group as they were both firing and under fire by friendlies.
The reserve platoon marched on, heading for the fields east of the Duna to bring the bridge under fire as per their orders.
The second echelon moved a bit closer to the action to try and acquire some targets as the fire platoon was looking a bit ragged and the Germans in view were mostly suppressed. This didn't stop them observing or firing but made it much harder for them.
The assault platoon lost an MG squad to fire from the Pak 36 as it crossed the open ground but made it into the fields. It suffered a minor morale setback and could only advance half. That was fine as on the other side of the fields and awful lot of Germans had just arrived!
The German motorised rifle platoon was here, and an impressive sight it was. Given the proximity of the enemy, just 300 yards away, they made the minimum motorised move onto the table and then all debussed as quickly as possible, shaking out into an extended line. MT hit by small arms fire is destroyed on a 3+ (2+ for MGs) and those trucks were visible miles away...
The following turn the Russian assault platoon moved cautiously into the fields but completely failed to spot the German infantry lurking on the far side of the crops. Instead they had the barn and German halftrack in their sights.
The Germans also struggled to spot the Russians (at that range and given all the cover, they needed sixes) but one rifle group managed to spot one Russian infantry group. That was all they needed to start firing, and as I had discovered in the previous firefights, once one group started firing, it didn't take too long for everyone to notice what was going on (there is a big +3 to spotting targets under fire by friendlies).
The Russian reserve platoon moved up cautiously to the edge of the wood line ready to take advantage of a weakening in the German position.
The recce group was really feeling the pressure. Both infantry groups were suppressed and one of the Russian 50mm mortars scored a direct hit on the Pak 36 and knocked it out. The German infantry fell back through the cornfields to try and extend the range.
Sadly for the recce team, they hadn't got far enough away for the Russians to lose acquisition and one of the moving groups was cut down. There were an awful lot of Russian infantry lining the woods now.
Back over at the bridge, the 4th Russian platoon pushed on through the cornfields. At 300m spotting through the corn was hard but one pioneer MG34 team rolled a six and managed to spot one of the Russian teams, They were instantly pinned down by MG fire.
I was getting more used to how these infantry firefights developed now. Generally just one or two elements spotted each other, firing broke out and gradually more and more elements entered the firefight. The main thing is to avoid get shot at while moving, so using cover and suppressing the enemy before moving is vital.
A similar process was taking place further west as individual elements from the German motorised infantry and 2 platoon noticed each other across the corn fields. The Germans were content to remain stationary in their firing line for now, but their spotting rolls were awful.
Over in the east 4 platoon advanced more cautiously (half speed) and began to exchange fire with the pioneers around the bridge.
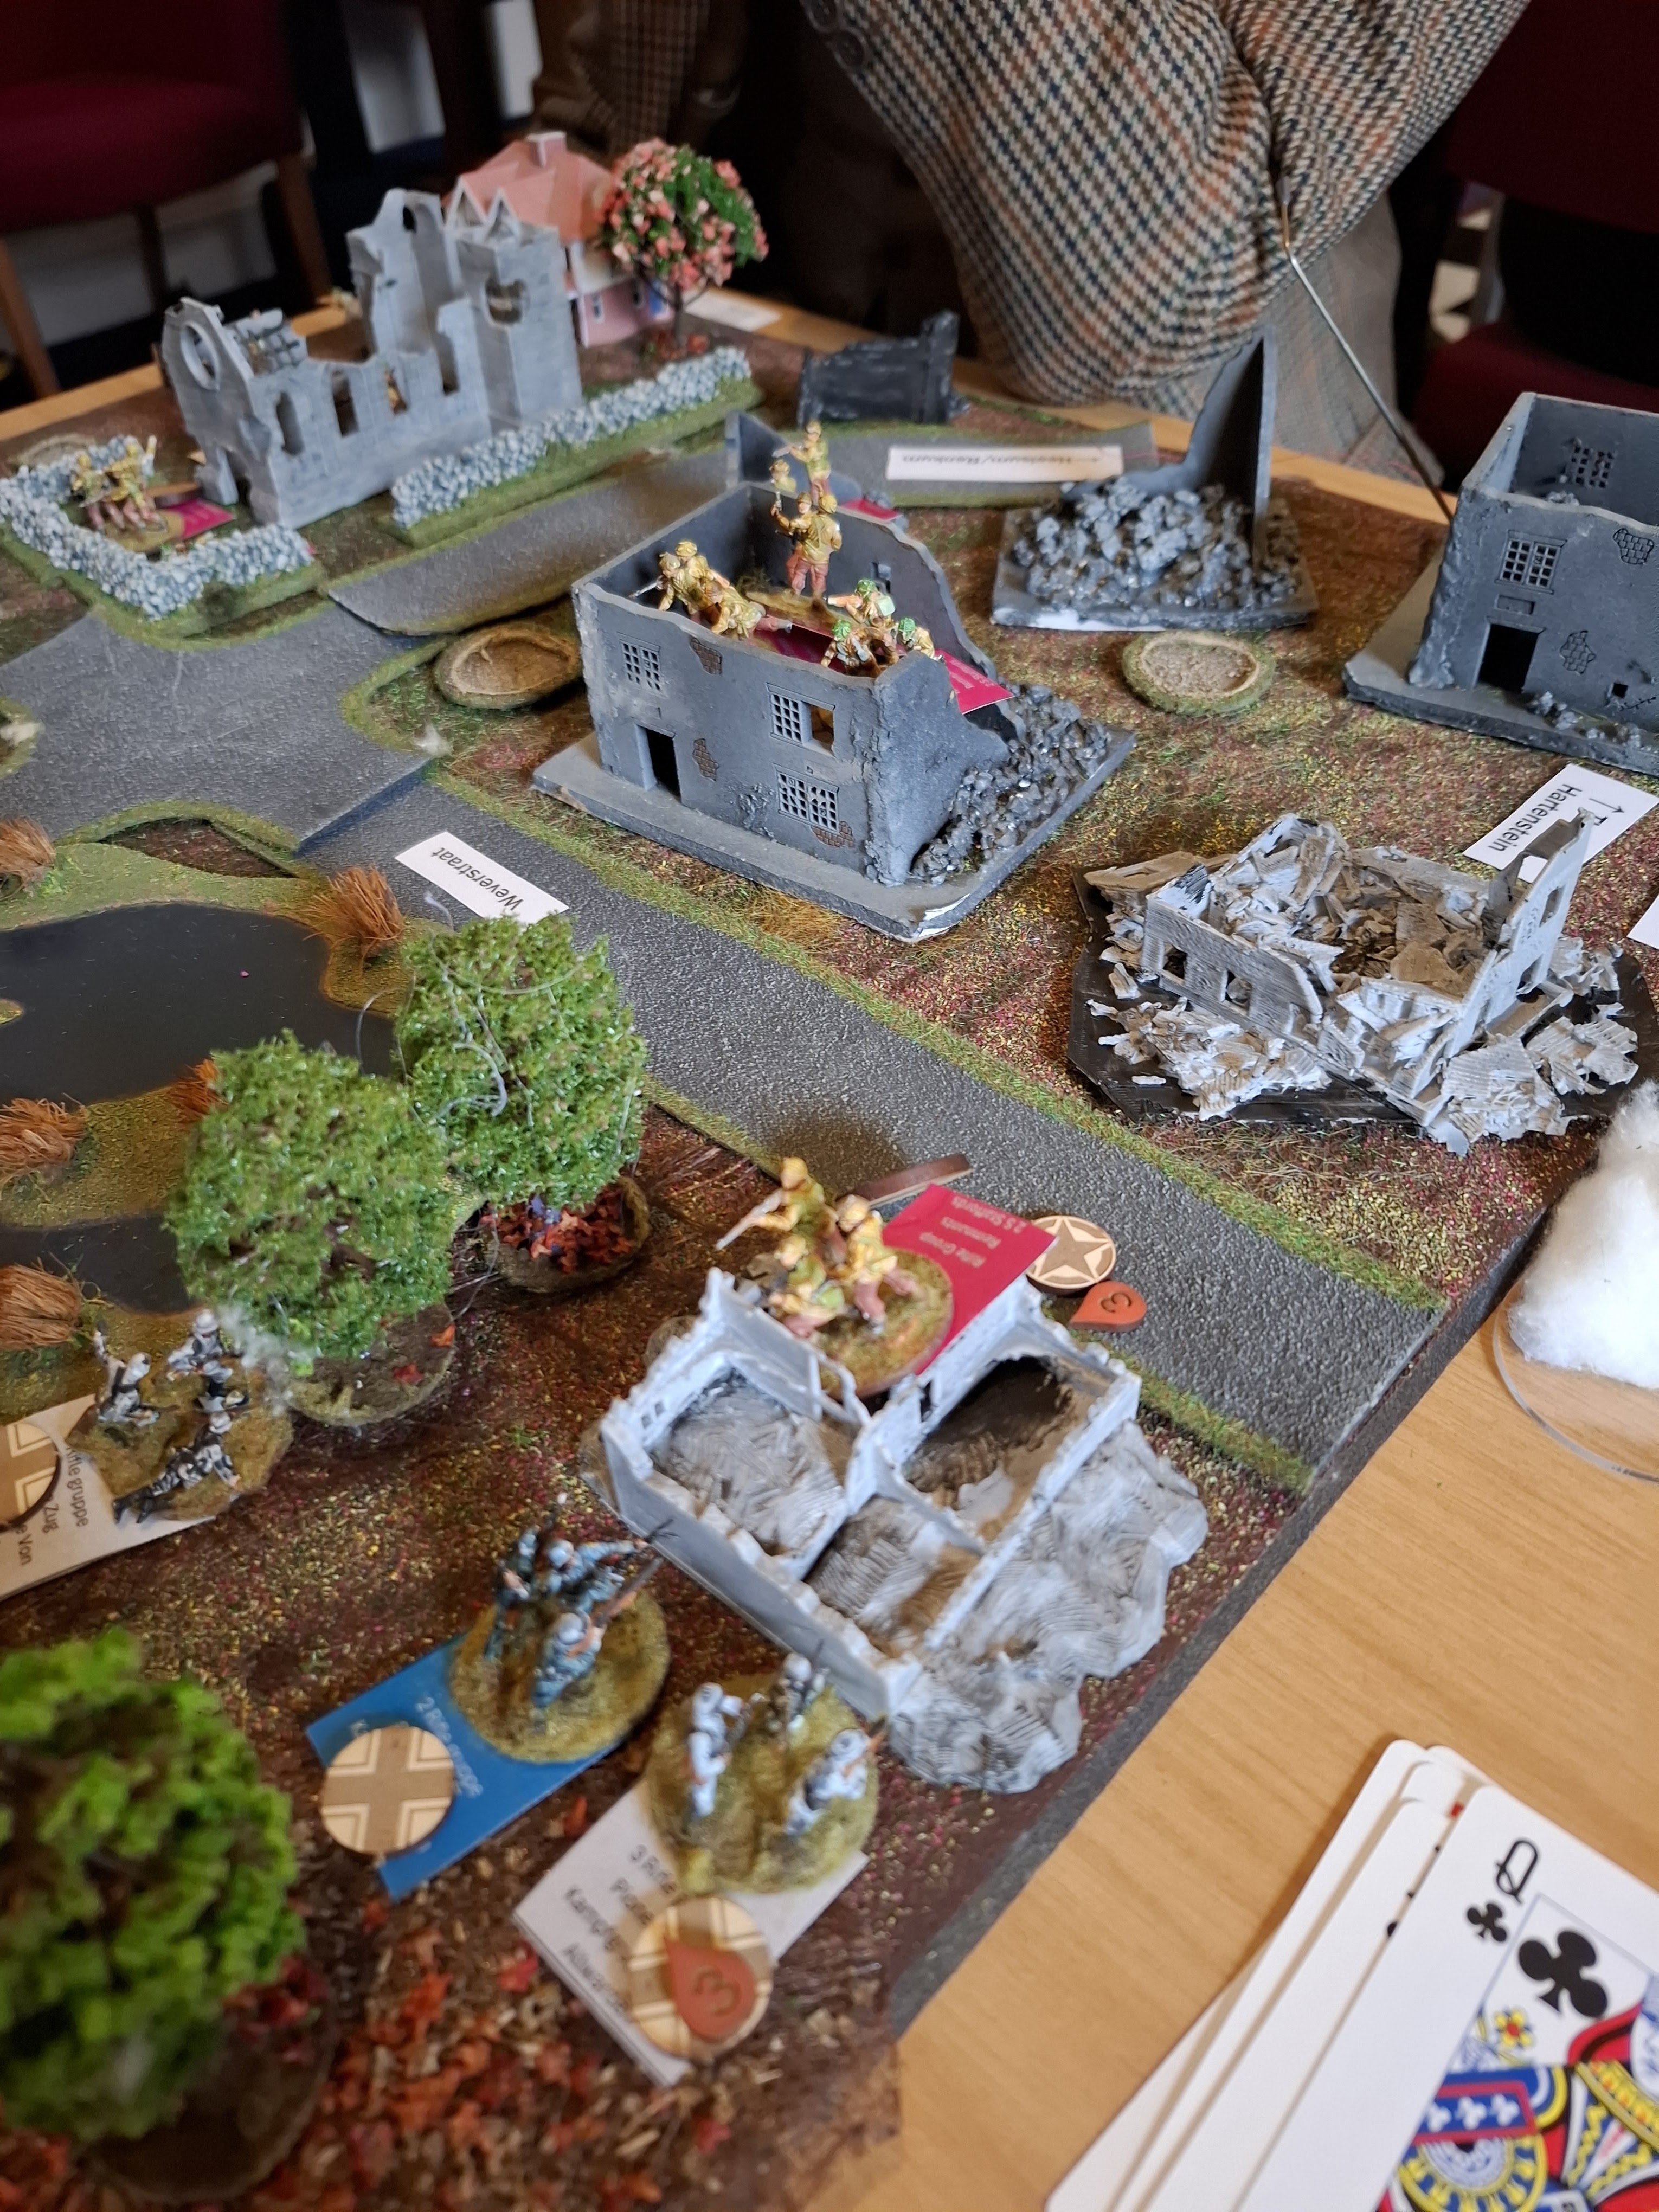
Back in the centre 1 platoon not only managed to cut down the other German recce team, but finally spotted, hit and destroyed both the vehicles which had been lurking in the fields. The German recce team was destroyed! In a decisive move to take advantage of the situation, the Russians fired smoke to blind the halftrack and the Company Commander ordered 3 platoon to charge the barn.
Over in the big cornfield, the firefight hadn't gone 2 platoons way. Once the firing started the Germans managed to spot all the Russian elements, and as they were all moving, just mowed them down with their four MG34 teams. Those GPMGs are just lethal. 2 platoon was completely destroyed. This did however attract the entire attention of the motorised infantry who didn't even notice the Russians charging towards the barn.
The halftrack popped out from behind the smokescreen and gunned down one of the Russian groups however, forcing a reaction test.
3 platoon in the field also lost a group to the pioneers, forcing another reaction test. I broke for the evening at that point to pick up things the next day.
The Russian 3 platoon easily passed their morale check and continued their headlong charge. Attacking Russians with their CC nearby (+4 to the reaction dice) are really, really hard to stop. Most of the platoon stopped to provide covering fire, while one rifle group rushed the barn. This also put them about 30m away from the halftrack, which had been suppressed by the covering fire.
Having enemy infantry advancing within 100m, coupled with the mass of suppressions on the pioneers (all the passengers were suppressed too) was enough to cause a -2 reaction and the halftrack got a big yellow badge of shame. "Withdraw from located enemy elements within 200m" . Disaster!
This was all very familiar from the original WRG, playing the 'stack the negative reaction modifiers' game.
The advancing halftrack had actually forced a test on the Russians too (enemy AFV advancing within 200m) , but they shrugged it off easily.
The halftrack withdrew back down the road to the rest of the platoon. The real problem was that this morale result applied to all the pioneers, so all the Russians had to do now was advance within 200m of the bridge and the Germans would be forced to withdraw.
Back near the barn the Germans should have been easily winning the firefight, they outnumbered the Russians over 2:1, but they were now having real problems spotting the stationary Russians on the other side of the fields. The Russians had a very good idea where the Germans were though and fired a whole platoons worth of suppressive fire into the massed Grenadiers. The Germans were very fortunate to only suffer two suppressions as a result, but this was enough to tip them into a 'cautious advance' reaction.
Back at the bridge the pioneers tried to sort themselves out, the German company commander himself ran over to try and force a favourable reaction test and stop them withdrawing.
Things went from bad to worse for the Grenadiers and the Russians cut down two moving German groups with LMG fire. Fortunately the Germans rolled a 6 on their reaction test and plugged on.
The Russian Company Commander now ordered 1 platoon to charge the bridge. If only they could get there before the Germans sorted themselves out..... as this platoon had lost its command group, the CC led them personally,
The German Company Commander had meanwhile gone down in a hail of lead as he ran over to the pioneer platoon. Things were just getting worse by the bridge.
Things were starting to go better for the Germans at the barn however. Despite their initial setbacks they were gradually gaining fire superiority. Even suppressed MG34s proved to be extremely dangerous at close range. More Russian elements in 3 platoon were suppressed now, although as they were all hugging the dirt they were immune from damage from ranged small arms fire. The Germans needed to get some momentum going to win the 'reaction dice modifiers' game and push them back.
The Pioneers also suddenly pulled a cat out of the bag and gunned down the last of the Russian 4 platoon as they advanced through the corn fields. That seems to be the only way to stop Russians attacking!
The German 50mm mortar destroyed the barn and its Russian occupants. Unfortified buildings are as a bad place to be in WRG against HE fire, and always have been. That was enough to tip Russian 3 Platoon over the edge as all their other elements were suppressed or KIA.
The pioneers finally debussed their third section from the halftrack and a hail of MG34 fire cut down many of the Russians in 3 platoon, including the Company Commander. That was enough to break their morale and they also got big yellow badge of shame. No more attacks on the bridge from these guys.
To add insult to injury, one of the Russian mortars destroyed a debussing pioneer group, which forced a morale check on the pioneers. As the platoon was now almost entirely unsuppressed however, it recovered and just went back to 'cautious advance'. The bridge was saved!
With all their platoons either broken or destroyed, the Russians called off the attack and it was a German victory. Well that was a closer run thing than I expected in the end, but given the balance of forces, not unexpected. A more focussed attack on the bridge from turn 1 may have been more successful, but who knows.
In the end I really enjoyed that and the game started to flow well, although I must confess I struggled a bit at first and had to consult the rules a lot. Much of it was quite familiar from the original WRG set, but I must confess I didn't properly read the smoke rules and just plonked it down as we used to instead of reading the lengthy rules on smokescreen management. In the end I got through 14 turns in around 4 hours (?) of play, I slightly lost track. I was very slow at first but got faster as I became more familiar with things.
Some of this game is very different to the original one, it is much easier to hit things and suppress them, but suppression only hampers fire and movement, it doesn't stop it, neutralisation is reserved for artillery fire. The thing which really did my head in was the deterministic acquisition aka rolling dice to spot. How on earth are you supposed to remember which element has seen which element from turn-turn? Command Decision 2 has the same issue, but the element count is a bit lower. At least in AHGCs 'Tobruk' they gave you a roster sheet and individually numbered counters, so you could write down that tank 17 had acquired AT gun 3 etc.
After a while I realised that what tended to happen was that one or two elements would acquire each other, firing would break out and then more and more elements would be able to join in (big plusses for acquiring targets under fire by friendlies) and after a couple of turns everyone was blazing away happily. So it was OK in the end, but I think I still prefer the original WRG fixed spotting which produced much the same effect but for far less effort - firefights used to ebb and flow quite nicely in those. Any extra step of dice rolling with long lists of modifiers introduces lengthy delays in the game, and this size scenario I could have got through in about an hour and half with Crossfire, if not quicker. Similarly, letting suppressed units still spot and fire with hefty negative modifiers just added more pointless die rolling. Much easier just treat them as neutralised.
I liked some of the changes in the outcomes of infantry fire, particularly just ruling that stationary infantry over 50m range were immune to KIAs from bullets (but not HE), so you could really do the tactic of pinning people with MGs then killing them with mortars. Being caught moving by small arms fire was very bad though (KIA on a 4+) so the most sensible thing to do in contact with the enemy is hit the dirt, suppress them, and then advance under cover to get close and force those critical, negative modified, reaction tests.
I largely role played the orders side of things. I did have mental written orders for all the subunits but they were couched in terms more like the attack/phased attack/defend type orders in Spearhead. While I did have some pre arranged flare signals, in the end all the critical communications changing orders were carried out by base-base contact, apart from one radio message from the German CC to the motorised grenadier platoon. I also tried to make the Russians follow their tactical doctrine, even though that isn't explicit in this edition of WRG, so their platoons were either in column or line etc.
My plan is to set up a couple more games and introduce more armour to see how those go. There are some interesting changes to the resolution of AT fire I'd like to try out, but starting with infantry is a lot more forgiving as I recall many WRG games where it was quite possible to lose armour heavy games in a couple of turns if you miscalculated.


.jpg)


