Saturday 31 March 2018

Cambrai 1917


Bob has published my old Nugget article on The Battle of Cambrai which was itself based on Operation Uranus. Bear in mind I ran this game a rather alarming 16(!) years ago, but the progress of the game was recorded for posterity by the miracle of digital camera technology, which was a bit of a novelty in 2002.

As might be expected, the massed armour rolled over the Germans, although the game was not without its distinctly sticky moments. The photographic evidence reveals rather poignantly the ever diminishing number of operational tanks in the front line and the increasingly ragged progress once the main Hindenburg defences were reached, a couple of pillboxes in the centre proving extremely tough nuts to crack.

Initial setup. The first line is the outpost line, and second heavy trench line is the main Hindenberg Line and an anti-tank obstacle. The two zones to the left are the British deployment area.


Closer view of the tanks. Interesting mix of Greens and Browns there! The 15mm tanks are deployed in the north (they are further away so are smaller). The plastic tanks are a mixture of Emhar and Airfix, the later minus their trails and doing passable impressions of Mark IVs. The infantry are lined up in support, restricted by the stacking limits, a brigade from each division forming the first wave. The cavalry can be seen waiting to exploit the inevitable victory.


Turn 1. The outpost line is obliterated by hundreds of tanks. Eagle eyed readers will notice that one tank unit has already stalled on the start line. Some Germans have popped up in the HKL (spotted from the hill) and the German reserve line behind the canal is visible.


Turn 2. Things are a bit sticky in the north, but the tanks press on in the south. One tank unit has already been destroyed by the main defences as the infantry follow the tanks up.


Turn 3. Reasonable progress in the south as the German guns are overrun. Stuck everywhere else.


Turn 4. More tanks into the gun line, but Bourlon wood is bypassed in the north as it is proving a very tough nut to crack.


Turn 5. Approaching the canal du nord with cavalry rapidly advancing to exploit any gaps.


Turn 6. Over the canal. Cavalry moving up and over the canal.


Turn 7. The cavalry pushes on to the green fields beyond and off the table.


Turn 8. The bells ring out a great victory! The cavalry can be seen galloping off the right hand side of the table, while the British have achieved their 10,000 yard breakthrough.

So, despite the somewhat dodgy rules, a reasonably plausible result. I  later ran this at COW with eleven British players (one per division and two Corps commanders) with much the same outcome. I later made up some MDF trench systems to replace the cardboard ones. The main Hindenburg trench is much wider as it was designed as an anti-tank obstacle.

Saturday 24 March 2018

Less Portable Wargame

After our previous outing with The Portable Wargame, I took on board the comments the players had made and had a go at making some revisions. I got a little carried away with this process and five versions and four playtests later realised I was in danger of re-writing the rules entirely and replacing them with a mixture of NATO Brigade Commander, NQM and Sam Mustafas Rommel!

A degree of cutting back was in order as I wanted to keep to the basic philosophy of the game. I ended up with some minor changes and some big revisions, but something which was still recognisably the Portable Wargame, although less Portable, hence its new title.

The main changes are:

1. Tightening up the turn sequence as we got really confused about which units had done what when.
2. Removing the retreat result altogether and replacing it with the 'pin' result as suggested in the rules.
3. The movement table was replaced with something which looks suspiciously like NQM.
4. The close combat system was replaced with the Sandhurst Battlegroup Wargame system, converted to opposed D6 and made a bit more heroic by plugging in a DBA type graded result system. I'll stick with it for now and see how it goes.
5. The shooting system was heavily simplified with only three classes of fire (good, OK, bad),  but three weights of fire and levels of protection (Light, medium, heavy) added. So an 88 is now considerably better than a 2pdr , and troops in bunkers only really need to worry about heavy artillery. Thank you Mr Kemp.
6. Some WW2 chrome was added (OPs, ammunition, reorg, communications, visibility) in as simple manner as possible.

It seemed simplest to play KG Fredrickson again, as it saved the players faffing around figuring out the scenario as I wangted to try the new mechnisms out. Tim and Graham took the Russians, John and Jerry the Germans


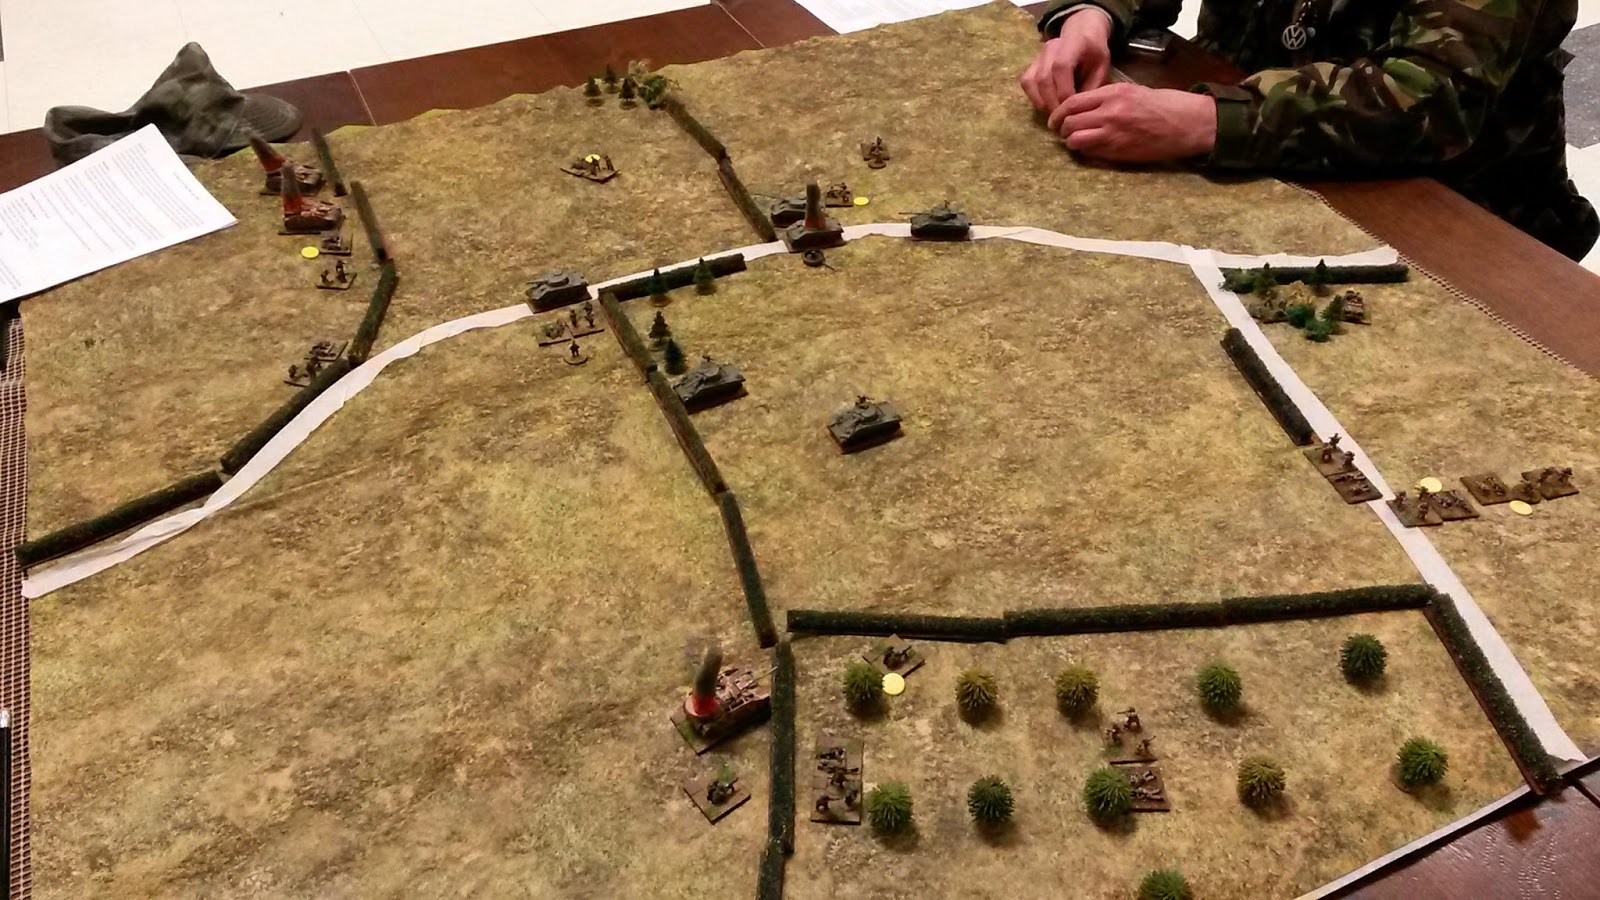
First turn. The Germans have adopted a forward defence with two companies in the front woods. I tried this in the playtests and it worked really well. Eagle eyed readers will notice that the Russians are using both my converted command bus and Zis-2 57mm AT gun. Really eagle eyed readers will spot Colonel Strelinkov and his megaphone standing by his command car.

The Russians have also got 76mm Shermans. Their first outing, from a batch of Shermans I bought at Triples some years ago, and fitting for a 1944 Guards Mechanised Brigade.


The Germans got some new toys too. Here is Colonel Fredrickson riding a  horse. They also have an Opel radio truck and a horse drawn Pak 40. Both sides have an HQ which needs to be active for them to call artillery fire, units also need to trace supply to it if they want to conduct engineer actions or reorganise (remove hits). If it is destroyed they lose 1 off their initiative dice. I've extended the artillery ranges to more realistic ones so the German 105s are now several hexes offtable. 


The Russians pushed hard on the right. The outpost took a loss and was pinned (yellow marker) but the ZOC held up the Russians.  In the centre a nice fat target of the Zis AT and a rifle company was heavily stonked by the Germans 105s (offtable).  I let the players stack two units in a hex, which seems to work OK. Greater concentration of force vs greater vulnerability.

The Mark IV company and the other forward outpost surrounded by wire and mines held the Russians back over in the distance. That chap on the motorcycle is the Russian artillery observer.,


Things are hotting up on the right flank. The German infantry are 'poor' so can only take three hits. Russian engineers (I gave them some engineers) are clearing the minefield under fire. Colonel Strelnikov  has turned up to encourage the troops.


Over in the distance, the Germans are holding out well and the Russian assault has petered out. The Pak 40 company in particular did massive execution on the Russians with direct HE fire. The surviving Russians fell back out of range and reorganised to remove their hits.


By great sleight of hand (ie two turns on a row), the outpost company managed to disengage, run back to the trenches and rally off a hit! I let pinned units retire, which seems to work rather well. They were all then pinned by Soviet 76mm artillery fire (offtable), but as they are only 76s (light) against trenches (medium), not much chance of any actual hits

Sadly in all the excitement I forgot to take a photo of the final assault on the trench system. 24 SP of Shermans and infantry against two second rate German rifle companies with three SP between them. The Colonel was killed rallying off the pin markers under fire, but the trenches gave the Germans quite a big bonus, which meant the Russians only attained a marginal success. That was enough to push the Germans out, then the tanks followed up with a breakthrough assault and wiped out the survivors.

By this point the Russians were only four hits off their exhaustion point so we deemed it unlikely they'd capture the other German positions and we called it a day.

Player feedback was very positive, although there was some discussion about the effects of artillery fire on armour and we still got confused about which units had done what. Old age I guess. I did notice that players never fired then moved, so we decided to bin the option. Units now either move or fire, and we'll see how we get on with that.

The main thing I was pleased with was that players made decisions which had some tactical verity, in particular whether to accept a pin or push on and take some losses. They also pulled units back out of range to reorganise them before putting them into the fray, so I'm glad I added that option. I'm slightly unhappy about having the pinned status, it is one more thing to keep track of, and I can't help thinking there are more elegant ways to solve this problem, but all I can think to do is copy the NQM or Horse, Foot and Guns firefight mechanisms, which are both aimed at different sorts of games.

I've made a couple of minor tweaks, but we'll play it as is for a few more games and see how we get on. It went well enough for me to starting thinking about some very obscure scenarios I've wanted to run for years with a few battalions. Too small for NBC but too big for Battlegroup.


Saturday 17 March 2018

Blitzspiel II - The Road to St Leger

I came across this scenario on another blog and thought it would be ideal to playtest Blitzspiel as it featured a bit less kit than the last game. It features a company of the Green Howards and two troops of the Royal Dragoon Guards vs elements of the 352nd Inf Div Fusilier Battalion and Panzerjaeger Battalion as the british push inland towards Bayeux on D-day.

I ran it on a 4x4 table (800m x 800m) with the German defenders hidden. John took the British and von Gow took the Germans.


John brings on his leading platoons. This game was also an excuse to try out my new Deepcut Studios 'scrubland' game mat. I made up the ridges either side of the road using hexon tiles and laid the mat over them. It draped very well as it is quite thin. 


The British infantry tanks and infantry operating independantly. All that training in England wasted!


A Stug opens fire from behind the hedgerow, and unfortunately misses.


The Shermans make no such mistake and their return fire turns the Stug into a column of smoke. Meanwhile the British infantry press on alongside.


More Shermans roll on as the British infantry pushes on to the far hedgerow.


The German ambush is sprung! Two more Stugs open fire, brewing up the leading Sherman.


A pair of tripod MG42s lay down a devastating crossfire on the British infantry crossing their front on the other side of the valley. The new 200m beaten zone for tripod MGs was really nasty here.


The platoon suffers a several casualties and the remainder are pinned. A German rifle section emerges from behind the hedge and takes pot shots at the survivors.


The other British infantry platoon is largely pinned by long range LMG fire.


Things were looking a bit sticky at this point, however the firepower of the remaining Shermans slowly began to turn the tide. The German advance guard and tripod MGs were suppressed and the surviving Britihs infantry assaulted the hedgerow.


The other Shermans pressed on under a hail of MG fire which neutralised one tank. More Germans emerged from their hiding places.


Perhaps more importantly, both the remaining Stugs were knocked out without any further losses of Shermans. The Germans were a touch unlucky here and might have been better siting their guns with more restricted fields of fire and aiming for flank shots. Easy to be wise after the event though.


Over in the orchard, a British rifle section stalked the suppressed MG teams.


Down on the main road, one of the German rifle sections fired their brand new panzerfaust at a Sherman, egged on by the platoon commander. Only to miss completely.


We called it a day at that point. The remaining defenders were pulling out, but the British infantry had suffered a bloody nose with only their reserve platoon intact. Without effective infantry support the Shermans weren't going anywhere in the ever denser country.

The game rattled on  at a fair old pace and we got through the whole thing in an hour, which was great. It just plays much faster than Platoon Commanders War, which is what John was after. In the washup I felt that the British would have benefited from closer infantry-armour cooperation as the tanks and infantry fought virtually separate battles. John had decided to dash for Bayeux though, and so kept his tanks concentrated, which worked very well in the tank battle, but less so in mopping up the German infantry. John noted that we were thinking in terms of platoons and troops rather than worrying about the manipulation of rifle groups etc which was what he was after from the design. So all in all, very successful.


Sunday 11 March 2018

Operation Uranus

Bob Cordery has very kindly published my ancient old rules 'Operation Uranus' on his blog. They are very, very simple WW2 operational rules aimed at set piece Corps level battles, and based on Ian Drurys 'Sands of New Stanhall' WW2 island clearing game.

I think I wrote these back in 2002, and they formed the basis for my late Cambrai game (with 11 divisions in action!).

Report here: Operation Uranus The article was originally published in the Wargames Developments Journal 'The Nugget'.

Saturday 10 March 2018

Soviet silliness

Somewhat inspired by the Portable Wargame a few weeks before, I thought I'd finish up a couple of silly Russian 15mm projects that have been lying around for a while.

First up, the mighty Zis-2 57mm AT gun. Not that silly perhaps, but I always thought the barrel looked disproportionately huge. 


This is one of the PSC 76mm guns made up with a 57mm barrel. A nice simple model which looks the part and paints up well. John kindly donated this as he had a spare.

Next,  a command bus for the Russians. This was inspired by a photo I found of a command vehicle based on a Gaz AA in 1944 where the occupants had essentially built a garden shed on the back of the truck. They looked so happy with the monstrosity they'd built, I thought it deserved commemorating.


Essentially I just added a 6mm extension piece to the edges of the rear bed of a Zvezda Gaz AA truck, plonked on the tilt and made up a window and rear door from plastic card. It looks rather more professional than its real life counterpart! I'm sure the HQ chaps will welcome the ride.

Next, that triumph of socialist labour efforts (helped by a spot of spying on the Vickers Independant), the T-35 Land Battleship. 


This is a truly monstrous model. I did have go at doing the radio array but it just fell to bits. Well, it was an optional extra anyway. I left it fairly plain (the supplied decals also fell to bits!) but I'm pleased with the weathering on the side panels, which is a mixture of mud and dust.


It has no less than five moveable turrets, which lets it shoot in all sorts of directions at once. Lack of central fire control must  have made that an interesting experience in real life.


None of your Battlefront or Zvezda rubbish here. This is a proper Premo model, with the instructions in Russian. Which makes them a bit hard to read, so it is a good job there weren't too many parts.

Finally, I thought the chaps could do with some encouragement in the battle to defend the motherland from fascist oppression. I knocked up this chap with a megaphone to bellow out suitably comradely messages of inspiration. Well, I blame Enemy at the Gates.


He is a PSC 'pointing and shouting' Russian officer with a megaphone made up out of scrap plastic.

I rather enjoyed making all of those, and most of them will hopefully be gracing a gaming table in the weeks to come. I've even found a decent scenario to use the T35.


Saturday 3 March 2018

Simplicity in Practice. Squared and 1866'd

I've already converted Neil Thomas's Nineteenth Century rules for squares, so I thought  may as well do the same treatment for his Simplicity in Practice rules, and do an APW/FPW variant as well.

I tried it at the club using my 6mm APW figures and my ancient old gridded carpet tiles, originaly set up for Minischlacht. The scenario was one of may favourites, Nachod from the Six Weeks War. Von Steinmetz leads his Prussian Corps over the mountains and into an Austrian Corps in a classic encounter battle.


The Prussians are coming in from the top right. The Austrians assembling along the road from the left.


Nasty Austrian Jagers ambush the Prussian artillery (it really shouldn't be at the front of the column!).


The Austrians line up to assault the Wenzelberg, they key feature of the battle,


It is all very unpleasant with casualties galore. Steinmetz lurks in the courtyard.


Prussian infantry poised to counterattack the Austrian flanks while some Austrian cavalry put in an appearance.


The Prussians manage to drive the assault off.

I've played this scenario many times before with a range of various rules, but this was all a bit scrappy and unsatisfactory. The roads in particular were just confusing and got in the way. I don't like games at this level which bother with road movement, and coupled with the NT style turn restrictions and grids it was too confusing and gamey. 

The combat system worked OK and using a grid instead of big unit bases worked alright, but the whole thing just didn't gell. So, back to the drawing board with that one, but nothing ventured nothing gained!