I'd volunteered to run a game and I wanted to try out my reworked Rifle and Kepi with a human audience. We'd played the old card driven version many times at the club, but I'd hoped by moving to the Belle Epoque dice driven system and with a streamlined combat system, it would work better for remote play. Well, lets see how that turned out.

The battlefield from the south. Regular readers will be familiar with this as I'd used it for solo testing. The Bull Run is the river running E-W towards the top, and the objectives for both sides are the stone bridge and ford nearby which cross it, as well as the two hill hexes right in the middle (Henry Hill and Bald Hill). Newmarket is the small town in the foreground and Sudley Springs up in the top left.

Stone Bridge was held by Evans Brigade, and Balls Ford by Cocke. These were commanded by Mark and Jerry respectively.

Union 1st Division waiting to march on from the North. Sherman and Schencks brigade plus some artillery, all commanded by Diego.

Union 2nd and 3rd Divisions marching down from the northwest. The whole lot was commanded by John (BG McDowell).

The rest of the Armies of the Shenandoah (Johnstone) and Potomac (Beauregard) hurrying westwards from Manassas. Tim C was Johnstone, overall CO, Jerry was Beauregard and Mark commanded individual brigades within those commands.

I thought the CSA might have time to do some digging, and I found these rather neat log based entrenchment markers in my box of fortifications.

Bartow and Bee (I'd merged their brigades) waiting to come on along the Newmarket turnpike.

The action opened in the northwest as 2nd and 3rd US divisions came marching on towards Sudley Springs while Johnstone watched from the nearby hill. Evans occupied the hill next to stone bridge (as happened irl). The ZOC seriously impeded the US march columns.

Over in the east, Sherman marched on smartly but only had enough movement points (MP) to deploy into battle formation up on the ridge. Schenk came piling down the hill in fine old style and engaged Cocke, who was waiting to receive them. Sadly for the Union, the woods masked their artillery from firing at the ford.

Bartow and Bee made a magnificent movement throw (rolled a 6, for 8MP in march column) and marched four hexes along the turnpike, making it as far as the bottom of Henry Hill.
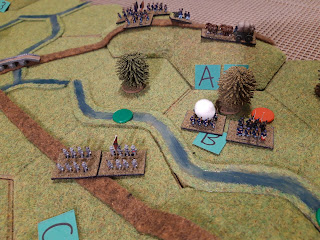
The action didn't open well for the Union. As Cocke had prepared to be attacked, he had the combat advantage, and bad dice rolling by Schenk resulting in him taking losses and routing! He might have been better off waiting for Sherman and making a combined attack.

Over at Sudley Springs the leading Union brigades (Porter and Burnside) deployed into combat formation while Howard was still in Sudley Springs in march column. In the face of superior numbers, Evans fell back, and was joined in line by Bartow who deployed into battle formation.

Back at Balls Ford, Schenk rallied to shaken and Sherman moved up in support. The extra fresh brigade tipped the balance the other way and Cocke became shaken. I made a mistake here, Schenk should have routed to the nearby wood and then rallied, instead I left him in place. It is hard work running a game for half a dozen people and I was distracted.

At this point Jacksons brigade came on, along with some artillery. Jackson immediately deployed and marched into battle, while the guns moved onto the hill to the south but didn't have enough movement to unlimber. Jackson evened the odds and both sides just exchanged fire, suffering some losses.
The white puffs indicate a single hit (not enough to remove a base), and the black puffs are two hits, which removes the base from combat. I left the bases on but marked as inffective with the black puffs. Well, I've painted all those figures so they may as well stay on the table.

Over in the west, Burnside got stuck trying to cross Bull Run, but Howard and Porter piled into Bartow and Evans. The resulting engagement was inconclusive, despite effective Federal artillery support. Both sides suffered some losses but stood.

Now it was a case of hard pounding. Burnside managed to enter the battle from the north, and coupled with support form both Union artillery battalions, Bartow and Evans came off worst and became shaken. The CSA units are at a serious disadvantage now, the US combat advantage is 5:1, not even accounting for the US artillery support. If the CSA don't rally they will have to withdraw or face being routed.

The CSA artillery was able to open fire at Balls Ford at (almost) point blank range, supervised by Johnstone. This was enough to tip the balance and both Sherman and Schenk took losses and became shaken. The Union units here are now at a big disadvantage, and they are the ones who need to rally or pull back.
We ran out of time and called it a night there. The mechanisms seemed to be working OK and the players said they enjoyed the decision making around the dice allocation to units. The rules around the leaders were a bit complex, I need to think of a better way to manage them, possibly the BBB mechanism of having a separate leader movement phase?
The biggest problem was that we'd only got through four turns of a ten turn game, so it was playing a bit too slowly. Have to see how we get on tomorrow, evening starting with the critical rally attempts for both sides. Now the forces are all engaged it may move a bit faster.

The action opened on turn five with Sherman managing to rally while Schenk fell back shaken. Cocke retired to the CSA gun line and Jackson took over at Balls Ford.

Evans and Bartow fell back to Henry Hill, but the run of dice draws meant the US was able to follow up closely and engage them. Howard lost contact, so it was only a portion of the Union force which was able to attack.

The battle at the ford went Jacksons way and Sherman took some losses and was disorganised.

On Henry Hill, Evans and Bartow were routed by the superior numbers of Union troops with artillery support. Evans fell back to Newmarket and was joined by Gen Beauregard, while Bartow lurked in some woods to the south. Evans failed to rally despite the presence of the General and his routed troops dispersed (routed units lose one step a turn and they only had one step left).

Sherman was now outnumbered 3:1 in combat dice by Jackson, so retired away from the ford to rally on the ridge along with Schenk. They were safe up there as the Union artillery was deployed and firing away.

In an act of astonishing heroism, Cocke now reoccupied Henry Hill, accompanied by Beauregard (they rolled a 6 on the move dice). This forestalled the Union occupation by a turn. Howard was able to move up to the creek though, ready for a mass attack next turn.

Under artillery fire and heavily outnumbered, Cocke was routed and fell back to Newmarket. The Union had failed to occupy Henry Hill this turn though and now JEB Stuarts cavalry had arrived and Jacksons artillery was deployed north of Newmarket.

Union 1st Div was stuck on the ridge trying to rally as CA reinforcements poured down the road from the east. The Union finally occupied Henry Hill, but Jackson placed his brigade squarely in their path at the base of the hill (which was exactly where he ended up in the real battle).

As the Union occupied the ridge, Kirby-Smith and more guns arrived and rapidly marched to the heights south of Newmarket. Everything now hinged on Jackson, could his brigade hold back the Union for a turn?

In a brutal exchange of fire, Jacksons brigade took heavy losses but held firm at the base of the hill. And that was how he got is nickname, 'Stonewall' Jackson.
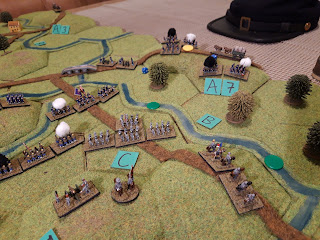
The time gained allowed the CSA to slip in another brigade to support Jacksons right, while Stuarts cavalry moved towards the unguarded ford. Schenk had managed to rally up on the ridge though, while Sherman was still disordered. The US artillery massed into a grand battery north of Stone Bridge.

Finally Kirby-Smith and Ewell moved up to support Jackson and attacked the Union troops on Bald Hill, while Stuarts cavalry dismounted in the woods across the Bull Run and were engaged by Schenck. The battle line now extended along 7km of front and all the artillery was in action.

There were an awful lot of combat dice to throw. The CSA had committed some fresh units however, so had a dice advantage (the white ones) over the tired Union forces who had been engaged with Evans, Bartow, Cocke and then Jackson.
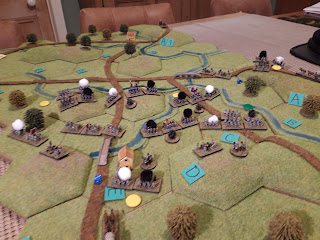
In a massive exchange of fire the Union came off much worse, and their units became disordered. They were still hanging on to three of the five objectives.

As dusk fell no-one was in a position to manouvre, it was just a case of blazing away. The Union were now seriously disadvantaged as so many units were disordered, and their heavy losses meant that none of them were able to rally. On the last turn the CSA beat the US again and the entire Union Army disintegrated and routed! They were still in control of the majority of the objectives however, so could claim a win of sorts.
Hilariously this mirrored the real battle where ostensibly the US had 'won' as the CSA was worn out and wavering, but then their Army just fell apart for no apparent reason. Both sides could reasonably claim a victory, and went away happy.
In hindsight, the crucial turning point was Cocke's counterattack onto Henry Hill, as it held the Union back just one turn. If they had a chance to consolidate their position on the hill, it would have been enough to turn the tide against the Confederates when they attacked. Ah well, such is war and wargaming.
That all went OK, although it was rather slower than the playtesting. The dice draw mechanism worked really well and I liked the way the draws coupled with the dice roll generated movement points added some friction. There was a reason I did that in Panzergruppe originally and I'd forgotten how well it worked. The leaders were a bit clunky, I need to figure out how best to activate them in a way which is simple.
The main problem is a nagging doubt about the combat system. I much prefer the dice to the old arithmetic heavy combat system, but as one of the players noted, it is very much 'winner takes all' and I'm not convinced ACW combat was like that. The simplest thing would be to inflict some losses on the winner. Some things to think about for next time anyway.


