We've had a couple of games of the Pz8 WW1 rules now, and I wanted to try them out for a 1918 German style attack as we are getting the hang of them. I set this on the front of Byngs 3rd Army, as it was held in a greater density than Goughs 5th, so the force ratios are a bit more even. Specifically it is the base of the Flesquieres Salient with 59th Div and a brigade of 17th Div being attacked by three German divisions (119th, 24th Reserve and 3rd Guards) reinforced with Stormtroops.
Both sides have nasty surprises, the Germans have lots of Stormtroops and poison gas, while the British have 2nd Tank Brigade in reserve. Historically they conducted an armoured counterattack in the afternoon of 21st March and made a real mess of the Germans.
Battlefield from the south (6x8 grid). It is quite busy with lots of trenches and terrain features (mainly woods with a couple of destroyed villages). In real life the Canal du Nord runs down the right hand side of the table.
59th Div. The British Divisions only have nine battalions now, and are deployed according to their interpretation of captured 1917 German manuals. In theory this is a deep defence with the main battle conducted in the rear two defensive systems, but the time it took to dig and a predeliction for forward defence meant the British defences were rather stronger at the front than the back.
17th Div sector. In both cases the British have fully manned the wired front line, and have a series of strongpoints in the rear arranged in a checkerboard.
119th Div (Simon). Each German division has nine battalions, with two regiments up. The lead regiments are reinforced with a Stormtroop detachment.
24th Res (Pete). Pete's division is facing up against the defended woods and village in the centre and has a tough job.
3rd Guards (Tim). The defences and terrain facing Tim aren't quite so grim, but there is a British redoubt in the second line.
German artillery all lined up. The Germans have masses of artillery support.
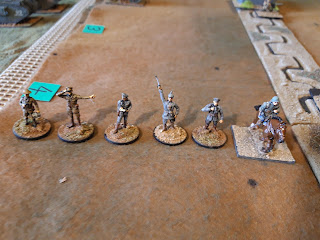
The usual suspects! All the various command figures. From L-R.
Wearing shorts, Russell. Looking one way and pointing another, John. Reading the manual, Simon. Waving a big sword, Pete. Looking a bit like Rommel, Tim. Riding a great big horse, Jerry.
These are all various goofy officer poses from Emhar sets, but the mounted officer is Tumbling Dice.
The British nasty surprise, Two companies of Mark IV tanks from 2nd Tank Brigade, supported by two battalions from 40 Div. In real life these conducted a counterttack in the afternoon of the battle.
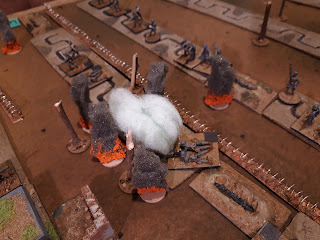
The Germans nasty surprise. A big bag of bilous green 'poison gas' - phosgene in this case. This can be used to attack a square instead of conventional artillery.
Artillery ammunition. The British don't have very much, representing the crushing suppressive barrage fired by the Germans, coupled with fog which restricted visibility.
The view from the British front line. It doesn't look very encouraging!
The attack opened with a rolling barrage. Simon took the British front line albeit with some losses. Pete's attack in the centre was halted by the British defensive barrage however and suffered heavy losses.
Over in the east, the Germans upped the intensity of the barrage and Tim rolled over the British front line easily.
Content with having halted the German centre, the British pushed up some infantry and MGs into the second line.
They also reinforced the wood in the front line, while the Germans milled around reorganising.
Simon proceeded to attack the second line behind a light barrage. He took one square, but the attack on the wood failed with some losses.
In the centre, Pete attacked 'Suicide Wood' again with much heavier artillery support. The British replied and the attack stalled once more.
Tim went in behind a gas barrage. This worked against the trench, but the bunker position was far too strong, and the attackers were mown down. Everyone decided at that point that gas wasn't much use against bunkers.
The defenders of Suicide Wood were still holding out, but there were an awful lot of Germans around.
John was content to observe proceedings from the bunker in the second line.
Tims leading regiment was looking a bit isolated over in the east.
Simon put in an attack on the third line covered by a massive barrage and gassed the wood. The wood fell, but once again British defensive artillery saved the defenders of the bunker, albeit with some losses.
Suicide Wood got the same treatment, Pete attacked behind a barrage which weakened the defenders, then finished them off with a flank attack supported by gas. Suicide Wood had fallen! A few Germans machinegunners advanced cautiously into the cratered, toxic wilderness.
Tim went for the bunker in his sector behind another massive barrage. By now the British gunners were running low on ammunition, and the Germans easily overran the defenders. This also made his salient a bit more tenable.
Although they'd lost the wood, the two central squares in the British second line were strongly held by MG positions supported by infantry.
At this point, the British reserves rolled up. 2nd Tank Brigade, personally supervised by Russell.
And two battalions of 40 Div, who headed off for the British third line in 59 Div sector.
As we were reaching a critical point, we called it a day at that point. Both sides had been lavish with their artillery, the British were down to one shot left, while the Germans only had six, but still had two gas attacks remaining.
Simons sector from the north. There really isn't much stuff left in front of him here.
Petes sector from the north. Looking a bit ragged here due to the heavy fighting and still a strong British position ahead.
And Tims from the north. Nothing left in front at all, apart from those tanks!
So, the strategic choice for the Germans is whether they should try and smash the strong British position remaining in the second line, or make a dash for the almost undefended third line, and try to hold off the British reserves. They aren't strong enough for both. Decisions, decisions....
After much online chit chat the Germans decided to play it safe and focus on clearing up the British second line.
Simon went firm in the west, and contented himself bringing up reserves and pinning the defenders in place.
Over in Tims sector, his lead regiment started mopping up the British third line trenches while more reserves moved up. Three battalions then parked themselves right in front of 2nd Tank Brigade! Clearly the Germans had decided on an active defence.
Pete spent the turn moving up reinforcements to assault the British second line.
The British tanks didn't fancy their chances in column 5 (particularly as there was a German occupied bunker in F5), so moved off to the left into column 4. So there hadn't been significant numbers of breakdowns.
The last of the German artillery ammo smashed into the British strongpoint in the second line, and the Royal Artillery fired the last of their ammo too.
The result was really close, but the Germans just gained fire superiority, and Petes infantry overran the position behind the barrage.
Frothing von Gow posed for a photo with the barrage behind him. It will look good in his memoirs.
Pete then stonked the remaining British position with phosgene. This really was a crap shoot - defence strength of 5 plus 1D3 vs attack strength of 4 plus 1D6. The whole game hung on this one attack.
The British MG rolled a 2, while the phosgene rolled a magnificent 5, with a difference of 2 that was just enough for Pete to overrun the defence (one less and one of the defending units would have survived).
The Germans had now achieved a Tactical Victory by taking the entire British second line. They now had to hang onto it. An interesting feature of the rules is that once all artillery ammo is exhausted, both sides can roll 1D6 for replenishment. So the gunners on both sides got a few extra shells.
The only hope for the British now was for 2nd Tank Brigade to break through to the second line and take one of the squares before nightfall. Tim had slipped a couple of battalions across to face them and British tanks went in behind a barrage. The Germans dropped a few shells back.
It wasn't enough to stop them though, and the tanks rolled over the defenders who fled in terror.
At this point one of the tank units bogged down. Given the amount of moving they had done, this was an average result.
The last remaining tank battalion rolled forwards behind a fairly light barrage. All the Germans had left was gas, so they stonked the tanks in return. Again, this was a pretty even combat, just down to the strengths of the respective barrages.
Sadly the Germans rolled a bit better than the British, and the battlefield was left littered with abandoned and burning tanks as the attack collapsed. Mercifully, night fell at that point, so we called it a day. So, summing up the final position.
The remains of Johns 59 Div, reinforced by 40 Div were holding the third line strongly in front of the German 119th Div.
In the centre, Petes 24th Reserve Div was holding the British second line, and the third line was a wasteland of wrecked tanks. Russells 17 Div had been overrun.
And finally over on the right, Tims 3rd Guards Division were well established in the full depth of the British Battle Zone.
Historically von Belows troops got hung up fighting in the Battle Zone and failed to make a clean breakthrough. Their attacks were disrupted by 2nd Tank Brigades counterattack and 59 Div was relieved overnight by 40 Div. The British troop density on the 3rd Army Front was much higher than that of Goughs 5th Army, so most of the German attacks here failed of didn't make much ground at all.
The game rattled along well, and certainly went right down to the wire. It was fun to run it, and the players seemed to enjoy themselves, although I always feel a bit sorry for the defenders in these sorts of scenarios. We had some discussions about things we might want to change, but tbh I'm quite happy with them as they are as they have a certain goofy charm and work well as a game.
It has prompted me to think about some ways to streamline OP14 a bit so it is more suitable for remote play, so I guess that will be my next WW1 project.


