Showing posts with label WW3. Show all posts

Monday, 29 June 2026

Strike Force One

 Recently on the Wargames Developments WhatsApp group the subject of Strike Force One came up. This was first produced in 1975 by SPI as an introduction to (board) wargaming and they used to give it away free at conventions etc. Hilariously it is still in use today on professional (as in DoD etc) wargaming courses in the USA, where the students are introduced to the basic game and then modify it for Cyber, drones, chem etc. One of my WD colleagues was involved in some of the chat about modelling chemical weapons, and some of the others were a bit disparaging about how simple it was etc. 

Anyway, I'd completely forgotten I own it, but of course it was given away free with Nicky Palmers 1977 book "Comprehensive Introduction to Board Wargaming", a book I read cover to cover at the time. Nicky Palmer also took part in the definitive two part series replay of 'Third Reich' in the AHGC General along with Marcus Watney, from which I learned a few more interesting strategies. I was fortunate enough to play a few games with Marcus in later years.

Anyway, I digress. I did play Strike Force One a few times in the 1970s and then forgot about it. After the chat on the group, I just had to give it another go.


It really is pretty minimal, ten counters, four turns but a surprisingly comprehensive set of rules as it has to explain in some detail concepts like CRTs, 'moving adjacent' (aka Zones of Control) etc. There is a page or so of advanced rules which include things like stacking and more advanced terrain effects.

The game is set in  a hypothetical WW3 invasion of West Germany with four US companies facing six Soviet ones. The Russians have four turns to capture two of the three towns.


The initial setup is fixed. ZOCs are sticky and in the basic games woods are impassable - lets assume everyone is mechanised and these are dense forests. Units can only stack one per hex, movement is four hexes and every unit has the same combat value. The CRT is pretty brutal, a 2:1 only gives a 50% chance of success and most results are retreats. A single 'Defender Eliminated' appears at 3:1, so most eliminations will be by forcing retreats on units which cant - due to ZOC, stacking or blocking terrain.


The Russians swarm unit X at 3:1 and push it back. This exposes unit Y to encirclements next turn if it doesn't do something. Combat between adjacent units isn't mandatory btw, but ZOC stop all movement and retreat.


The US try a 1:1 counterattack and manage to roll AE! that isn't good. They push Z forward to protect Y southern flank (it is on an objective).


The defence collapses spectacularly in concentric attacks. One Russian pins A in the village at the top.


By turn 4 it is a complete wipeout. 

OK, that was good to remind myself of the rules. I need to be much more canny with the US and make use of the blocking terrain to channel attacks so they are only at 2:1 or worse. Unfortunately the initial setup is fixed so X is always going to get attacked at 3:1.


On the next run the US did a bit better, and ended the game losing but with half their units and one village in hand.


Next game ended up much the same. I seem to recall the attacker having a much easier time of it when I used to play, but some of the people on BGG seem to think it is more balanced game, so I'm either a brilliant Russian or useless US player.


I thought I'd give it a go with the advanced rules. Woods cost 2MP but combat strength defending is doubled in them. Units can also stack two per hex. The US weathered the first attack, abandoned the centre and then occupied a lot of woods. The ZOCs block access to the villages and the defending units are doubled in the woods, and they all have open retreat routes. This is a much tougher position for the Sovs to attack. 


The Russians focussed on the north and managed to drive the US out of the woods (at 2:1 with four units) and then the village.


I'm not quite sure how the US managed to both lose a unit and get another surrounded! I must have made another mistake.


With two villages in the bag, the Sovs just put ZOC on the last US units to keep them bottled up.

That was actually kind of fun and an interesting blast from the past. I think it is very funny that serious people are still playing this, but I can see how it is a simple framework you could add chrome to - rather like the Neil Thomas One Hour rules.


There is plenty of stuff about it on BGG https://boardgamegeek.com/boardgame/5960/strike-force-one-the-cold-war-heats-up-1975 and you can always download it from the SPI games archive should you feel the inclination.


Friday, 29 May 2026

Room at the Inn

 Time for another trip to our on/off early 1980s WW3 series. This time we are joining the plucky socialist heroes of the Czech 15th Motor Rifle Division on their trip through Austria, previously seen here from our last game a couple of years ago: https://tgamesweplay.blogspot.com/2024/04/phaffing-around.html

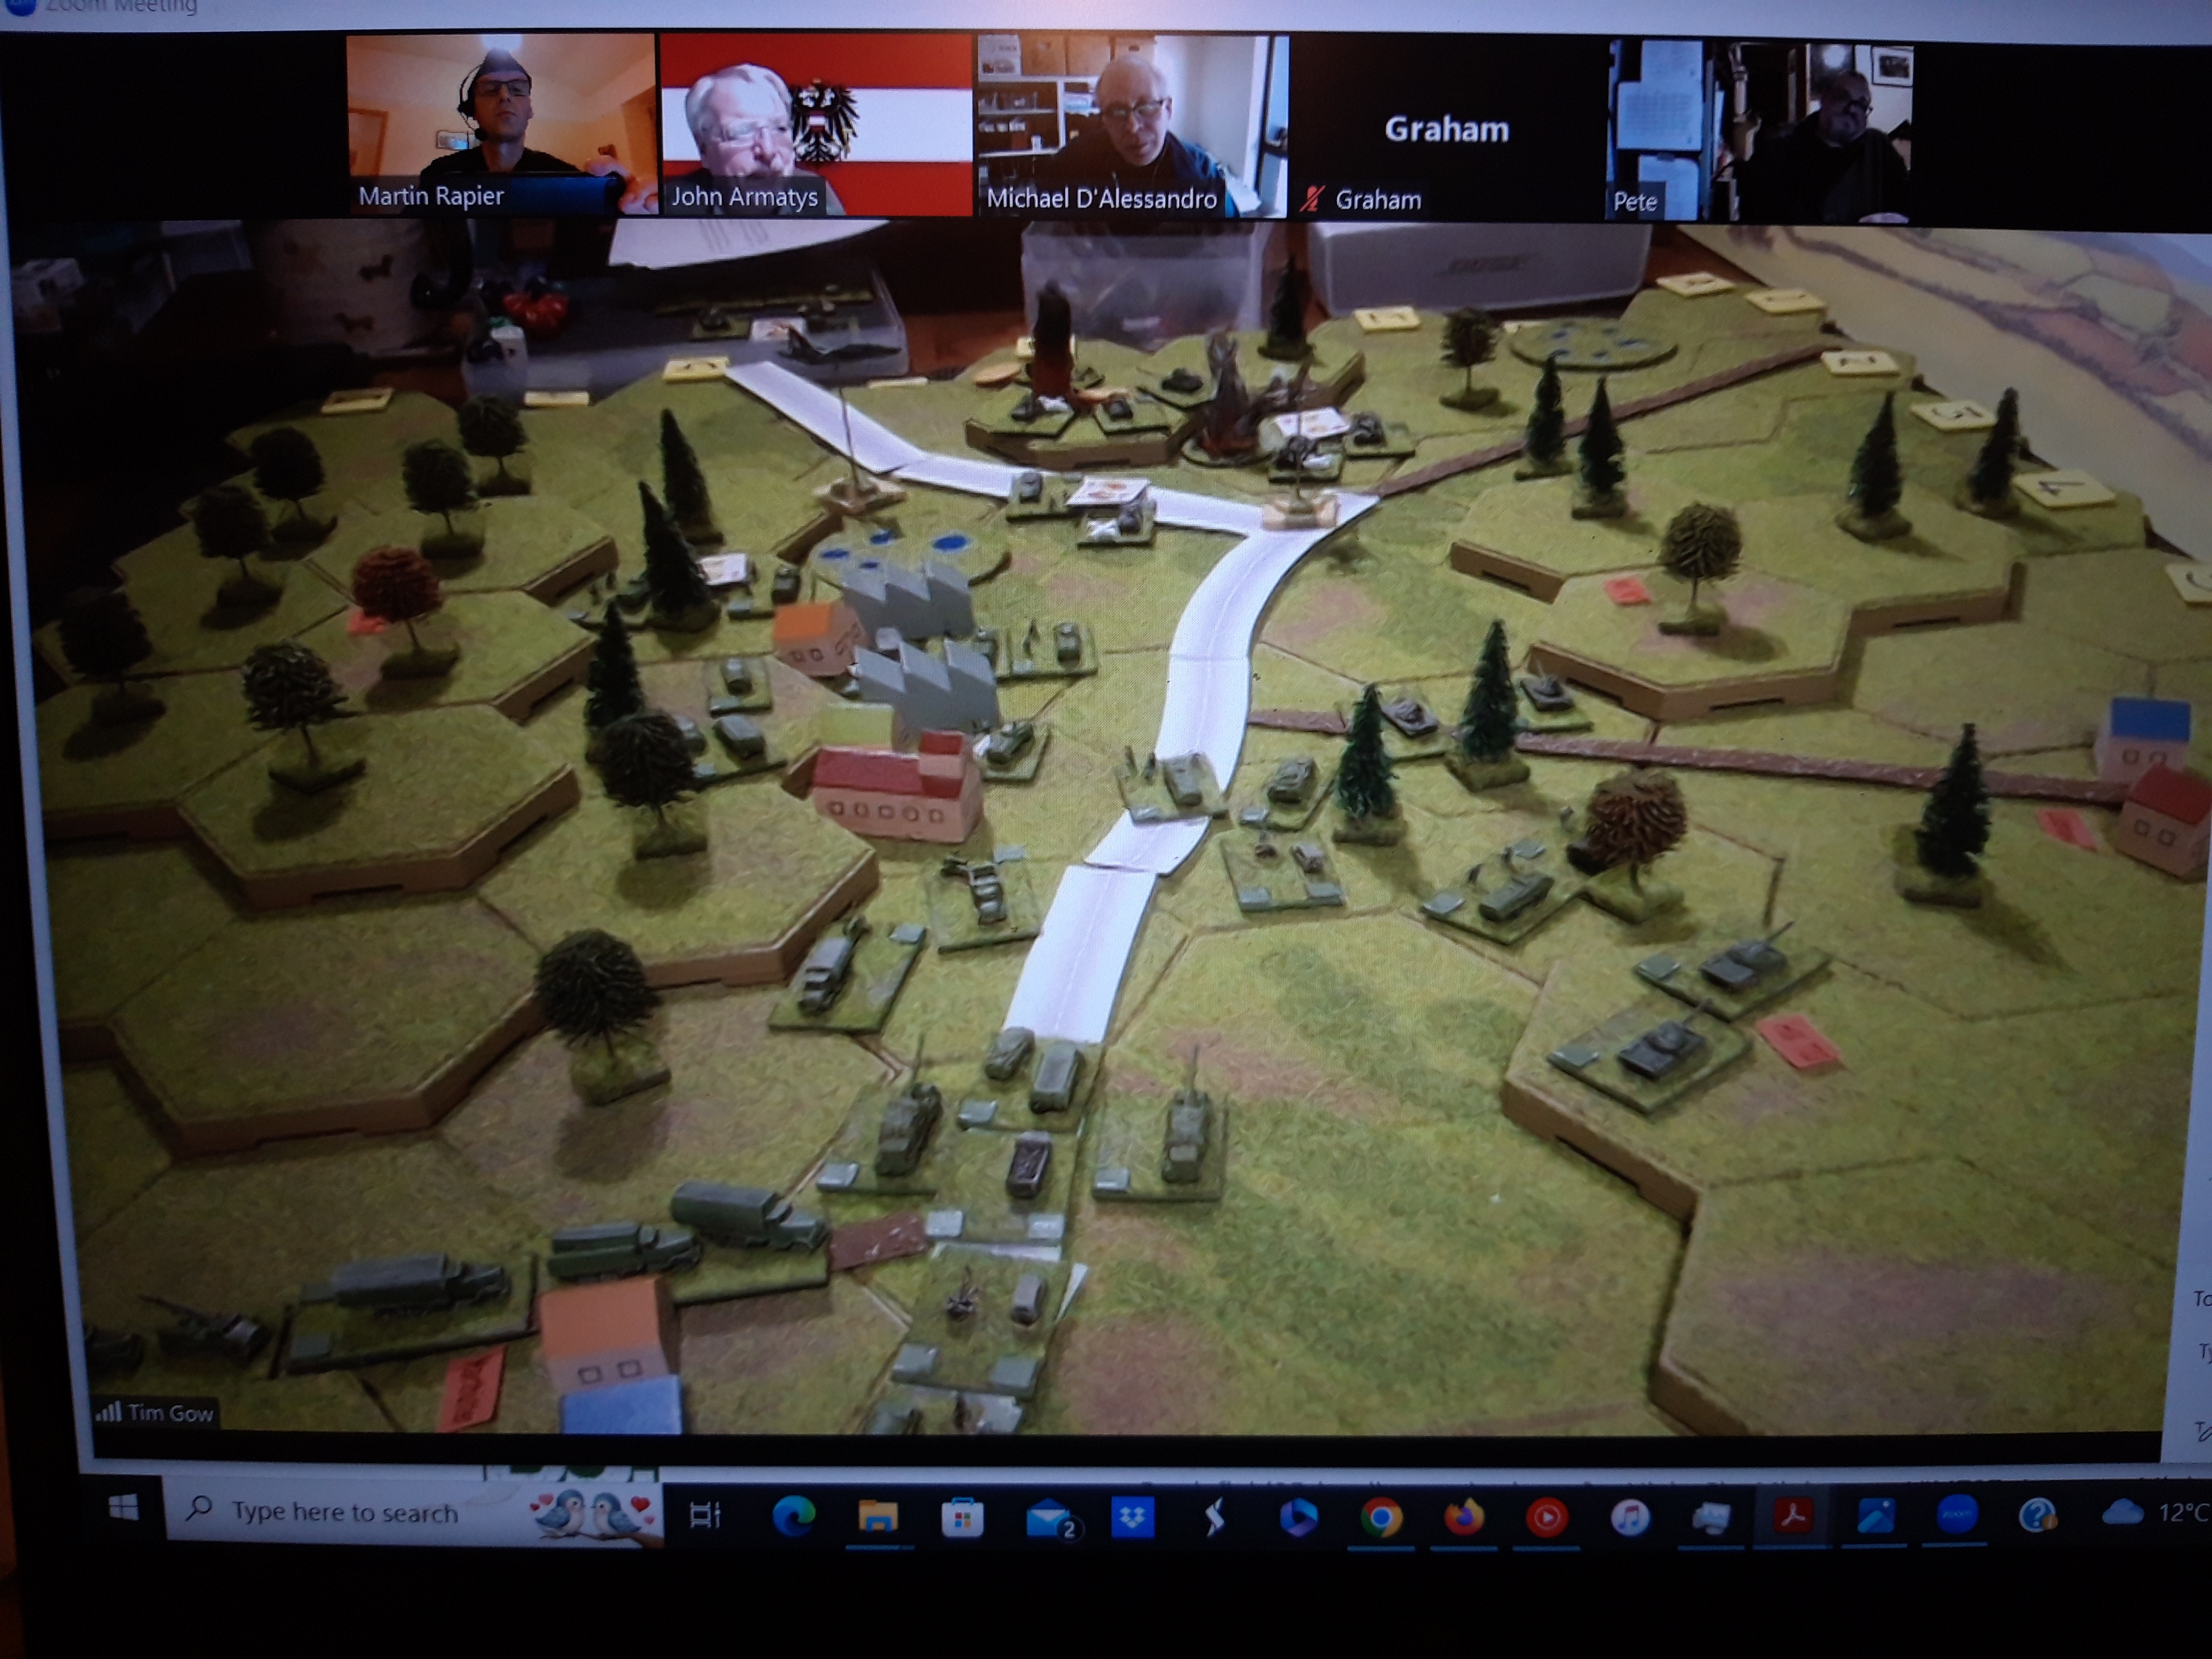
I really must dig out my central front stuff again, I've not put on a game for almost ten years now, but Tim was running this one with his 6mm toys and NATO Brigade Commander. And yes, he does have all right Czech kit, including wheeled artillery, wheeled 57mm AA guns etc. 


The field of battle, north is left. The River Inn runs down the centre of the screen and the outskirts of Brunau (sp? ) are visible at the top. The entire city is large, so the Czechs are going around it. The Inn also marks the border between Germany and Austria.


We had a pretty good turnout for this one. Pete did the overall plan for the Czechs, I was the division commisar to ensure everyone followed the plan in the correct spirit (and I also ran the divisional assets). Russell commanded a regiment of fearless Czech paratroops, Jim the 68th Motor Rifle Regiment and Terry the (Divisional) 20th Tank Regiment.

The Capitalist Running Dogs were Ian running the Bundeswehr, Micheal the Austrians and John A in overall command.

Our general scheme was to drop the paras at the far end of the bridge, and race to the rescue with the MR Regiment and Tank Regiment, clearing out any annoying pockets of resistance on the way.


As a couple of units I was assigned included traffic control units, I broke out my ancient copy of 'Armies of the Warsaw Pact'. Cheery Soviet traffic regulation troops can be seen on the left, while traffic regulation diagrams and unit march orders are on the right.


As we had no intel on the defences at all, and as we had been thoughtfully supplied with a bridging train, I thought it best to prepare a plan B just in case the paradrop wasn't fully successful....

Diagrams for assault river crossings, there were a couple of suitable sites west of the autobahn bridge with decent deployment areas for the bridging train. The manual did mention preparation of the opposing bank with tactical nuclear weapon fires. I'm sure that will be just fine and dandy.


Tim ran the game with his usual roving eye camera view, which certainly introduces an element of fog of war. Dimly visible in the distance is the head of  Jims MRR while in the foreground, the paras have had quite a decent drop without too much scatter and only discovered one company of German jaegers in the town beside the autobahn.

The explosions are from the Czech preparatory barrage, which was noisy and spectacular but ineffective.

Slightly alarming was what looked like an entire Austrian mechanised battalion in the outskirts of Brunau. An armoured combat team was on a rise overlooking the bridge and an infantry heavy combat team was in the city itself. You can just see Austrian M60s on the ridge above the bridge, accompanied by an AA platoon of Dusters.


Also noisy and spectacular was the unwelcome arrival of an Austrian Saab Draken. Fortunately it got distarcted chasing away the paras Antonovs.


The Czech barrage lands beside the bridge! (luckily not on it), and the Jaegers shoot up one of the para companies. It is hard to see but I've put a PT76 recce company into the village just above the bridge and a company of OT65s onto the river bank at the far end to scout out crossing sites.


More Germans rock up, another Jaeger company and a company of Jagdpanzer Kanone. The M60s and Duster shoot up the paras from across the river.

To everyone amazement, the para AT missile platoon manages to hit and knock out some of the M60s. Two more companies of paras assault the Jaegers in the town and destroy them, only to run into their own artillery barrage. The para commander clearly didn't read the fire plan. The paras took losses and hit the dirt.


The lead battalion of the MRR reached the southern end of the bridge as Austrian refugees fled in terror. The Regimental T55 battalion peeled off to engage the M60s, covered by an airstrike from venerable Mig 21s. Eagle eyed readers will spot the PT76s lurking around the pump control station on the dam. They have spotters for the divisional artillery attached and I want to get them in position to spot the Austrians. The dam is passable by foot troops, so another potential crossing site.


The leading APCs crunch across the bridge and link up with the paras, who have now taken losses from the German jaegers and are looking distinctly shaky. A Frogfoot strike misses the M60s, but they are finished off by the para AT missile platoon while the T55s knock out the Dusters.


Back at the river, the Czech OT65s start swimming across the river! Very carefully...


Back the bridgehead, the shattered paras fall back to regroup under German artillery fire and the Motor Rifle troops take up the fight. Czech Frogfoots target the Germans and inflict some losses.


A bit of a problem further back down the column! The Austrian mechanised infantry venture forth from the city and attack the MRRs (towed) artillery battalion. This of course blocks the autobahn and stops the bridging column moving on. Terrys Tank Regiment is marching on in column to cross the river, but someone is going to have to deal with the Austrian infantry.

Well, we will leave that conundrum until tomorrow night as we broke for the evening at that point.

The action resumed the following day. Given the 'flying camera' viewpoint, expect a certain degree of chaos as to what gets photographed for here on in, as things were happening all over the place.


Back down on the Autobahn, the Czech artillerymen tried to break off from the vicious Austrian infantry assault. They retreated in a disorganised fashion under the guns of the Tank Regiment. Unfortunately the Austrians were made of stern stuff and pursued them! 


Some Hinds turned up and set themselves up in range of the rampaging Austrians. The MRR HQ pulled off the road to allow the leading units of 20th Tank Regiment to approach the bridge, but unfortunately the trailing two tank battalions had become embroiled in the battle down on the Autobahn.


The Austrians meanwhile covered themselves with glory. They dispersed the Czech gunners, then routed one of the T72 battalions which tried to overrun them! Sadly they had taken heavy losses from close range tank guns by this point.


Hearing alarming radio chatter about incoming artillery strikes, they engaged the T55s more closely.


I had meanwhile called down the entire Divisional artillery (152mm guns and MLRS) on the impudent Austrians, and despite the proximity to the our own troops, just let fly. More Hinds appeared and both wings poured rockets into the melee too. 

A certain degree of friendly fire took place, but more importantly, the last of the Austrians had enough and disappeared, so we had (finally) cleared the southern bank of the river.


North of the river, the MRR finally managed to deploy two battalions and the Regimental mortar and AT companies while the paras dug in. With more force to bear, they soon saw off the Jaegers and consolidated the bridgehead as the Tank Regiment thundered past.


And what of the swimming OT65s? Well, they finally made it across the Inn despite some strong currents, and scouted out a bridge site. A German panzergrenadier battalion briefy made an appearance, took one look at the massed Soviet armour across the river and thought better of it and went away again. So, several hours later, a pontoon bridge went across the river upstream from the dam as an alternate crossing point. Bravo!

That was excellent fun and purely by chance we managed a strategic victory by seizing the Autobahn bridge intact. The paras had very fortunately managed to forestall the demolition team, and some of us had misunderstood the victory conditions and completely ignored the Austrians in Brunau, not realising we were supposed to clear them out until we'd already bypassed them. Ahem. It worked out OK in the end, even if it did cost us an artillery and tank battalion to do it

The game rattled along very well as ever, and reminded me that I really, really must dust off the central front again..


Friday, 28 June 2024

Kaliningrad 2024

 Another game brought to us courtesy of Ian R and the British Army Fight Club. This one is an extension of the Peoples Army of Voronoi system, using a Voronoi map of the Baltic States to examine various scenarios around a Soviet Russian incursion and NATO responses.


It is an area movement map, much like the previous game, although it now includes sea areas, capital cities and ports (cities facing sea areas). Units, movement and combat are still heavily abstracted to let players focus on the strategic situation, but there is plenty of operational decision making to be made.

A rather scary inclusion in this one is tactical nuclear weapons, whose use is fairly devastating, but carry an ever increasing risk of starting an all out nuclear exchange.

There are four scenarios, covering various levels of NATO readiness and involvement (or not) of Belarus. We started with scenario 1, which has a supine NATO, riven by internal divisions, but a neutral Belarus. The big victory points are if the Russians can make an uncontested land bridge to Kaliningrad by game end, but there are also points for destroying units, occupying capital cities etc. Only the Russians have tac nukes in this one, but if WW3 breaks out, both sides lose. More on that later.


Jim and I were the plucky Baltic States, Tim and Pete the wicked Russians. John ran the game and Ian observed and chipped in to answer questions. The active NATO countries (Finland, Poland, Latvia, Lithuania and Estonia) each start with a couple of units, and we have to take reinforcements from Sweden and Poland before the rest of NATO rocks up.

The Russians have a fair amount more stuff, particularly four units rammed into Kaliningrad. Fortunately all the Belarus units are neutral, although the Russians can pass through them. Our reinforcement rolls are penalised for the first two turns in this scenario. 


The Russian opening attack is devastating. The Polish border forces are wiped out, as are half the Baltic States forces. Russian reinforcements appear on the Russian border. Our guys mainly retire to their respective capital cities (you get a defensive bonus defending your capital). The Russians have been fighting, not moving this turn.


By game turn 6, things aren't looking too great. We have at least held off the Russian attack against Helsinki, and the Swedes arrived to help out. Talinn has fallen, but Vilnius and Riga are holding out. The Russians have pushed across the map and have their land bridge however.

The Baltic Fleet is floating off Kaliningrad, while the Swedes are afloat in the Gulf of Finland, threating St Petersburg with amphibious attack. The Polish reinforcements have now arrived in eastern Poland.

The game ends when the sum of 4D6 equal the current turn (a ceasefire is declared), so we have a way to go yet. So far we've lost 8 NATO SP and killed 5 Russian.


Sadly Vilnius finally falls to a mass Russian assault on Turn 8, and Poles disappear in a can of Instant Sunshine as the Russians fire a barrage of nukes. This wipes out the Poles, and produces a single nuke marker. On a roll of 1, WW3 breaks out.... it doesn't.

Two NATO naval units arrive and lay siege to Kaliningrad.

Sadly this produces another nuclear response, and the fleet goes to the bottom. WW3 on a 2 or less.... phew, we survive another turn.


NATO doesn't give up, more ships and troops pile into Eastern Poland and lay siege to Kaliningrad. The Swedes are just outside the port of Riga, where the Latvians are still holding out. We broke for the night at that point. 


On turn 10, the Latvian defenders finally give up, just as the Swedes debark into Riga and continue to hold the city.


The force ratios are just too much in the Russians favour now. The Swedes are kicked out of Riga again, and our ground troops in Kaliningrad are wiped out. The Russians set about widening their land bridge and occupy Eastern Poland.


NATO (finally) gets some good reinforcement rolls and massed troops pile into Eastern Poland and Southern Lithuania to contest the land bridge. By this time we are deliberately stacking troops up and encouraging the Russians to nuke them, as if WW3 starts both sides lose ie it is a draw. I think that needs thinking about in terms of victory conditions.


The Russians wisely don't rise to the bait and instead our attack into Lithuania is beaten back. All the Baltic States have been overrun now with no possibility of liberating them, and as the game clock runs out, it is a massive Russian win. The geographic locations are largely irrelevant in terms of VPs as the Russians get 22 points just for destroyed NATO units, whereas the land bridge is worth a measly 5 VP.

Well, that was a total wipeout, but a very compelling game with lots of serious decisions to be made. It certainly doesn't bode well for the Baltic States in future - which idiot thought NATO expansion was a good idea? Although the game was thought provoking and fun to play, I do think some of the victory conditions need looking at. The relative VPs for geographic locations vs losses for one - the Russians really don't care (much) about losses. Secondly, the nuclear aspects. The optimum strategy for the player losing is to start WW3, as then they salvage a draw. This really doesn't seem right, as the end of civilisation probably isn't a price to casually pay over whether the Russians have a land route to Kaliningrad or not. My suggestions was that if all out nuclear war breaks out, the player who fired the most tactical nukes to start it automatically loses.  

Anyway, thanks to Ian for the game design and John for putting it on. 


Friday, 12 April 2024

Phaffing Around

 Micheal was very keen to play NATO Brigade Commander as intended - in a Cold War setting (what I tend to think of as 'modern'!), so Tim kindly put on a game. We've been doing a cold war gone hot set in 1981 for many years now, I tend to do the Central Front, while Tim does the more peripheral theatres.

This weeks excursion featured Czech forces invading Austria, always a bit of a side show in SPIs mighty 'Next War' as I recall. 


Here we are near the town of Phaffing in deepest Austria. The River Inn is off to the left (west) and Czech columns with masses of bridging material are heading west down the Autobahn.

Micheal and I took the Czechs, with their OT64 APCs and interesting collection of T55s and wheeled artillery. John (later joined by Pete) took the Austrians. I recall first seeing Tims 6mm Austrians at the old Polish Club where we used to meet, so that was a very long time ago indeed.

Micheal and I each had a Motor Rifle Regiment, and I was also notionally the division commander. My MRR was a long way down the motorway, so I was mainly there to provide guidance and support to Micheals regiment, as it was his first game. We also had the divisional T72 battalion, a battalion of 152mm howitzers and an entire brigade of bridging engineers. Our aim was to get the engineers safely off the map to the west. 

The terrain was extremely poor for wheeled APCs, with lots of steep hills and heavy forests, so the road network was going to be key.


The opening moves saw the 1st MRR recce company driving down the motorway to the outskirts of Phaffing. Amazingly it was unoccupied. We'd been very concerned about the bottleneck there. 


The recce pressed on as the main body of 1st MRR arrived. Standard Warpac march order, so a MRB in the lead, with the Tank Battalion behind. We'd opted to bring the engineer brigade in straight after 1st MRR, as I had a plan...

The recce had meanwhile spotted some AFVs on the far ridge overlooking the motorway (dimly visible in the distance). These loosed off a some shots at the recce company, knocking out some BRDMs. They were Austrian Kuirassier SP tank destroyers! Tim had converted them by attaching an AMX13 turret to an M48 hull, and very convincing they looked too. 

The TDs had got the motorway firmly locked down, hull down on the ridge and with a big ZOC over it too.


Well, there wasn't much we could do about it for now. The lead MRB occupied Phaffing just as the Kuirassiers finished off the BRDMs before they could scoot. The T72s also showed off, roaring across country towards the tree line (they are visible just right of the motorway). 

It was a good job we'd occupied the town as now a large Austrian Panzergrenadier Battalion came roaring up the motorway, and split into two groups. One set up in front of the Kuirassiers, while other splashed through a marsh, heading for Phaffing.


Micheal now began  to deploy more of the column, and is it broke up into its constituent battalions, the inevitable friction of card activation resulted in various traffic jams. 


We had at least managed ot get our tank battalions into (and beyond) the tree line, along with the Regimental mortars, AA and AT companies. Another MRB and the Regimental engineers filtered along the tree line south of the town.

We were very fortunate in that the Austrian Panzergrenadiers attempted a hasty assault into Phaffing, but failed their morale test and were now pinned down in the marsh taking increased casualties from the defenders. We were less fortunate in that an entire battalion of Austrian M60A1s had turned up, and now AP shells and missiles flew back and forth down the valley.


The rest of 1st MRR now rolled on, including the Regimental artillery battalion, which would be very helpful. Austrian artillery now hammered Phaffing, but our MRB hung on despite taking heavy losses. Our T55s weren't doing so well against the Austrian armour however, and a number were now burning. The T72s were fine though and blasting away happily at the M60s.


The Engineer Brigade finally arrived. I parked them down this very handy side road, to await an opportunity to advance and free up the motorway for 2nd MRR (mine).

We broke for the evening at that point.


Close view of the battle for Phaffing. We've got two MRBs and the Engineers up now, although the Engineers are disorganised. The Austrians are still disorganised and shot up in the marsh, you can also see we've got a couple of hits on the M60s. 

1st MRR is virtually fully deployed for battle now (finally) despite the difficult terrain so hopefully we can stop just being targets in the Austrian shooting gallery. Our T55 battalion has been completely destroyed, the T72s have taken some hits and one MRB is down to half a company(!).


The main Austrian position. M60s top right, Kuirassiers and AA on the central hill, and remaining Panzergrenadiers bottom right. The Austrian Regimental HQ is on the road at the bottom.


Next evening, the Divisional 152mm battalion comes rolling on, followed by 2nd MRR. I have a cunning plan! The artillery is going to deploy each side of the highway, and the MRR column heads northwest cross-country - I'm aiming to reach that valley in the centre right and form the entire Regiment up their prior to assaulting the Austrian position. There is no point trying to conduct a passage of lines with 1st MRR, it would just be chaos.


Suddenly, things start to go our way. So suddenly I only took one photo in fact. A flurry of Czech airstrikes arrive, called in by our numerous artillery HQs, as does a storm of mortar and artillery fire, backed up by direct fire from the T72s and Sagger company.

Under the massive volume of firepower, the Austrians melt away. The Austrian RHQ and half the panzergrenadiers are destroyed, the Kuirassiers and M60s take more hits and almost all the survivors fail their numerous morale tests (152mm stonks are scary! airstrikes are more scary!!), only the M60s hang on.

With the Austrians in disarray my plan for 2nd MRR is hastily revised. My lead MRB and Tank battalion are already in the tree line, so they form up into a powerful tank/mechanised Forward Detachment. The rest of the column just plans to bash on right up the motorway and overrun the disorganised Austrians.


There is no need however, with their HQ gone and all other units with heavy casualties, the Austrians pull back.


The Bridging Engineers are completely unscathed - I hadn't realised the Austrian objective was to damage (or ideally destroy) them. Parking up in the side road was the best decision we made.

That was really good fun, and re-kindled my interest in WW3 again. This was the period NBC was written for, and it just works so well. I've already dug out my notes on the existing campaign, I hadn't realised we'd already done a dozen games on the hypothetical 1981 war.