Wednesday 30 October 2019

Peter Pig 15mm Tiger 1

As I noted in my recent post on the Peter Pig July 2019 special offer, along with stretchers, bicycles and Nebelwerfers, I may have bought another Tiger. You can really never have too many Tigers, and I have delighted over the year in finding scenarios to field them only to have the Germans hopes dashed as they run into walls of 17pdrs, medium artillery, HMS Belfast or waves of T34s and T70s. Luckily they are omnipresent in Normandy (the British sector anyway), turn up at Arnhem, the Seine Crossings, much of the Italian Campaign as well as many of the key actions on the Eastern Front


This is a pretty standard mid-war model. The track links and cables are moulded on. To keep the weight down it is largely hollow, even the tracks are basically just stuck underneath the hull superstructure, but even so, it is a hefty lump of lead.


It looks fairly terrifying from this angle. Just what you'd need to guard a bank in occupied Alsace from Clint Eastwood and Donald Sutherland. The gun barrel is somewhat overscale, nearer 188mm than a puny 88. But hey, its a Tiger.


The rear engine deck is exquisite, and overall there are tons of deep recesses and nice sharp edges to pick up a wash and a drybrush respectively.


View from the side. The only slightly annoying thing is that the cable obscures the normal balkan cross location point so I ended up putting the crosses further back, which is a much more 1942 type arrangement. I also found that there wasn't enough room between the gun pivot and pistol port to fit more than two turret numbers. Perhaps I should have used smaller decals, but it is what I had. Not the end of the world in any case. 


Here it is with some friends, seizing lebensraum on the dining table. If starting on Tigers from scratch, these days I'd go with a plastic one, either PSC or Zvezda, but I already had two old PP Tiger 1s, so I got another to join them as the plastic ones would look a bit slight next to the metal monsters.


The older models have held up really well. I bought them almost 20 years ago now, and the new one is exactly the same overall dimensions. This is a nice clean model, missing its front outer roadwheel, which was a common eastern front modification to deal with freezing mud. It has an eager looking commander (also PP). I don't think PP make this track configuration any more, but I didn't look too hard.


Its mate is a 'battle hardened' variant. It is covered in dents and scrapes, missing track guards and all sorts of junk like spare wheels wired to the engine deck. It is one of my favourite models and has fought in lots of actions over the years. It reminds of the PP Stug IIIG which has a bicycle on the engine deck.

They are all done in the inevitable dunkelgelb, with green/brown disruptive camo. The older ones look a fair bit lighter and cleaner as I didn't dirty vehicles up as much when I painted the original ones. These days I prefer to slap a lot of mud on, it certainly makes painting the tracks a lot easier. I could dirty the old ones up I suppose, but it is hardly a priority.

Saturday 26 October 2019

Ocana 1809

John put on another game in his tour of unknown battles of the Peninsular War, this one was hot on the  heels of Tims 1808 matrix game. This was the Battle of Ocana, some 35 miles south of Madrid, featuring Joseph Bonaparte and Marshal Soult taking on a huge Spanish Army under General Arezaga hiding behind a ravine.

Tim G, myself, Richard and Diego took the French, while Tim C, Jerry and Graham took on the wicked Spaniards.


View from the French side. Tims cavalry are on the left, I've got the brave Poles and Battenburgers while Diego has a great mass of French infantry. Basic plan, avoid all the Spanish in the town and roll up their right flank. Simples! We had 12 turns to destroy the entire Spanish Army...


My Allied contingent led the way, marching rather slowly to  let the French catch up. Each unit represents a division, so as there were no grand batteries, all the artillery is factored in.


Over on the left a massive cavalry battle rapidly develops while some of the Spanish form square.


It is all very bloody and unpleasant!


The French infantry have caught up, so a massive three division assault goes in against the Spanish right.


The superior quality of the French Army soon tells and rout the first Spanish division. The square is proving a tough nut to crack though.


The French cavalry inexorably drive their opponents back.


Another Spanish division is routed. Time to stop for a turn and reform.


Sadly things are looking a bit sticky at the square. The Battenburgers pile in but also suffer some disorder. One more hit and the Poles are going to rout. These Spanish were apparently armed with machineguns judging by the fire damage they put out.


Some French infantry took on the far left Spanish square after shooting them up first. The Spanish defensive fire was still astonishing though.


In the centre our chaps rallied and Richard committed our reserve cavalry and infantry to assault the town.


The last of the Spanish cavalry left the field, and at that point we called it a day.

The Spanish were left with three divisions surrounded in the town and the rest of their Army routed. The French had lost one base of troops. So a resounding victory, as in real life. I've done a fair bit of commanding the Spanish and it can get a bit dispiriting facing the French without a significant terrain or numerical advantage, and I think the Spanish commanders did the best they could under the circumstances.

There are a couple of oddities with the rules but they work well enough and produce a fast game which looks like a proper wargame.


Tuesday 22 October 2019

Zvezda 1/200th SB-2

Along with the ground attack planes and fighters, I thought my Russians could do with some bombers and as my efforts to find cheap Lend Lease B-25s failed, I went with some Zvezda SB-2s in the delightfully eccentric 1/200th scale.


Here are the pair of them. It is a good job they are 1/200th as their wingspan is enormous. These are the versions with in-line engines rather than radials (which I think makes them a bit more modern?). Well, who cares really, they are great big bombers covered in red stars and I'm sure they are perfectly capable of showering bombs all over cowering Hitlerites until 1945. 


The kits went together reasonably well, most of it was fine but the tail planes were a bit fiddly due to Zvezdas insistence that these are 'snap fit' models. The elevators sort of overlap each other in a slot in the fuselage and in the end I just gave up trying to make them fit and slathered them in glue instead. They are still a bit wonky but hey ho.


I just did these plain green (Humbrol Army Green) with plain red stars and tail numbers in varying styles. There is a fair bit of perspex on these and the smaller scale means the bars are very small indeed so I gave up trying to paint them and did them with a micron (0.05mm) pen which seemed to come out OK.


Usual plain underside. The kits come with options for underact retracted or deployed. One casualty of my fat fingers was the antenna post on the underside. It was never going to survive an undercart up use anyway so it is probably better removed before painting. As with my other planes, I lopped of the prop blades to save my wargaming pals doing it for me and I think it looks better.


And off they go to bomb Berlin, as the bomber will always get through. I was really pleased with these, they came out well and look the part. I've already got some 1/300th SB-2s but the bigger models are just more pleasing. 


Saturday 19 October 2019

Battle of Lodz - Kutno

I've been reading Pritt Buttars excellent series of books on the Eastern Front in WW1, and I was inspired to do a linked scenario mini campaign (similar to my old 6th Panzer Div in Lithuania or Siege of Tarnopol campaigns). Rather than do boring old Tannenberg which is amply provided for, I thought I'd have a go at Von Mackensons attempt to encircle and destroy 30 Russian divisions in western Poland in late 1914. This short campaign later became known as the Battle of Lodz, after the crucial communications centre the battle focussed around.

The Germans planned to drive south between the Vistula and Warta rivers, cutting the rail lines through Lodz and isolating the Russian forces massing in western Poland preparing to invade Silesia. The Germans were outnumbered at least 2:1, but lousy Russian staff work and logistic limitations had led to a huge gap opening up on their northern flank.  The gap was vaguely covered by 5th Siberian (Reserve) Corps, but it too had serious logistic issues as the Vistula had few crossings, and it was easily brushed aside by Von Mackensons army in early November.

Rather than game the initial attack (which is unwinnable for the Russians), a more interesting action was the German attempt to exploit south while Russian forces hurried northeast from Lodz to protect their rear.

This engagement covers the battle at Kutno on the River Bzura on 14th November 1914. V Siberian (Reserve) Corps has retreated in some disorder from the advancing Germans and is regrouping around Kutno. II Corps is moving out from Lodz to protect the  northeast approaches to the city. Unkown to them, no less than eleven German divisions in four Corps are advancing from the north....

We played this using OP14 (with Tims hex modifications) and my 15mm WW1 stuff on Hexon terrain. The hexes are 2km, turns 1.5 hours and each unit is a brigade (or Cavalry Division) of several thousand men or several dozen guns organised into Corps sized formations.


View the the east. V Siberian is grouped around Kutno in the centre, Von Mackensons Army is off to the right and Lodz the top left. Far ahead is the Warta and behind us the Vistula. The rail line through Kutno is the main LOC for V Corps.


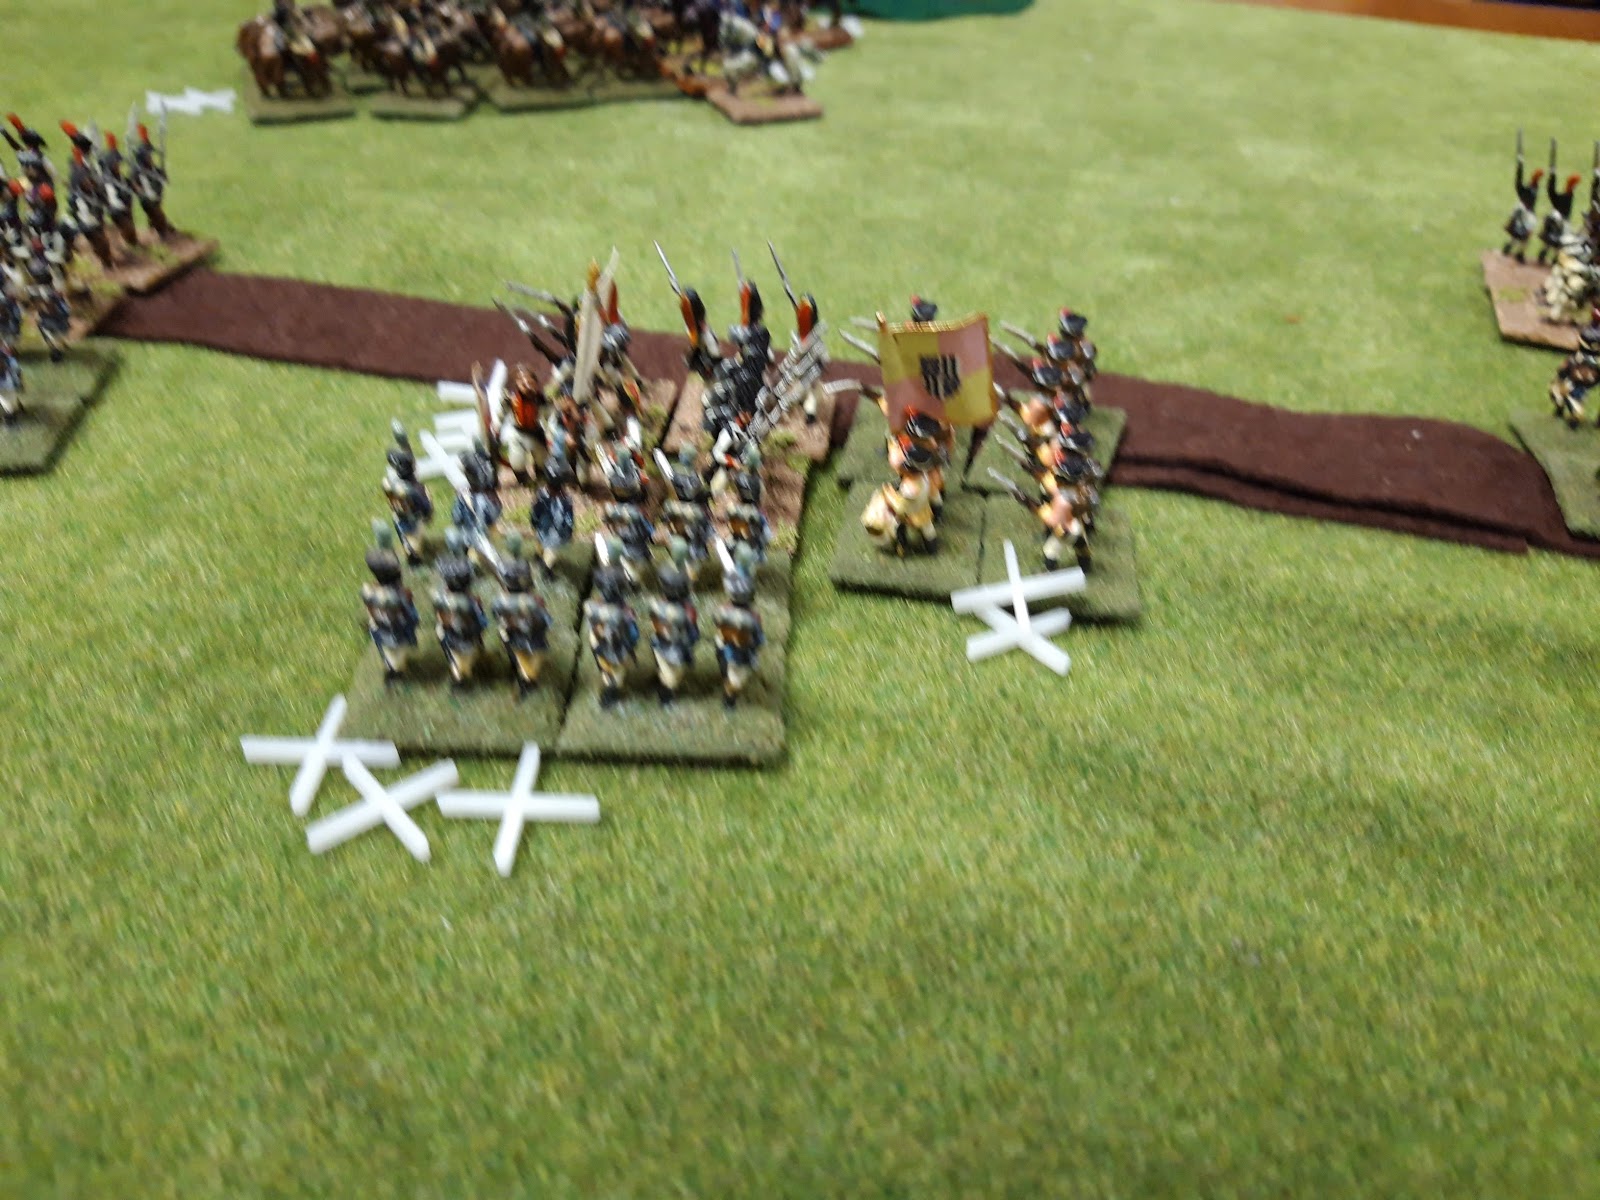
V Corps around Kutno. After losses in the opening actions they are down to three brigades. As a reserve unit they have no heavy artillery, as Russian reserve units were fairly poor, they on a D12 (big dice are bad in OP14).  Jerry and Diego took the Russians. Jerry positioned his troops with one eye on that bridge over the Bzura, a raging torrent at this time of year.


Diegos IInd Corps comes marching on. The weather was determined to be thick fog (it is mid November in Poland in a river valley, so hardly surprising). This meant the opening moves would involve blundering around in the mist until it cleared.


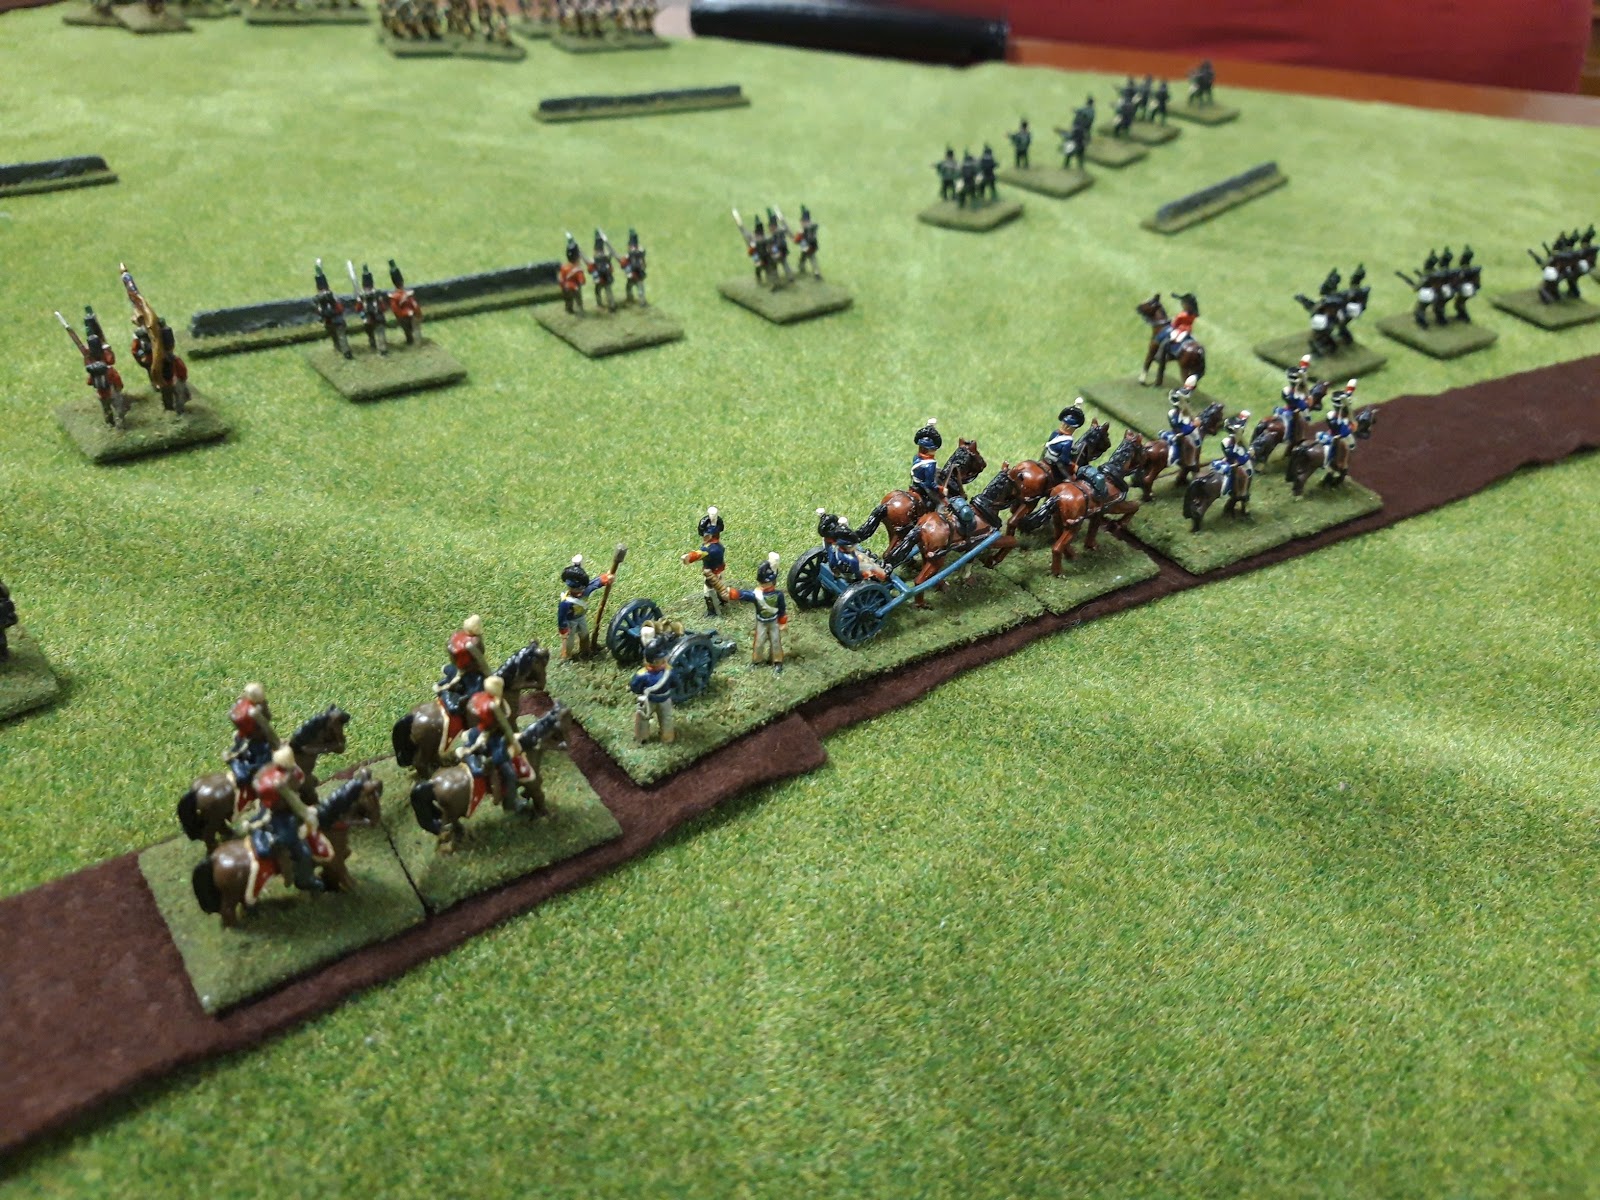
The German XVII and XX Corps come marching on, commanded by John and Tim respectively. These were regular German infantry, fleshed out with garrison troops and well equipped with field guns and 150mm howitzers. The thick fog grounded 16th Flieger Abteilung though.


Close up of XX Corps in march order. The fog provided welcome cover from observation.


As the Germans closed in, V Corps cunning plan became apparent, a phased withdrawal across the Bzura. Jerry kept one brigade deployed facing the Germans while everyone else hightailed it for the rear. The challenge of moving 30,000 men and all their transport and guns across one bridge should not be underestimated!


XX Corps approaches Kutno to find it deserted.


As the marching columsn shuffle slowly over the river, the rearguard deploys defensively, including its MGs. This posture provides greater defensive firepower and better cover against artillery fire. Jerry helpfully points out his brave Maxim gunners.


XX Corps presses forwards up against the rearguard and deploys its artillery.  There is every possibility the Germans will catch the Russians, depending on the card draw next turn, especially as the Russians are hampered by logistic problems.


Yet another German unit rolls on, the mighty XXV (Reserve) Corps, reinforced with 3rd Guards division and an entire Cavalry Corps under von Richtofen (a relative of the famous fighter ace). This is Von Mackensons schwerpunkt, tasked with exploiting south and cutting the rail lines from Warsaw to Lodz.

In another exciting development, the fog clears and 16th Flieger Abt takes to air , spotting for XVII artillery which inflicts losses on the Russians massed behind the Bzura.


Jerry manages to break contact with XX Corps and retires over the river. The Germans can only watch in frustration as they slip away. The cards were kind to the Russians. 


Von Richtofens cavalry spread out into a screen along a 12km front.


XXV (Reserve) Corps marches steadily south, its route obstructed by clumps of woodland. The November days are short and night will be falling in a few hours.


In the west, XVII Corps keeps on shelling the Bzura crossings spotted by aircraft, while the Russians frantically dig trenches.


Having pushed V Siberian behind the river, XX and XVII Corps deploy and start to dig in as night falls.


Meanwhile von Richtofens cavalry and XXV Reserve Corps head south. The siege of Lodz is about to begin.

That all went rather well and amusingly both sides were able to claim victory. Jerrys rearguard action was really quite tense as the units are all large and cumbersome, so it was quite a feat to break off with minimal losses. In the end there was little in the way of intense infantry fighting as both sides manouvered for positional advantage, and all the losses were inflicted by artillery, the Russians suffering quite heavy losses despite their entrenchments.

Historically V Siberian was pushed out of Kutno rather than voluntarily withdrawing, suffering considerable disruption in the process. XXV Corps then managed to break through. So it all ended up quite historical. The foggy start and short day added a certain urgency to the proceedings, while the card activation of the Corps added an acceptable level of friction. The Russians suffered a certain amount of dithering and even a friendly artillery fire incident, and the Germans were impeded by the various obstacles in their path. The aircraft spent most of the day on the ground, but on the odd occasion they put in an appearance, they added a significant force multipler. This is the period OP14 was designed for, and it works very well.


Tuesday 15 October 2019

Peter Pig German WW2 Cavalry

I have been slowly building up an essential force for any WW2 German player, cavalry! While the Heer only had a single cavalry division, later converted to panzers, cavalry were omnipresent in divisional and regimental recce units and the SS also had a bit of a thing about cavalry brigades and divisions.


Here they are so far. Enough for a Megablitz cavalry division, and a number of squadrons for less meglomaniac rules systems.


I used a mixture of the carbine armed and cavalry command figures to get a reasonable mix of poses. They are all nice clean castings, and joy of joys, the riders are moulded onto the horses. I wish more manufacturers would do this for wargames quality pieces.


They have a decent range of horse and personal equipment, which all paints up nicely. Like most of my WW1 cavalry, I did most of them based in pairs, but also did some single based figures.


The command pack includes officers in both crusher caps and helmets. Ideal for command stands. 


I did a handful of single based figures, they are really useful for recce stands or to use as mounted command stands. 

So a bunch of lovely little figures, really easy to paint and useful for lots of things. I generally don't like painting horses, give me a tank any day, but I've settled on a reasonably fast method over the years. A base  coat in some sort of brown (GW Bestial Brown is ideal), I try to use a mixture of three shades. Pick out the manes and tails in either black or dark brown (depending on the shade of the horse), then give the whole thing a heavy dark brown inkwash. That runs into the crevices and gives the horse a bit of sheen. Finally a light drybrush will pick out the highlights on the mane, tail and tack and then follow it up for odd dobs of white for sock etc which make them look a bit more natural. I used to pick out the tack but ti is rarely worth the bother and wash and drybrush seems to work just as well.

Friday 11 October 2019

Battle of the Coa

Johns trip to battles of the Peninsular took us to the Siege of Almeida this week, and the Battle of the Coa.  At last, some decent troops to fight the Frenchies!

Almeida was held by an Allied garrison, and the Light Division of around 4,000, under 'Black' Bob Crauford was rather unwisely floating a round outside it, despite being warned by Wellington that it was unsafe to stand on the far side of the river. Meanwhile Ney was marching towards Almeida with over 20,000 men and when his cavalry pickets found the small British force in the open, he hastened to attack at once in the early morning mist.


The Coa and the road leading to the fateful bridge. In real life it is a steep ravine (hence the bend in the road) and the whole area was deemed to be out of LOS unless units were actually over the edge of the ravine.


Almedia, with various enclosed fields around it. These were ruled to provide cover for skirmishers only, as irl they didn't prove much of an obstacle.


Almeida! a scan from Google Earth.


The Light Division deploys covering the road to the bridge. The cavalry picquets and Chestnut Troop, RHA, are already formed up to pull back. The infantry are two battalions each of British and Portuguese light infantry, and in the far distance, the 95th Rifles. Sharpe and Harper are in for a hot day. 


Portuguese Light Infantry in the foreground. They are all formed up in skirmish order to take advantage of the walls. Tim and I were the British, and we thought we had a cunning plan.


RHA, flanked by cavalry.


Neys leading division. There are an awful lot of them! Thirteen infantry battalions and four cavalry regiments. Plenty more behind... Graham, Tim C and Jerry took the French.


Our opening volleys were very effective, which rather took the swagger off the advancing French.


The French cavalry shook out into line, but took some losses from the fortress guns. Almeida had over a 100 pieces of artillery mounted on the walls, but somewhat unhelpfully, most of them were sited to fire in enfilade along the bastions.


The surviving French made contact all along the line. Attack columns vs skirmishers, not so good...


Our guys evading back, becoming disordered in the process. At least they had bought some time for the cavalry and guns to get over the river. Unlike their real life counterparts, Chestnut Troop made it across without leaving a disabled cassion to block the road (they passed all their move checks, much to our relief.


The guns began to deploy on the far side of the river, while some Portuguese infantry headed for the bridge. The cavalry fanned out to clear the way.


By now we were in a ring around the knoll covering the bridge as one battalion was over the bridge and another was lined up to do so. Alarmingly two French cavalry regiments were sneaking around the left flank in a typical wargamery fashion.


As the French closed in, were formed up into close order. 95th on the left, Portuguese in the centre, and 'South Essex' on the right of the picture. Crauford went to join the 95th as they seemed to be facing the bulk of the French.


And in they came. Two battalions against the Portuguese, two more against  the 95th and a cavalry regiment against the South Essex.


The 95th didn't do to badly at first, inflicting some losses on the French.


But sadly in the ensuing melee came off much the worst and broke contact into a sort of pudding shaped skirmish formation. To add insult to injury, Crauford was wounded and went in search of medical attention.


The French cavalry followed up into devasting defensive fire from across the river and the regiment routed, leaving a sad pile of white crosses behind.


The South Essex had seen off the French cavalry at some cost and fell back to the knoll as the 95th retired across the river. The Portuguese did not manage to score a single hit in melee at all, and unsurprisingly were overwhelmed by the French infantry.


At this stage it was pretty much all over and the South Essex were clearly going to escape. Ney declined to repeat his historical counterparts series of suicidal assaults over the bridge, so with four battalions over the river it was duly declared to be a 'tactical victory'.

Fighting retreats in the face of overwhelming force are always difficult to model and to game, but that worked OK. Our original plan proved to be over-optimistic in the face of French speed and strength, but we just got away with it. The French didn't feel too had done by as they'd routed the 95th, wounded Crauford and obliterated one of the Portuguese battalions, albeit at the cost of two destroyed cavalry regiments and hideous infantry losses. Ney had flung himself into the heart of the action time after time and missed death by a hairs breadth. Truely, the bravest of the brave.