Sunday 30 October 2022

Stones River

 Another outing to the Western ACW campaign, this time Stones River/Murfreesboro. This battle was fought in late December 1862 after the failure of Braggs invasion of Kentucky. Rosencrans led the Union Army of the Cumberland from Nashville to fight Braggs Confederate Army of Tennessee camped outside Mufreesboro in the depths of winter.


Battlefield from the south. Stones river runs north-south down the middle, Murfreesboro is at the road junction on the right and the turnpike to Nashville runs off the northwest corner. Although there are woods, it is late December so little undergrowth or foliage so they just restrict LOS. The rivers are fordable to infantry and cavalry and crossed by numerous fords and bridges, but still an obstacle. 


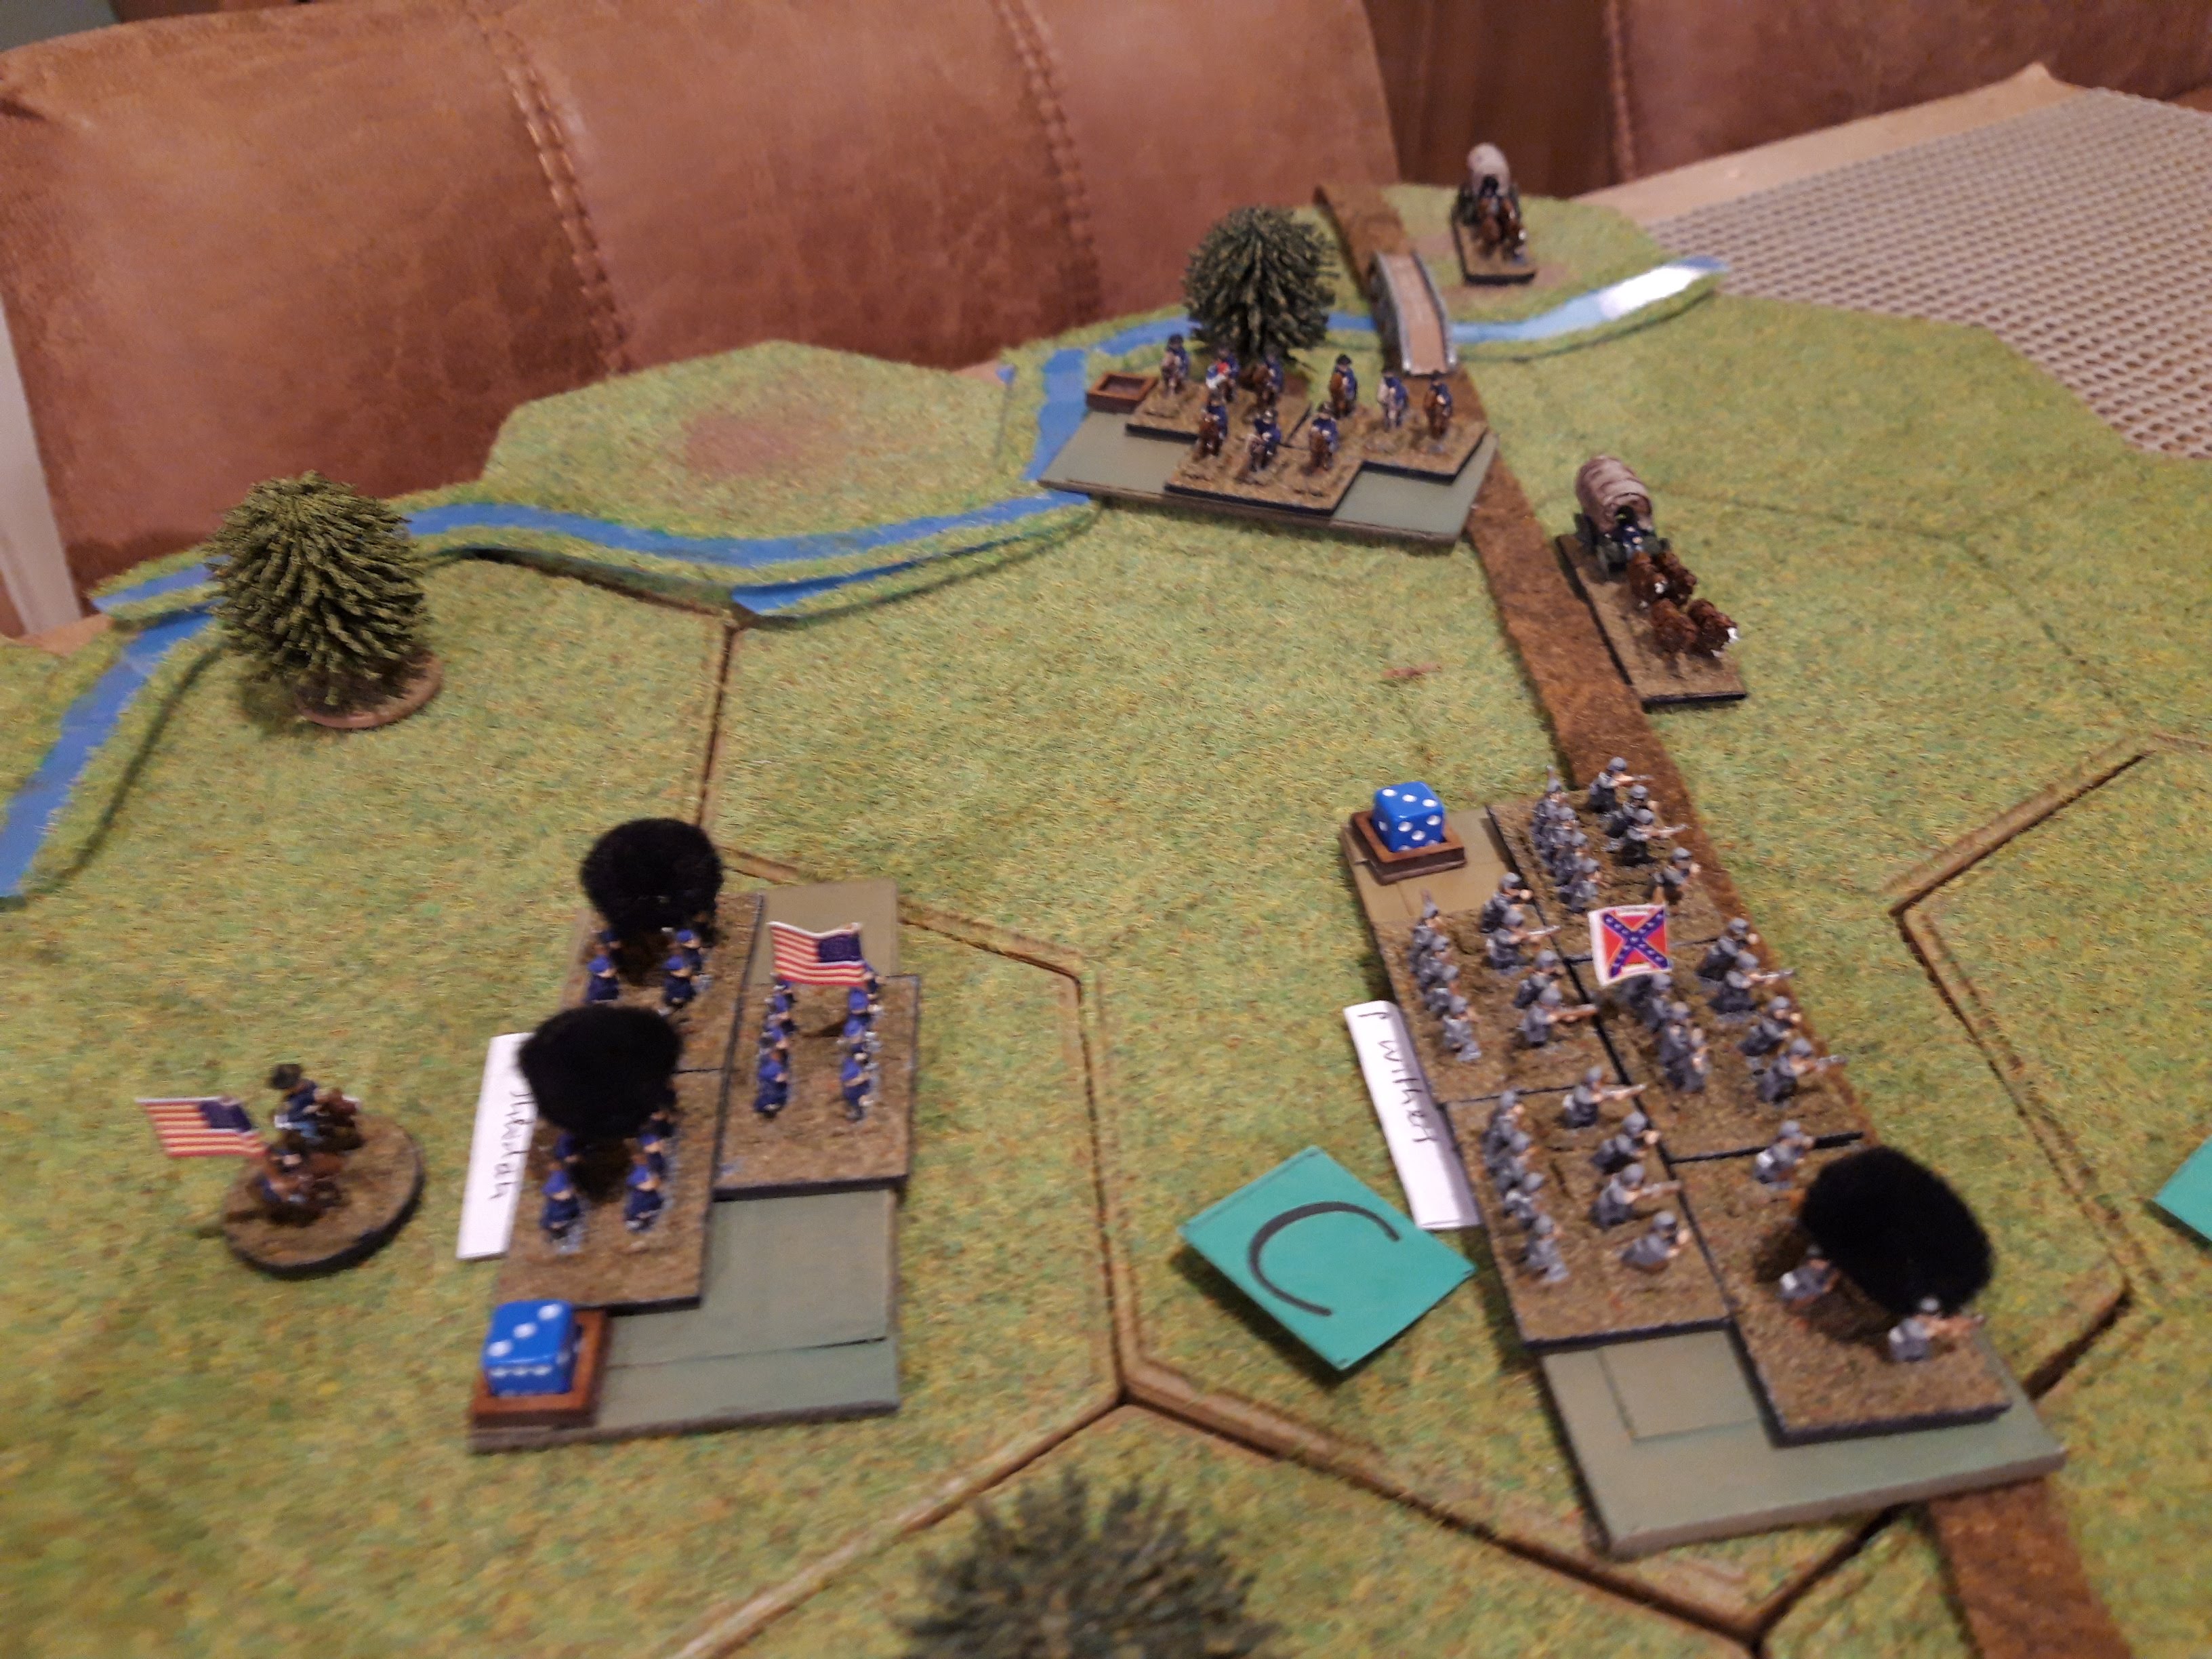
Both sides had decided on similar plans, to mass on their left and attack the enemy right. Here the Union has the bulk of its force concentrated against Withers and Breckenridge. Rosencrans HQ is with Negley in reserve. Three more Union divisions are en route down the turnpike (one cavalry and two infantry).


In the south are most of the Confederate forces, three infantry divisions and Whartons cavalry brigade against two Union divisions (Johnson and Davis). In the real battle the Confederates were quicker off the mark and 13,000 Confederate infantry closed with the Union positions before they had time to react. This flank had been screened with dummy camp fires so Wharton found almost no opposition in front of him. Bragg is with the units on this flank to keep them in command.


The entire Confederate right flank is held by only Breckenridges division and Pegrams cavalry brigade.


The Union reiinforcements straggling up the Nashville turnpike, led by Stanleys cavalry. By now most of the troops are experienced so rated as 'Seasoned', Stanleys bunch of looters and bushwackers are rated as 'Green' however.


From the Union positions it all looks fine.... for this game John took the Union and Tim the Confederates, and various other players (Simon, Pete, Mark) dropped in to watch on consecutive nights.


The action opened with Wharton pulling a wide outflanking manouvre. McGown took Johnson under fire to cover the advance of the other two CSA divisions.


In the north Breckenridge advanced to the river bank. He had a large division (five bases) and were the only Veteran rated unit, but outnumbered 3:1 he needed all the help he could get. Pegram also moved to the northern flank.


Like any good ACW battle , the entire front now erupted into a monumental firefight as both sides blazed away at each other.


This went on for a while but slowly the CSA got the upper hand thanks to their (slightly) larger formations. Sheridans division in the centre lost two bases (the black puffs) and Woods division opposite Breckenridge also lost one. Meanwhile the Confederate cavalry had worked around both flanks (Whartons brigade is just visible in the Union rear on the far left of the photo).


Just as well as in the south the Confederates were taking heavy casualties and both Withers and Cleburne fell back in disorder.


At this moment the Union centre collapsed as both Wood and Sheridan fell back to reorganise. Negley pushed up to Stones river accompanied by the Army artillery to hold the front.


The fortunes of war now swung in the CSA favour as Davies took heavy losses from Whartons cavalry charging them in the rear, while Johnsons entire division routed under withering Confederate fire and was removed from play.


The Union was now back in a tight arc across the Turnpike, but couldn't rally off any hits due to the proximity of enemy units. Pegrams cavalry were well over Stones River now.


Negley was pushed back by fire from Breckenridge who had also lost a base by now, but his Veterans stood firm. The rest of the Confederates closed with the enemy.


In the confused fighting in the south, Davis turned his Union division to face down Whartons cavalry who promptly dismounted and poured revolver and carbine fire into the Union infantry. This was followed up by a bayonet charge into their rear by Cheatham and Davis's division disintegrated.  


The line now stabilised a little as the Confederates reorganised themselves. Whartons cavalry were finally sent packing by rifle fire and withdrew to rally, only two hits away from complete destruction.


In the north, the fighting was all over the place. Breckenridge was still on the river, now faced by the Union Army artillery and Sheridan, but Withers had managed to get his entire division across the Nashville turnpike. This left Negley and Woods sandwiched between Pegrams dismounted cavalry brigade in their rear and Withers large division to their front. Ouch.


Massed infantry fire soon despatched another Union division in the south. They were now taking Army break tests every turn.


And another in the north!


This was another unfortunate unit sandwiched between Confederate cavalry to the rear and infantry to the front.


Pegram then kept on going and overran the Union Corps Artillery from the rear. Breckenridge had been unable to do this as 'Veteran' units are very reluctant to make frontal assaults - there is a reason they are veterans.


Stanleys cavalry now made an appearance, but it really was too little too late by now.


Rosencrans was now hemmed in with what little remained of his command and at this point the survivors finally became exhausted and the battle ended.


Negley was still hanging on in the north, and with the arrival of more reinforcements later that evening, astonishingly, the Union army would probably be able to match the Confederates the following day. 

That ended up being a fairly historical result, and in the real battle both sides remained in contact another day before Bragg tried to attack again and was repulsed. Rosencrans refused to retreat and Bragg eventually marched off in disgust leaving the Union to claim a 'victory', of sorts anyway. 

The mechanisms are all tried and tested now, the only thing which felt a little odd was the army break tests, which were too easy to pass given the extent of damage inflicted. It is extremely hard to actually destroy units in these rules, and I need to reflect that in the break penalties.


Wednesday 26 October 2022

On to the 6mm Napoleonic Russians

 The other 6mm Napoleonic box has my Russians in it, plus wagons and things.


This one is a bit emptier than the other. I expect that will change when I've thinned the figure count per base out a bit. I've already got all the leaders (rebased on pennies) over on the right hand side.


Russian cavalry and guns. I realised fairly quickly that rather than actually taking them off the old bases, I could simply cut down the existing bases as I've fortunately lined up the magnabase strips underneath in such a way which made this easy. The guns were originally on 30x40, so if I was lucky I could get two useable 30x20 bases out of it once I'd pried the horse teams off. The row of guns in the right hand column are all the French artillery which has had the cutting treatment.

The cavalry were originally on 30x30 bases, so I basically had to just cut 5mm off the leading and trailing edges. I wish I'd thought to do this for the French and British stuff. Oh well. I've got plenty of card and magnbase, it is just the latter is quite expensive.


Some rather ployglot units, supply wagons (30x40), Cossacks (30x30) and some Russian leaders (30x30).  The wagons just needed trimming, and both the leaders and Cossacks (all H&R) had originally been based on very thin plywood, so it was quite easy to pry the plywood off the card bases. I was going to base the Cossacks in more open order (2-3 figures per base) as they were irregular cavalry.


The Russian infantry, plus over on the right all the leaders I'd already rebased and the various limbers and teams I've taken off the existing artillery bases. I was just going to do enough limbers to use for pure Horse Artillery units and leave them out for foot artillery. 


The Russians are all H&R and were obtained third hand from John A, so I didn't paint any of these. They are utterly exquisite figures, a masterclass in how to paint 6mm over a black base with just the highlights. They have even got the pack straps, different coloured pom poms for each regiment and the Shako cords painted on. Unbelievable, and they rather put my teenage daubings in perspective. 

This lot currently has eight bases of Guards (each of two ranks of four plus four Jagers)  and sixteen bases of line infantry (each of two ranks of six). All the figures are based in strips of ultra thin plywood, which makes it quite easy to get them off the current bases in one piece.

The slightly daunting job in the future will be to get the paint jobs on my existing stuff up to snuff to compete with these figures. Fortunately I have learned a thing or two about painting 6mm figures in the last 40 years, as I certainly don't intend to re-paint hundreds of figures from scratch.


Sunday 23 October 2022

Wargames Developments Virtual Autumn Gathering 2022

 Time for another Wargames Developments Virtual Gathering. These aren't gaming sessions as such but various presentations, workshop discussions etc. The next gaming event is Virtual COW early next year.


The assembled multitudes, there were a few dozen people attending. With fairly large numbers Zoom comms discipline was essential, so everyone on mute, hands raised to indicate questions etc.


David Bradbury gave a very interesting presentation on the role of Oxford in the English Civil War.


I was particularly taken with the maps.


I like maps! This is a rather fanciful representation of the defences after the King took it over.

I was particularly interested in the geography of the region and the maps of the contemporary road layout of Britain (many of them based on Roman roads) - every road really does lead to London....

A very interesting session.


A rather better map of Oxford surveyed one by the commander who actually laid out a lot of the defences.


Tim Gow, Ian Dury and David Isby ran a very interesting session on gaming positional warfare in WW1. Avid readers will know this is a particular interest of mine, that is me in the bottom left photo in my Stalhelm, mantel and gas mask for Tims outstanding Isonzo game.

I've played a lot of the games mentioned in this context, so there weren't any huge surprises, but it is interesting to hear other peoples thoughts on things.

I guess this is something I could have contributed to (various of my games were namechecked), but while I'm happy addressing a dozen people or presenting to several hundred, this sort of size thing I'm not massively comfortable with.

I didn't get any photos relevant to the other sessions (they were just a sea of faces), the two main ones were one on the future of Wargames Developments and the other on Predictive Wargames.

The WD Futures featured small workshop sessions to discuss where the organisation might be in 2040. There were some interesting discussions and points of view, mainly around the role and scope of the organisation, composition of the membership etc. tbh, I'm not that bothered, I've done Enterprise Architecture, Strategic Development Plans etc professionally but this is my hobby, not a job. I value the social aspects of WD, the gaming get togethers and having a broader group of people to kick ideas around with, and in a world of a million micro markets, that is fine for me. In the feedback session there was a fair degree of interest in continuing to look at options hough from the various participants, so it is a conversation which will continue. 

The Predictive Games session was actually very good. We were asked (in small groups) to look at old 'near future' games and what had actually worked as opposed to what hadn't (were is my jetpack?). Our group all immediately declared we were historical gamers and didn't have anything to do with Sci Fi, before launching into lengthy reminiscences about Traveller, Striker, Laserburn, Stargunt and... Seastrike.

If there were any broad conclusions, it was that some aspects of Sci Fi tactical games worked well for current (or future as it was then) tactical warfare up to company/battalion level. After that, there were technologies which were simply unimaginable in the 1980s which have transformed the operational battlespace. Seastrike was the unexpected surprise, it modelled then then unfought Falklands conflict really rather well, based on rather sparse data from occasional naval conflicts in the Arab Israeli wars and a lot of supposition. I still have a copy in the loft. Hats off to WRG and Phl Barker.


Wednesday 19 October 2022

Re-basing the 6mm Napoleonics

 Ah, re-basing don't you love it. I'm hoping this will be the very final iteration for my 6mm Napoleonic stuff. I've been somewhat inspired to do it by the various ACW games we've played recently, as I've realised that a cunning rules-agnostic basing system will always be best. I also wanted to do some modelling/painting as I haven't picked up a brush in ages as I've spent the last few months playing Fallout 4 (again) instead.


Here are some of them in one of the boxes. Some British on the right, various French on the left. I've already re-mounted several leader stands onto pennies and cut down the artillery. This lot are currently based for the second version of Horse, Foot and Guns with various 'brigade' sized elements with typically 12 x foot or 6 x horse on them. 

The British figures are mainly Irregular, from one of the Division packs they did back in the mid 1980s, although there are some newer additions. They were originally based for WRG, and then HFG version 1 from the late 90s, so this is their fourth re-basing. They generally have two ranks of six infantry on each base.

The French are much older and are my original H&R figures from the mid 1970s. They were also originally based for WRG, but prior to that they were based for a long forgotten 6mm set which used  individually based figures(!) on 10mm bases. This will be their fifth re-basing. The infantry are arranged in little columns of twelve figures in three ranks - a few voltigeurs, then the line companies and a couple of grenadier figures on each ie my original WRG battalions all glued together in a big mass!


Some of the French stuff. The HFG artillery bases are huge, but I've kept the 30mm frontage so in most cases all I had to do was (carefully) cut the bases down after prising off the integral limbers. In the foreground are some Lancers based in sixes, also on huge 30mm deep bases. These  started life as Polish Lancers, but I repainted or at least tidied up, a lot of the figures when I rebased everything for HFG 2 back in the noughties.


Some Prussians. These are also Irregular,  but unlike the British they are based in columns like the French (three ranks of four). The Line units usually have some Fusiliers or Jaegers in front, while the Landwehr are just in massed columns.

The general plan is to thin them out a bit as the figures are really crammed into the HFG bases. Phil Barker was always a big optimistic about figure counts and base sizes. I'm looking at something similar to the ACW basing with eight infantry per base or four close order cavalry. I like using two ranks as it gives much more flexibility about how the figures are arranged, which can be used to give visual clues as to what unit type and quality they are. 


The general process for some cavalry. They are currently based sixes, so lever them off the old bases with a sharp craft knife - some are still stuck down with two part epoxy, so it can make it a bit challenging to get them off.


Then rearrange them neatly on their new 30x20 bases in groups of four. The Irregular stuff is cast in fours, but I had to cut quite a few of those bases up for the individual figure removal required by WRG, and the H&R figures are all individual but if you are lucky they come off the old bases in groups. These chaps look like French cuirassiers.

I'm aiming for generic infantry and cavalry 'units' of four bases each (ie Neil Thomas style), but with some extras to mix and match, and obviously the bases can be used as individual elements in their own right or mounted in appropriate groups on my ever increasing collection of sabot bases. The units can be anything from Battalions to Corps, depending what I'm doing, but I'm a big battle sort of guy so they will more commonly be on the bigger end of things. 

It is going to take me quite a while do the whole lot, and I'll re-paint some of them as I go along, so I'll post updates as they occur. I nice Autumn/Winter project.


Friday 14 October 2022

Marston Moor

 John put on a game of Marston Moor using his ECW version of Brown Bess. I got to play the Royalists (Prince Rupert no less), while Tim was the wicked Parliamentarians, which included a large contingent of Scots.


The initial deployment, Royalists in blue. My chaps have a big block of infantry in the centre with a Forlorn Hope lining the handy ditch (in green), and cavalry on the wings. Prince Ruperts Lifeguard are our only reserve.

The other lot are deployed in much the same way, except their blocks of infantry and cavalry look an awful lot bigger than ours! Oh well, I am sure Cavalier dash and spirit will carry us through.


The enemy infantry roll forwards, halting at the ditch, while their cavalry fan out on the wings.


Much to everyones surprise, the Forlorn Hope inflicts some hits.


My cavalry roll up to line the ditch, while I wheel the second line infantry to get them in the front and fill the gaps. Unlike real life, there is no discernible bonus for rear support and there are hideous penalties for retreating through your own units, so there is no incentive to fight in multiple lines.


Not wanting to hang around while my guys redeploy, the Covenanters just charge the ditch, with rather mixed results. There is some bloke called 'Cromwell' on the left and his cavalry take a real pasting trying to cross the ditch. The enemy infantry force the ditch and overrun the Forlorn Hope, but one of the regiments breaks in volley of defensive fire. 

Unfortunately the enemy cavalry has outflanked me on both sides, so things aren't looking too good already. The Lifeguards are heading for the Royalist right now.


There isn't any room for subtlety, just slaughter. The cavalry action on the right is fairly indecisive, although my infantry take a pasting in the centre. On the left, one of Cromwells 'elite' cavalry breaks! That is a turn up. Rupert had joined the action there, which may help.  


The enemy flanking cavalry attacks go in and drive back my cavalry on each extreme flank. My infantry in the centre chooses this moment to collapse. Rupert is holding things together on the left though, and the Lifeguards have managed to slip right down the flank into the enemy left rear.


Parliament presses its advantage and Royalist units break all over the place. One of the enemy infantry breaks as it overruns one of retreating Regiments, but generally things aren't looking too good. Rupert is still hanging on through.


My right and centre are a mess, but on the left the cavalry counterattack.


Which goes pretty well, two enemy cavalry destroyed. I'm just going to focus on keeping an Army in Being now.


The enemy mop up the remains of my centre and right, I do the same thing on the left, catching two more of the weakened enemy cavalry in a pincer.


The clears things up nicely as the last of my infantry in the centre goes down, outnumbered 4:1.


Rupert launches a last charge to cover the withdrawal of the remains of his Army, and victory goes to Parliament.

That was good fun, quick and decisive, and although the course of events weren't necessarily very historical, the overall outcome was. I'm still not convinced about the use of small squares each with only one unit in them to model this period, I works OK for Napoleonics and linear warfare, but units just weren't that manouverable in the seventeenth century, and I can't help thinking larger areas containing multiple units (like an ECW version of Lost Battles) might be the way to go. A project for another day perhaps.