Friday, 23 June 2023

Panzerblitz!

 For some odd reason I had a hankering to try Panzerblitz again, it is forty years since I last played it! After a rummage in the loft I discovered I had two copies, although I have no recollection of buying the second. My original copy came from the The Games Centre just off Oxford Street in the late 1970s.


tbh, some of the unit ratings set my teeth on edge as they are so eccentric. The most egregious examples to my mind are the under-rating of infantry mortars (which barely scrape together the firepower of a rifle platoon) and classifying all the Russian 76.2mm divisional artillery as anti-tank guns! Which makes them rather less useful against soft targets.

It was nice to get the old counters and map boards out again though, and I spent ages re-reading the designers notes and the expanded notes in 'The Wargamers Guide to Panzerblitz' which I'd bought at the same time.


Wargamers Guide to Panzerblitz. Some useful scenario and unit analysis, along with a rather random collection of articles from The General. It also includes loads of extra scenarios, although some verge on the very silly indeed (like Wehrmacht helicopter troops).

It does also include some additional sensible scenarios, and to re-start, I picked one of the simple single board ones. One board scenario #1 is 'Supply Convoy'.


The Germans have a supply column (the five trucks) which they need move from one end of Board 1 to the other end. They are escorted by a security company with a couple of Security platoons in halftracks and a platoon of light tanks (Lynx in this case, being the only German light tank counter in the box). 

The only wrinkle being that they have to get all five trucks off to win.


The other wrinkle is that the area is infested with Partisans. Four of the strange Russian 'recon' counters, a couple of weak 82mm mortar platoons and a fleet of horse carts. I can only assume the latter are supposed to represent partisan scouts on horses or something, they are only good for blocking and spotting. I have slightly different opinions on the effectiveness of mortars to Jim Dunnigan, so I treated them as if they were 'intensive firing' each and every turn, giving them an attack factor of 6 instead of a measly 2. 


PB veterans will recall Board 1 as being the one with all the swamps at one end. In this scenario they are treated as frozen open ground, but the gullies are still in effect. Very poor ground for offroad truck movement, and there is only one road which goes the whole length of the board.

The Partisans have free setup anywhere, and instantly analysis paralysis set in for me. This was a really good way to revise all the movement and LOS rules, as the Partisans have lousy tactical mobility compered to the entirely mechanised Germans, so they need to block the easy movement routes, and set up OPs to spot the Germans hiding in bushes to call in those (now more effective) mortars.  The terrain is really much more complex than our tabletop games.

I ended up setting up a defence in depth to allow for any German breakthroughs - a screen of wagons out to the east to block routes and spot, then four infantry stands arranged one up, two in the middle and one to the rear, while the mortars occupied the woods on the very commanding hill position right in the middle.

I could have gone for a dense linear defence, but there is a risk that the Germans will slip through and then it is game over for the immobile Russians. You need to be able to see into woods hexes with adjacent units to shoot into them as this is 'Panzerbush', units in cover can't be seen more than 250m away, even if they are firing. It certainly makes for a game which hurts your brain. 


The Germans proceeded to start picking the defence apart, but cunningly using just their combat elements to surround the first roadblock. The trucks lurked offtable. Those green woods hexsides are impassable to wagons, so the unfortunate Russians are trapped.


Even if they couldn't move they could spot, and an 82mm mortar barrage dispersed the Lynx platoon, while some Partisan infantry rushed up to close assault the disorganised tanks.


Fortunately the tanks survived, although it was a close run thing: a 1:2 attack but at -2 off the dice, when rolling low is good. That would have been game over on turn 1. The Germans wiped out the offending wagons with MG fire from the halftracks, the infantry stayed mounted.


The mortars laid down a real hail of fire on the tanks again, but missed, however the infantry dispersed them.


Time to clear the roadblock. The halfracks swung around the Partisans and the German infantry dismounted and close assaulted them in the infamous 'Panzerblitz' attack.  


That was enough to disperse the Russian infantry, freeing up the tanks.


The panzers went off hunting those pesky wagons. They are sitting on a ford over the gully in a woods hex, just the sort of place the trucks will need to go if they are to have any chance of motoring through as the movement penalty for trucks leaving gullies without a ford is horrific otherwise.


Time for the German trucks to come on. They nervously hide in the woods or on the reverse slope of the ridge east of the mortar position (as the crest line is closer to the trucks than the firer, they are hidden). The German infantry keep the Russians pinned down.


Now the Germans have committed the supply convoy, the other Russians close in a bit. I need to be super careful not to leave easy road routes free, there is no opportunity fire in these rules, and they are all the better for it. Panzer Leader slows to a grinding halt once people start counting movement points for opportunity fire.

Basically those two infantry units on the left have locked down the roads, which will force the trucks up on the slopes (at 4MP per hex). The other two wagons are moving up to both block easy movement routes but to provide some spotting in the hilly terrain.


It is all getting a bit unpleasant in the woods. Russian mortars suppress some of the German infantry, but the partisans are suppressed in turn and the Russians at the ford are destroyed. The German trucks edge in closer, hugging the terrain. They only have a defence value of 1, so almost any Russian unit can destroy them easily.


The Russian push in another wagon to block the road south, but a hail of German fire and infantry assaults pins all the Russians, preventing them calling in the mortars. The first two German truck platoons have  made it to that useful ford hex. That single truck at the bottom end of the wood is a bit stuck as it is surrounded by slope hexes, and if it tries to move, the mortars will spot it. 


Goodness, that is what happens when you have a gap in a defence line! Four truck platoons make a dash for the rear slope of the central hill through gap opened by the tanks, while the rest of the German force starts to disengage. The only problem is that trailing truck, which has to make its way around the blocking Russian wagon and hope the German infantry can suppress the Russians and stop the mortars obliterating it. The Lynx occupies the ford, planning to move forward and escort the trucks.

The Russian infantry unit at the top is a bit stuck. It could move adjacent to the truck using the road, but then can't close assault (no CA after a road move), and there is a real risk the Germans will just drive through the gap in the woods at the top.


The trailing truck is saved as the German security troops destroy the Russian wagons. Now it needs to get out of there before the Russian infantry move down to it.


Now the Russians need to trap the trucks. The infantry at the top block the gap in the woods, so no-one is going that way. The infantry at the bottom hold the road junction and can spot into the woods.

The last platoon deliberately sits in the middle of the road out in the open. This would be a really bad idea if the German tanks were closer, but they aren't, and it will force those trucks to move over the expensive slope hexes. They don't have quite enough movement to get onto the road and away out of close assault range.


Back on the road, the Russian infantry make a road move to get adjacent to the truck. It will need to move or be destroyed. One of the German security units gets back into its halftracks. 


Suddenly most of the German army is pushing west. It is those rapid changes in position and the impact of manouvre which is why I really enjoy this game. No plodding forwards at two hexes a turn here.

The tanks have occupied the hilltop woods hex and are now posing a serious overrun threat to the Russians in the open. The German trucks have started filtering through the woods and gullies, slowly. This isn't great terrain to move through, but the green hexsides block them getting to the road. This is a gamble as the Russian infantry can move next to them.  


The Russians assault the trucks, but only manage to suppress them. Phew.


And then the cunning plan! The German tanks go and park on the trucks to protect them from assault, while a platoon of infantry debus next to the Russians. How did we not win in 1941? 

The other trucks all continue their filtering. Once they get out of the gullies it will be onto the road and away.


Mmm. The Russians suppress the other security platoon. Ah well, omelettes, eggs and all that.


And of course I'd forgotten that the Russians have moved one of their mortar platoons to face in the opposite direction. Thanks to the esoteric Panzerblitz target priority rules, you attack the whole hex OR the weakest unit (I'm oversimplifying, but you get the idea). Guess which is the weakest unit in the hex? Yes, one of the trucks.

Cue a 6:1 mortar barrage on one of the unfortunate trucks. The Russians are hideously unlucky and just suppress it. Phew.

The Russian infantry then assault then stack at 1:3. The suppressed unit subject to a -2 modifier, despite the woods (-2 for CA, +1 for woods, -1 for being suppressed) and suffers the infamous DD result. Dispersed unit Destroyed.


Ah, blow. Despite my best efforts the Germans have lost a truck and lost the game.


They were so nearly there as well. The Germans destroy the Partisan unit which was the source of all the trouble, and the surviving trucks head off the table.


The last Germans mount up and head for home, leaving the Partisans to celebrate their victory.

I played these micro scenarios a fair bit back in the day, and this one is tough for the Germans. I suspect I dimly remembered that defence in depth is better for the Russians, although it is so tempting to build a single line right across the table.

I really enjoyed that, although it was scary how much I'd forgotten and the tactical choices were overwhelming as there was so much terrain and so few units. A far more complex situation than many of our tabletop games. It came back fairly quickly though, and I got back into it again, although I expect I made many mistakes.

I definitely want to try another one of these, and I've got some ideas on how to fix some of the unit values. The mortar thing seemed to work OK, and the Russian 76.2mm guns I'll treat them as H class with double the attack factors and range. That way they will be just as dangerous against tanks as they currently are, but more useful against infantry, but still less powerful than the German 105s or Russians 122s, which feels about right. I may alos make up some extar counters, I had a look in the box but could see any blanks. I'd like to field an entire Soviet Cavalry Division, which need an extra eight cavalry stands.

Not sure what to do scenario wise, I might see about converting one of my historical WW2 ones - I've got plenty of Command Decision, Rapid Fire and TAC scenarios, all pitched at the right level.


Wednesday, 21 June 2023

Airfix Commandos

 Gosh, this is a blast from the past, it must be almost 50 years since I last painted a set of these boys. Anyway, I 'needed' some 20mm Commandos for the Sicily game I'd been planning, and I'd actually acquired a few grab bags of old Commando figures from Bring and Buys some years/decades ago.

Unfortunately they'd obviously been stored in an outhouse or something as they had dreadful plastic rot and a number of them just fell apart in my hands.


Here are the finished article, three stands for Megablitz, so each base representing a battalion sized unit. There were supposed to be four bases but one of the figures crumbled as I was handling it. The others seemed to be OK though and three bases is enough for the scenario I had in mind. 


They are still lovely figures, very delicately moulded with human proportions. Just enough depth on the moulds that a wash takes OK, and the rifles are nice and slim. A big improvement on the ACW figures, and more natural than the old "Combat Group" figures. 


Running rifleman and kneeling officer with his spindly Webley. 


Another rifleman (these guys seemed to survive the rot OK) and the very useful radio operator. 


The infamous "running with you arms out" bloke and the nicely posed Tommy gunner. Unfortunately the end of his SMG barrel fell off, perhaps it is a special cut down Commando version. 

I just did the guys in khaki with tan webbing as it makes a nice contrast. They got a brown wash and a very, very light dry brush (the shallow detail won't take any more). I was a bit anxious they might fall apart in use, but they did actually survive the game intact. 


Friday, 16 June 2023

Stalingrad Matrix Game - three year Zoom anniversary edition

 Three years and three months ago marked the beginning of the first Covid lockdown in the UK. I was sent home from the office on March 20th 2020, and didn't set foot back in work again until went in to pick up my stuff when I took early retirement in late 2021.

On March 28th, 2020, we ran our first remote wargame over Zoom, and three years on, here we are still remote gaming. In honour of the anniversary, Tim put our first game on again back in March (you can see how long I sit on these posts!). 

The first remote game outing was a matrix game, as Tim thought this would be easiest to run on-line, as each player goes in turn in a structured sequence, and Tom Mouat Stalingrad matrix game is a fairly straightforward scenario. 


For the re run the usual gang of reprobates in dodgy hats turned up to play. I've played this game twice before so I was just a 'Technical Advisor' and Nick was a journalist from the Washington Post. Otherwise John B was Hitler, John A was Paulus and Pete was Hube. Russell was Stalin, and Diego and Mark were two Russian Generals whose names escape me.   


Each of the Stalingrad sectors is an A4 piece of paper, with the whole thing being 3x4. View from the northeast.


The various combat units, leaders etc were represented with Tims 54mm toys, so they were easy to see.


Panzers at Yelshanka. Not much use in the city and attempts by Paulus to get them to dismount and fight on foot(!) were unsuccessful.


The action proceeded much as one might expect. The Germans ground forwards into the factories, slowly pushing the Russians back at huge cost to both sides. At this point in the game, the Russians were back on the banks of the Volga.


Both sides kept requesting more reinforcements as units were burned up in the no quarters fighting. The Russians were a bit more successful in this than the Germans. Although they lost the ferries further south, Golodny Island ended up a veritable fortress.


Operation Uranus duly surrounded the city, but much to everyones surprise, Mansteins relief column made it as far as Gumrak Airfield (a Pz 38 is dimly visible in the distance). Having renamed the city 'Hitlerstadt', Hitler was in no mood to let the Germans withdraw, and they had to hang on in the freezing rubble.


At the conclusion everyone had to justify why they thought they'd won. Overall I think the Germans did a bit better than their historical counterparts, although the Russians were still hanging on in parts of the city. Sixth Army was still doomed however, with its flanks collapsed and at the end of a tenuous supply line with the Russian Tank Armies heading for Rostov.

Another great outing for this scenario, and plenty of opportunities for the players to ham it up. Tim ran it with the traditional formation of Action, Result and Three Reasons Why, which rattled long nicely. Some of the less experienced players still got their reasons and results mixed up (Action, Reason and three results!) but everyone got the hang of it after a while.


Wednesday, 14 June 2023

15mm Semovente

 I have a few Italian vehicles now, but I was missing a 75mm Semovente. Again, I ordered one from QRF but it didn't turn up so in frustration I ordered a Peter Pig one along with the Para figures. In fairness to QRF, when they came to cast it they found the mould was useless, and did tell me that. 


The finished thing.  a nice clean model with very little flash. It had a few parts to assemble, separate tracks, the rear hull plate, two hatches with an (optional) commander and the gun barrel.


It all went together OK without much filing or bending required. The gun kept falling out until the glue set, so I should have put in a blob of blu tak to hold it. I did the hatches shut and the commander went in the spares box. My other 'Italian' commanders are modified Russians and Germans!


For a metal model it is a reasonably crisp casting with nice deep engraving that took a wash well. You can see the engine deck detail here. I did in sand yellow with green disruptive, which was quite common on Italian vehicles, then gave it a dark brown wash and a light drybrush of pale tan.


Here it is next to my QRF M13/40. The chassis are similar sizes but PP is always a bit on bloaty side of 1/100th scale.


The slight chunkiness of the PP suspension is a bit more obvious here, but they are close enough in size.

A perfectly good model, and a useful addition to my apparently expanding Italian forces. 


Saturday, 10 June 2023

I have been to.... Malaga

 We recently spent a few days in Malaga, having a hankering to return to the Med after our cruise last year. I realised that it is well over ten years since I was last in Spain, when we cycled the pilgrim route to Santiago de Compostela. Although we used to go to Andalucia quite a bit back in the 1980s and 90s, I haven't been to the very south of Spain for over twenty years, and a place we always missed actually going into was Malaga. 


The city didn't suffer much damage in the SCW and has a large surviving old town between the river to the west  and the large hill with the Alcazaba and Gibralfaro Castle on it to the east. The settlement is ancient, having first been founded by the Phoenicians 2,500 years ago.


The largest Roman remains are the theatre (exposed here), and just behind is the Moorish Alcazaba.


Our first trip was up to the Alcazaba at the eastern end of the old town. It is a walled palace complex at the bottom of the hill, and rather like a mini Alhambra.


The walls are very well preserved and restored. This is looking due west along the south side of the fortress.


In common with Moorish architecture on southern Spain, it is studded with delightful shady walled gardens with water features. We went fairly early, before th4 coach parties arrived, and it was very empty. It reminded my of the first time I went to Alhambra in 1982, when you could just walk in and wander around the deserted gardens, unlike now!


View from slightly higher up, the mountains behind the coast just visible in the distance, as is the port.


A lot of the internal features were beautifully preserved.


The main historical exhibits were various bits of restored pottery.


And a (massive) reconstruction of a pottery kiln.


I just loved the shady gardens with their integral water features. There is a small stream running along the path here. Some ideas for the garden at home.


Malaga is studded with numerous old churches, many of which feature external paintwork. The city has been undertaking a programme of restoration to recover these from under many, many layers of whitewash.


The main cathedral is an astonishingly huge structure. Like the cathedral in Granada, it is very hard to get large scale photos of it as it closely surrounded by buildings. This is one end of it, and shows the layer on layer of construction over the centuries. I can't recall who the Cardinal is. 


Trip number two was up to the top of Gibralfaro, (lighthouse hill - Jebel Faro). The castle was originally built here to protect the Alcazaba further down the mountain, and they are linked by fortified pathway which sadly isn't open to the public. We hiked up the mountain before it got too hot, although there is a road at the rear of it to give access to the Parador behind the castle.


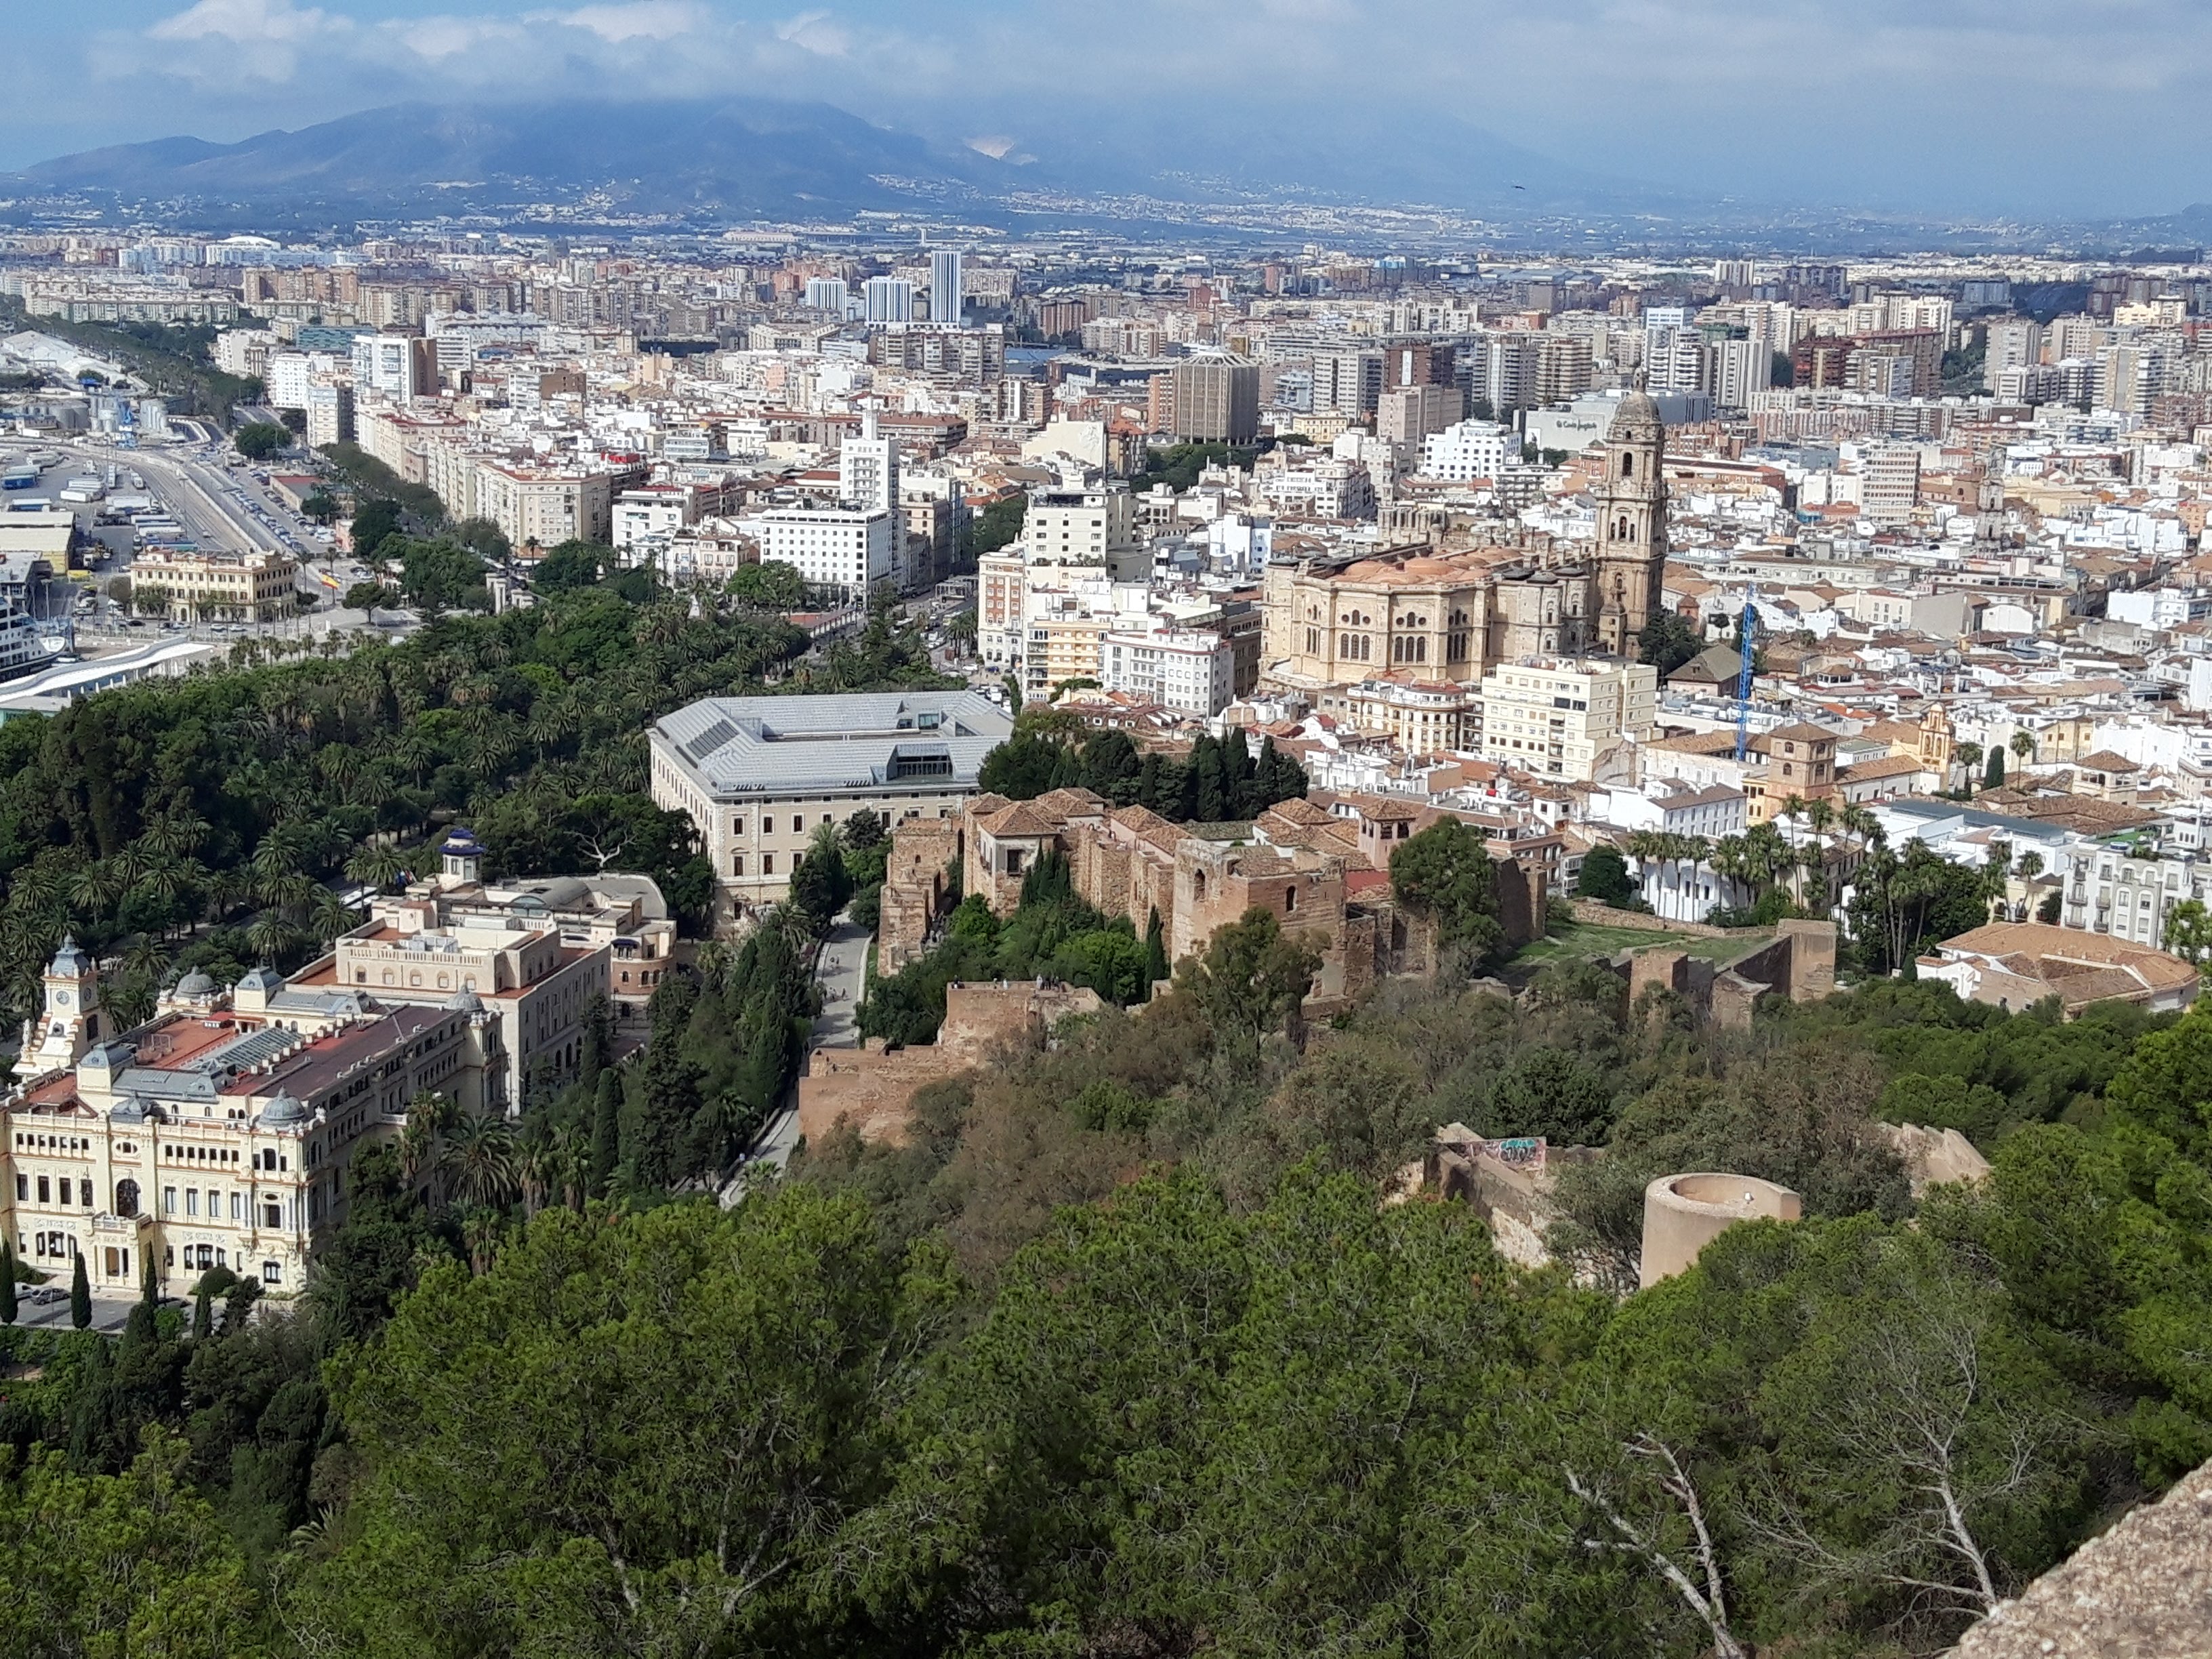
It has a spectacular view right across the city, but I certainly wouldn't fancy hauling  cannon up here.


The Alcazaba is just visible further down the slopes, the Cathedral just beyond.


When the French were forced to retreat from Malaga in 1809 they rather unhelpfully blew up all the installations inside the castle, so it is somewhat bare inside. The only surviving building is the powder store, which tbh, I'm surprised wasn't the first thing to be blown up. 


The walls are in excellent condition, with the usual rigorous Spanish health and safety protocols in place. One young lad just jumped up on top of a wall to take a selfie, apparently oblivious to the 300' drop below. 


One of the old Moorish sentry boxes.

The old Powder Store has been converted into a visitors centre, with lots of great military exhibits. First up some uniforms.


Halbardier.


Musketeer. This figure seems the one most appropriately dressed for the climate.


Spanish Grenadier. A very interesting study of a 'white' uniform. It is made of quite thick wool and I really, really wouldn't fancy wearing this in summer. 


This from the siege of 1809. British supplied (?) uniform.


And from 1915 with a long Mauser. Also very thick wool.


Plan of the Castle and Alcazaba in relation to the port and Old Town.


A few firearms, a couple of Spanish Mausers. The pistol on the top right is an Astra, which George Orwell said was execrable.


I was very taken with this screw breech rifled cannon!


There were also lots and lots of toy soldiers in a variety of scales an uniforms. Well worth a visit.


The path up/down also gives an excellent view of the Bull Ring.


There are some formal gardens at the bottom of the hill which include a few surviving Roman bits, including this nice fountain.

Malaga is also the birthplace of Pablo Picasso, and there is an excellent Picasso Museum.


The Minotaur features a lot in his paintings around the SCW and WW2.


I really liked this one of an enthusiastic man eating an ice cream!


And a buffalo made from a bicycle saddle and handlebars.


This group rather reminded me of Barbara Hepworth. The museum had a lot of Picasso sculpture, something you don't see so much.


In the basement of the museum were various relics of the city. This is the corner of a Phoenecian building, from around 800 BC.


As is this wall section.


These are Phoenecian double headed oil lamps, also from around 700 BC.


The museum itself is inside a well restored sixteenth century Palace, with a typical courtyard.


We also went on a day trip to Cordoba. The typical Andalucian countryside (although it isn't usually quite this wet!). Olive groves, very rugged rocky hills and White Villages as far as you can see.


Although I've been to both Granada and Seville, I somehow missed Cordoba. It was both the Roman and Moorish capital, and at one point was the largest city in Western Europe with a population ten times that of London.

This is the old Roman bridge across the river.


Los Reyes Catholicos. Ferdinand and Isabella conquered Cordoba during the Reconquista.


The Mesquita (Mosque) was established around 679, and functions as a Cathedral today, making it one of the oldest public buildings still in general use in the world.

The Mosque is huge, albeit with lower ceilings than the Blue Mosque, it has these distinctive Romanesque double arches. The Moors re-used a lot of Roman and Visigoth columns in its construction, hence the different designs on the capitals.  


After the Reconquista, the Christians built a cathedral right in the middle of the Mosque.


Charles V in particular gifted some completely understated and non ostentatious additions!


Many of the ancient Moorish designs are extremely well preserved.


Relics of St Ursula.


There is a stunning Choir, carved from mahogany.


The Old City is also very well preserved, probably better than Malaga.


Oranges on the trees. These are last years crop and occasionally fell to the ground with a very heavy thud.


The courtyard in the Mosque has some spectacular orange gardens (when it isn't pouring with rain). The bell tower is a later addition.


Scattered along the river are a series of old Moorish water mills. This one has a restored water wheel.


This is the Alcazer de Los Reyes Catholicos, the castle built to defend the city end of the bridge. Unfortunately it was closed to visitors.


The sun did put his hat on eventually, and the honeyed stone of the city looked fabulous in the sunlight.


This is the castle at the southern end of the eiver bridge. In the very centre of the wall is the old Roman fort, surrounded by the Moorish one, then with a huge Christian one built on top of the lot.


From the other side it looks like a standard medieval castle.


Finally it was back to sunny Malaga and one last look at the Alcazaba and Roman Theatre as the sun set.

I probably haven't done it justice, but Malaga was a great city to visit in its own right, and not just as an airport to get to the Costa del Sol. It is also perfectly possible to put on half a pound a day in weight there, as what passes for 'tapas' are apparently four times the size of those in Asturias.  Deep fried Aubergines and cane honey are however not to be missed.