Friday, 5 April 2019

QMG Cold War - outing number two

After the last outing, we were all keen to have a go at QMG Cold War again having now got slightly more idea how to play it. One thing I'd completely missed the first time around was that you get VPs for each army you have, rather each supply base as in the WW1 and WW2 versions. That partly explained why the Non-aligned Powers wiped the floor as they spent their actions building armies, while NATO and Warpac spent them fighting WW3!


The game board once more, this time with a very high tech looking addition. I can't for the life of me remember what we used the iPad for in the game though.


Tim had recently obtained a very budget British Generals hat, so naturally had to play NATO.


While John had acquired this rather grand original PLA hat, so played Non-aligned.


That left me with the Warpac, so in the interests of international solidarity, I wore my Castro Cap (sourced in Havana!). I also rather unfairly read the notes at the back of the rules, which suggested the best plan for Warpac was to build armies, lots and lots of armies while building up a huge hand of Espionage cards to unleash a devasating attack (as you can play as many Espionage cards at a time as you like). Well, that sounds like a plan.

In the three player version, you get one deck each, with each of the two power decks shuffled together.  Jerry advised that this worked much better than the six player game.


Mid game, and India and China seem to have expanded quite a bit while Nationalists overrun the middle and far east. At least the USSR has some troops and planes in Central Asia to stem the tide. Eagle eyed readers will spot a big blue NATO counter on the far right. That is Israel (established as a NATO ally early on by Tim).


A distinct lack of WW3 going on in 1955. NATO have Italy and a strong presence in the Balkans though. Warpac have just built armies, and lag behind in the points.  Amusingly the US has just successfully completed a manned mission to Moon.


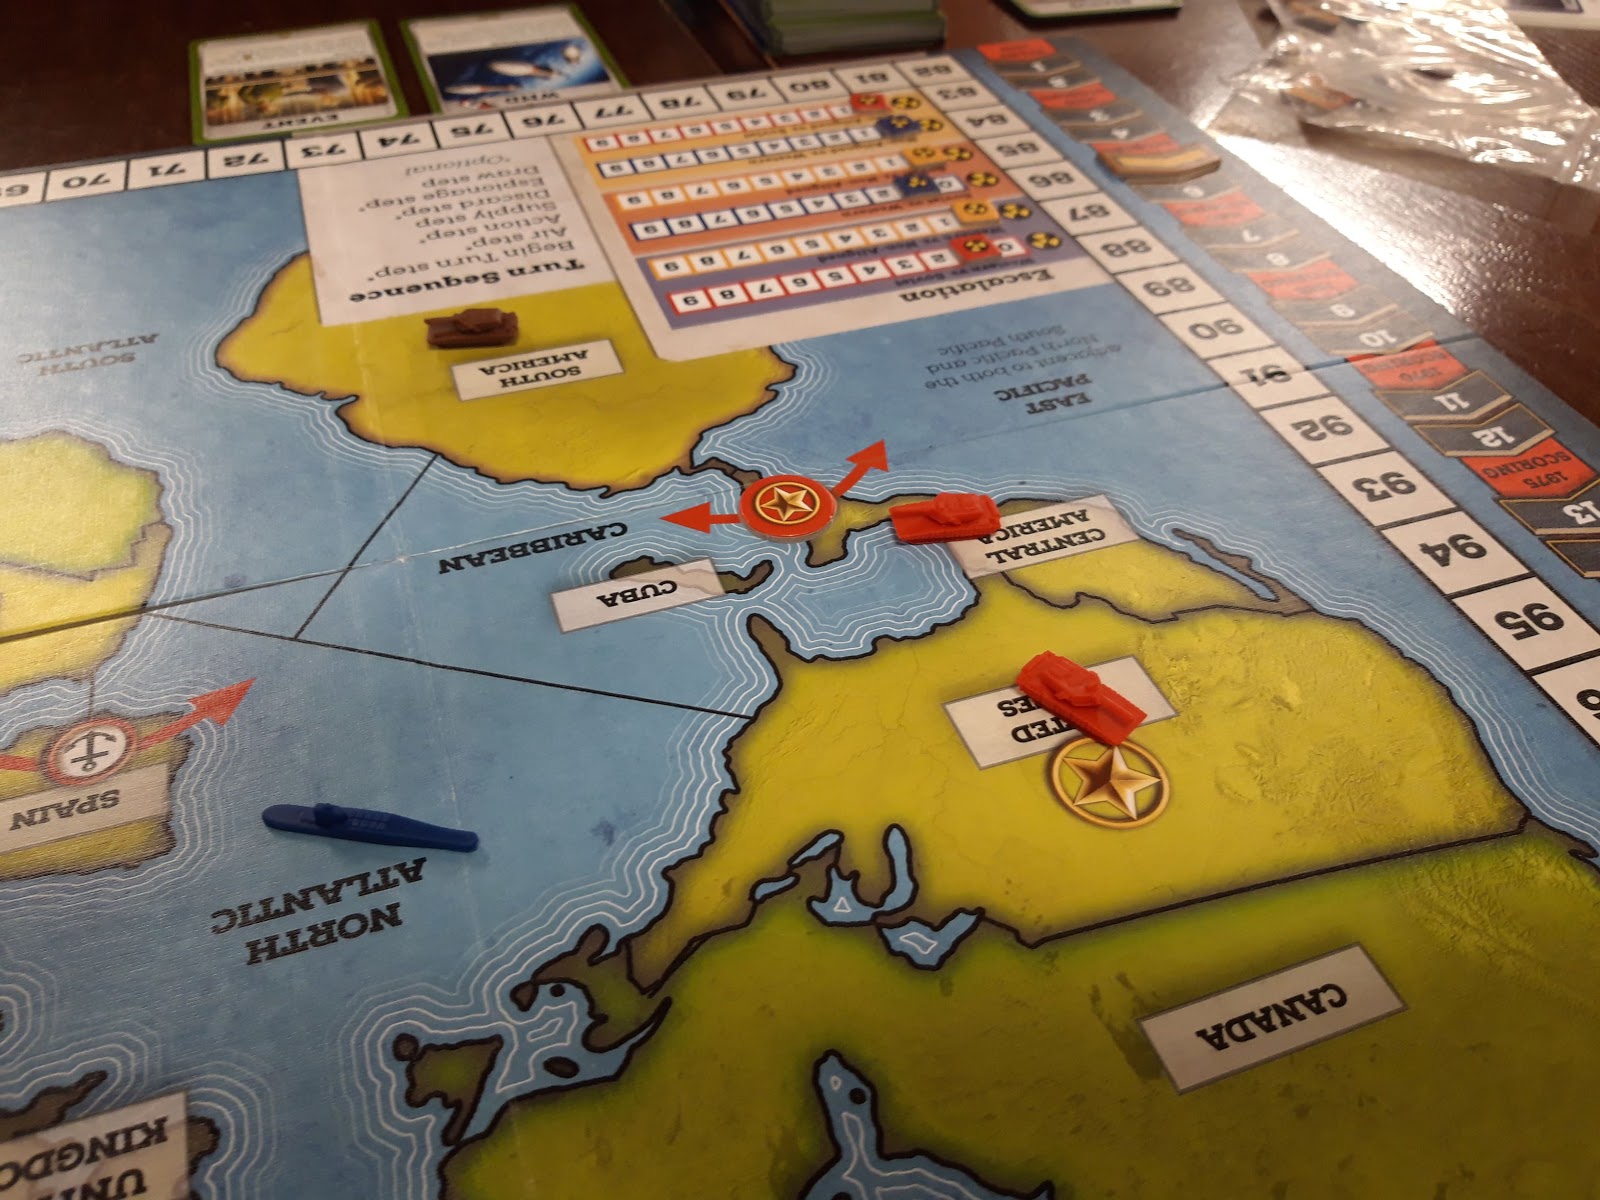
By 1960 I had a fair crop of Espionage cards and deployed WMDs. This was one  of my carefully planned Espionage coups. A revolution in Central America, supported by an extra army build and some tactical nuclear weapons manages to take the USA. I had planned to do this in the last game but didn't get to pull it off.


This was followed in 1965 with Soviet Fleets and Air based in the USA contesting the North Atlantic. Air power drove away the allied ships and this was followed up with a Soviet Army landing in Britain! Well, that went well. To rub salt into the wounds, we launched Sputnik too. 


At the end of 1965 the scores were much closer than before. NATO lagged behind but Warpac was only a couple of points behind China/India. We called it a day there. We still don't seem to have figured out how to stop China rampaging all over Asia, but at least NATO and Warpac didn't mutually destroy each other in futile combat this time.

So, I think we are getting there slowly. It does seem to take a while to play this one and I'm not convinced we'll ever get to finish a game in an evening, but the three player game did seem to rattle along a lot faster and we had a bit  more idea what we were doing. There are some NATO and Warpac events cards which stem the Nationalist tide in Asia, but we didn't get a chance to play them.


Sunday, 31 March 2019

I have been to... Argentina

The second major leg of our South American cruise was Argentina.


We docked at Ushuaia, the southernmost city on earth. It was pretty spectacular, surrounded by mountains with a glacier perched above the town. A couple of Argentine frigates were across the harbour.


Not that far to the Antarctic from here, there were several Antarctic ships in port.


Another hero of Latin America, Admiral William Brown, who established the Argentine navy.


Ushuaia is the administrative capital for Las Islas Malvinas. The sign (helpfully in English as well as Spanish) notes that the isands are currently under illegal occupation.


Another Argentine warship lined up to enter a floating dry dock. The sea in the harbour looks a bit choppy, that was because the storm caught up with us again. 50 knot winds hit the ship broadside on at 6am and for the next seven hours the engines ran at full power to stop the mooring lines breaking and us drifting into the Frigates moored across the way and the port was closed. Feeling a 35,000 ton ship heel over was quite exciting. We were confined to the ship as it was too dangerous to be outside, but eventually the winds abated and the port reopened.

Sadly the wind was too strong and the sea was too rough to visit the Falklands, so instead we diverted to Puerto Madryn in Patagonia.


There were a number of nature reserves and penguin colonies up and down the coast, so we got to spend they day with these chaps. Who knew penguins lived in deserts.


The pampa was astonishingly arid, essentially desert steppe. I was expecting it to be lush grass covering in roaming cattle. Instead there were odd flocks of sheep, wild Llamas (Guanacos) and even a flock/herd of Rheas (related to Ostriches). I gather further north there is more rainfall and it is much more lush. 


This guanaco was pretty tame (it was an orphan being cared for at the penguin colony).


There were quite a few penguins down on the beach. Evidently the Orcas prefer to eat the seals further up the coast, but there were some eagles hanging around hopefully.


We eventually arrived in Buenos Aires which was really very grand and quite European in feel, unlike Santiago. It could have been Bilbao or Milan.


Our hotel was was close to the La Recoleta cemetary, where Eva Peron is interred.


General San Martin in the main square outside the presidential palace. San Martin was a hero of Argentinian Independance,


Peron used to make speeches from the central balcony.


William Brown once again, down in La Boca, the original port area. He looks a bit more heroic than in Ushuaia. The naval college was just up the road from here.


There were a few gems in the Museum of Modern Latin American Art.


There was a special exhibition covering Diego Suarez. This is his take on the Falklands War.


I really liked Suarez's strange picture/sculpture combinations.


This one is quite famous.


An interesting feature was the number of monumental squares dedicated by various countries to commemorate Argentine independance. Here is a statue of Louis Braille.


And the rather grander monument on the Plaza de France. 


General San Martin in Plaza San Martin.


The Torres Ingles, donated by the UK. It is now just called the monumental tower.


As it is directly opposite the Argentine monument to the Falklands War. 

There was rather a grand naval base close to our hotel with a Skyhawk, LVTP and bizarrely, a Gloster Meteor as gate guards. Sadly there were a lot of no photograph signs and a number of heavily armed soldiers so I didn't take a chance. I didn't fancy being arrested as an espia inglesa!


Sunday, 24 March 2019

Spiders from spaaace....

To greet the New Year, John had dug up an experimental set of Pz8 rules covering that oft occurring military problem - giant space monsters invading earth in the 1950s and 60s.

The alien monster(s) were controlled by the game system, while the humans could select from a range of infantry, MG armed jeeps and the odd tank (in this case, the inevitable M47).


A general view of the battlefield with the spider set up in the centre in a rather rural setting. So less The Creature Which Ate Sheboygan, and rather more The Creature which visited Ambridge.


The spider parked next to Johns Roskopf M47 to give an idea of scale. It is a very big spider.


Our jeep swarm roared on from one side of the table, supported by the tank. Movement used an AK47 style random movement system. Jeeps were quite fast.


The spider responded by taking refuge in the wood. The spiders movements were dice controlled, with minuses if it was wounded, and pluses if there were human units within 6". Higher scores resulted on more aggressive moves, lower scores in more timid ones (generally moving away for the nearest humans)


Over on the other side, our footsloggers cam marching on to cut off its retreat. We would win by eithe rkilling the spider or preventing it exiting the table. As it was quite capable of simply running away, it was important to surround it.


The spider cautiously emerged from its wood as our jeeps and tank closed in


Unfortunately the jeeps got a bit too close, and one vehicle got eaten as the spider jumped forward.  (The spider kept dodging back into the wood and getting close was the only way to spot it.


The survivors fell back (when a human unit was killed, the rest had to take a 50:50 morale throw).


The spider then turned its attention to the infantry cowering in this rustic cottage.


The infantry also decided prudence was wise, but as the spider was distracted, the jeeps sneaked up behind it.


And finally poured enough .50 cal fire into it to finish it off. Everyone knows space spiders explode when they die.

That was hilariously good fun, so much fun that we played it two more times with different force mixes. We discovered that mixed jeep/infantry teams didn't work so well on the last playthrough and sadly the human race was doomed as the spider defeated us, which at least proves than game wasn't completely one sided.

Possibly appearing at a well known  gaming weekend near you in the future.

Saturday, 16 March 2019

Castricum 1799

Tim had dug up this scenario featuring the little known Anglo-Russian invasion of the Batavian Republic in 1799. Local French and Batavian forces counterattacked the invasion force near the small town of Castricum in what is now the northern Netherlands (I've been cycling around there en route for Texel and Terschilling).


The battlefield from the east. The beach is to the right (north), as is the British army. The French and Dutch are left (south). A detachment of Frencn infantry and Dutch cavalry are across the stream, which is crossed by two bridges and a number of fords.

I took the French (as usual faced with crossing a river to attack) while John and Kevin took the British.


The British left, Guards and Grenadier Guards (masquerading as Highlanders). 


Some brave Batavians in their white uniforms. These chaps were rated the same as Portuguese, so not bad at all, but not as good as their French pals in melee.


Over on the French left, sand-dunes made movement difficult for artillery and cavalry (plus all those woods!). There was to be a surprising amount of fighting in this unpromising terrain.


British infantry and a unit of horse artillery massed behind the dunes.


The British centre (infantry, light cavalry and foot artillery) faced this single unit of unfortunate Frenchmen. I was determined to pull these guys back as soon as possible.


Ah, the best laid plans.... instead the Allies pushed their left forward, and I responded with a cavalry charge supported by artillery, which was a catastrophic failure (my Dutch cavalry being reduced to a single base).


I did manage to 'pull back' my chaps in the centre. Hit by artillery fire and musketry with multiple retreat results they didn't have much choice. They were lucky to only lose one base.


I retired the crippled Dutch cavalry on the right, and meanwhile massed all the French and remaining Dutch cavalry in the centre, led by no less than two Generals.


Over on the left the British advanced through the dunes and we both pushed our guns up to close range. Surprisingly the French came off better in the exchange of fire and British unit on the dune was reduced to a single base. 


In the centre, a Leadership card enabled a glorious Franco-Dutch cavalry charge over the canal bridges.


Which duly obliterated the opposing British light cavalry on the bridge.


And then pressed on to destroy or rout two more British cavalry. The British were suffering from not having advanced off their baseline. The French on the other hand were looking a little exposed.


So they pulled back, or possibly suffered multiple retreat results (Le Moniteur was a little vague about this). Ahem.


I pulled the back over the river and moved up some French and Dutch infantry in support, along with some guns (I think I must have had an Assault card to move all this stuff in one go).


The British moved up in pursuit and I unleashed the piece de resistance, Cavalry Charge! If only I still had four cavalry units left...


This actually went rather well as the last British cavalry unit was eliminated and the Grenadier Guards were pinned in square by a single base of French cavalry, killing a base of Guardsmen in the process (the little blue infantryman on the dice). Hurrah!


My last intact unit of cavalry then tried to overrun the British artillery. They came really close, rolling two hits and a retreat, but MacDonald managed to rally the remaining crews and the gunners held on.


The French then launched a mass infantry assault across the canal. The Dutch piled into the Guards square.


French line infantry led by a General assaulted the centre.


And a half regiment of French assaulted the canal on the left.


The Batavians reduced the Guards to a single base, losing one of their own in the process.


In the centre the British were thrown back to the village.


And to everyone's amazement the French fought their way across the stream on the left.


They followed up next turn with an assault supported by artillery on the British General on the hill, which duly rolled a swords required to kill him and get the last victory banner. Vive la France!

That was a great game, really hard fought and more even-handed than my Franco-centric account gives credit for (the Allies had killed an awful lot of Franco-Dutch units by the end). So, another very entertaining CnC Napoleonics scenario, with lots of of very pretty toys.