Off we go again with another 3x3 PW/DBA hybrid game, this time is the Gauls and Samnites vs the Romans at Sentium in 295 BC. For this version I'm sticking with my sort of PW/DBA hybrid, but I'm going to use one of the suggestions on the Facebook group that the two units in a square can either be 'in column' ie one behind the other, or 'in line'. That means you could have e.g. a Spear unit with a Psiloi unit next to it, providing an overlap, or two Legionary ('Blade') units in line as they don't get a support bonus, but a bunch of hairy Warbands in 'column' to get the Wb support bonus. Oooh, I like this idea.
Otherwise everything else is as per the last game, still not figured out wheeling restrictions, but I might slightly ignore those in this one. I'll still use the initiative dice thing.
Here are the Gauls and Samnites, Phil Sabin thinks they were mainly fighting as 'heavy infantry' as Polybius described them as 'stubborn', but they, they are Gauls, so out come all my Warband elements. Quite a scary army, 2 x Average Chariots and 4 x Average Warband, plus a nameless General. Asterix?
The figures are almost all plastic, a mixture of Airfix, Esci, and Italieri. The Airfix chariots have spoked wheels courtesy of Irregular Miniatures.
NOTE: I'd misread the Army Lists, the Chariots should actually be heavy cavalry. Too late to take another picture now.
And the Romans. About time they made an appearance. These are all from the HaT Punic Wars range and the infantry are all Hastati in white tunics as this is quite an early battle. Prof Sabin reckons they were using maniples by now so all the heavy infantry are Average Legionaries (three units) plus 2 x Average heavy cavalry and 1 x Levy Light Infantry (HaT Velites).
This Army would be subject to dual consular command, but in this particular case I had Fabius in charge.
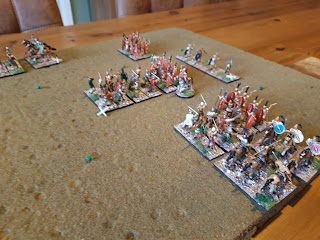
The historical deployment, the battlefield is devoid of significant terrain features.. Eagle eyed readers will note the chariots have gone and been replaced with Gallic Cavalry - the units I hated painting the most as they have horses and blokes in checked shirts. Agh.
One Warband and a Cavalry on each flank deployed in line (so the Cavalry can give an overlap support to the Wb), and two Warband in the centre in column to get the +1 Wb support bonus. The Gauls favoured their left, so the General is over here, riding one of the Chariots.
The Romans in a typical Republican battle array straight out of the Consuls drill manual. In the centre a Legion screened by the Hastati in column, and on each flank, another Legion with a cavalry unit in line. Fabius is in the centre.
The Gauls won the initiative with 4 PIPs and piled straight in with the left and centre. There is no Wb charge bonus in DBA, but Wb will kill Legions if they just beat their score (or in PW terms, score two hits).
The Gauls cunning plan was to match up the cavalry with the General on the far left for a +1 advantage, that would hopefully win and give an overlap bonus to the Wb next to them, which in turn would give an overlap bonus to the big mass in the centre. Sadly the guys in the centre were overlapped on their right by the enengaged Romans at the bottom.
In the north, both attacks failed, but the units took hits to stay in line. At least the Gallic General survived. In the centre, the Warband column defeated the Velites, but not overwhelmingly and they just took one hit.
Time for Fabius to fight back with just 2 PIPs. He pulled back the damaged Velites into reserve behind the Legion in the centre. The units in the north were still engaged so fought another round, the Roman cavalry were soundly beaten (2 hits) - they took a hit and retreated. The Legionaries returned the favour to the Warband, who also took a hit and fell back. In the centre there wasn't any contact any more so no battle.
In the north however, the Legionaries promptly side-stepped and wiped out the Gallic cavalry (2 hits). The Gallic general survived.
The Romans won the initiative and followed up with attacks in the north and centre. The Roman cavalry moved back up in the north to support the Legionaries.
With mixed results. The big Warband column in the centre was thrown back with an SP loss too, but the Legionaries were repulsed in the north - the Wb beat them, but because Wb quick kill Blades, the Romans took two hits from a marginal loss.
The slogging match continued. In the north the Warband and Cavalry exchanged blows, one victim being the Gallic General. The surviving units had a hit each.
In the centre and south was a massive Gallic counterattack. All the unengaged units piled back into the Romans. Ouch!
The Romans survived, just. The Warband were defeated and took 1SP loss each, but the Roman cavalry was also beaten and took a hit rather than retreat. Not one step back!
The Warband in the north finished off the damaged Roman cavalry.
The Empire (well Republic) strikes back. The unengaged Legionaries in the north advanced and over the bodies of their comrades and took on the Warband. Along the rest of the line, the combat continued.
The Romans in the north were defeated, but everywhere else the Republic was victorious. The Gallic cavalry retreated, and another Warband was destroyed. At this point, I started to think about victory conditions. The Gauls only had 5SP left at this point and had also lost their General, yet still seemed to be fighting on. The Romans weren't in much better shape but at least hadn't lost over half their Army.
I hurriedly set a random exhaustion point at 50% (so 6.5 SP for each Army) and anything over that rolled on a D6 would rout the Army. -1 if they had lost their General. The Gauls proceeded to throw a a bunch of sixes, so on we go.
The Romans avoided defeat by slipping the Velites across into the top row, thereby re-occupying it. The entire Roman line also engaged the remnants of the Gauls and destroyed the lot, so it had been 'game over' earlier in any case.
That worked really well and was good fun to play. tbh, I think I'd struggle to describe the geometry on paper, but it works in my head. I've realised that I am now basically playing six element DBA on squares, with hit points bolted on, and by allowing units to be in line, it effectively turns the grid from 3x3 into 6x6. Ah well, it seems to work. I'll write some of this down and then press on to the next battle in the series. I can't see this working for a multi player remote game, but it is fun to play solo.


Another interesting battle. Your hybrid system seems to work well, and also highlight the flexibility of Bob's rules. Are you going to fight your way through the book? I'm looking forward to future battles.
ReplyDeleteWell, this is the one I rather lost my way on as it was all way too complicated in terms of the in-square geometry. My plan was to fight five battles (the five in the 1st Punic War chapter of Lost Battles) to try out a range of rules options and troop types. Only two more to go!
DeleteHello Martin,
ReplyDeleteI had to laugh when I read your "I have effectively turned the grid from 3x3 to 6x6". Last year I had a go at playing some games with my own ancient rules on a 3x3 grid for some fast resolution campaign battle rules. But after a play or two I noticed I was effectively playing as though it was a 6x6 grid :-) So I gave up and then after a few 6x6 games could not help myself and upscaled to a 12x12 grid with a mashup of my own rules and DBA. But I still am playing WW2 on my 3x4 grid :-)
LOL! I actually really like the 5x4 grid in Lost Battles (with three centre squares and two flank squares per row). Essentially it comes down to how well your game maps onto area movement as opposed to a unit per hex/square type stuff. I'm not quite there yet with this one.
Delete