Sunday, 31 July 2016

WW1 in Five Games


One nice idea with One Hour Wargames is to string together a series of engagements as a mini campaign. On the AMW yahoo group some kind people have pre-done some already, and a First World War campaign of five linked battles caught my eye.

The first two are 1914 and 1915, so we had a go at these at the club. They are so quick to play you can easily get through two in an evening.

These were all played with my 15mm early war figures, generally four bases to a unit (two for artillery).


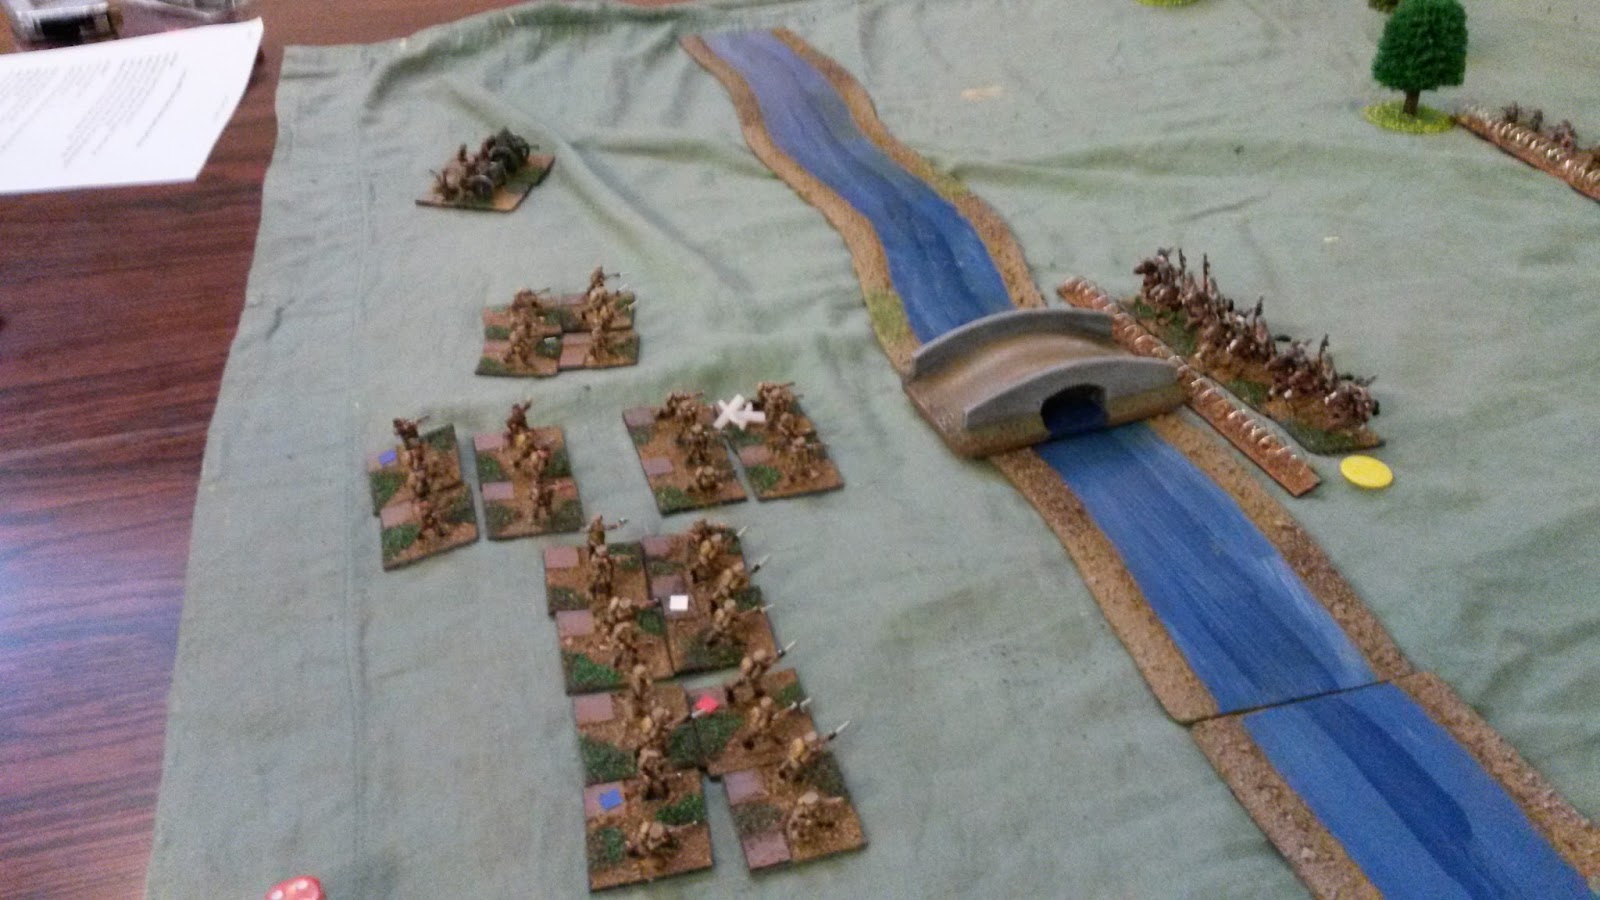
The first scenario is the river crossing one. Germans entered from the right.


And British from the left.


The German cavalry pushed very aggressively over the far bridge, supported by infantry, into the face of the British artillery position.


But massed firepower saw the Germans melt away. First game to the British.


The second scenario was defence in depth. Four German units dug in on the far side of the river.


The British had the un-enviable task of bludgeoning their way across the bridge.


The isolated German cavalry were overwhelmed despite their entrenchments, and the British went on to roll over the other German units in fine fashion.

We called it a day there. I keep meaning to go back and do the 1916,17 and 18 scenarios but some of the players said they found the mechanisms really too simple for comfort, so we've not returned to this. A shame, as I think the games were a lot of fun.

There may be some mileage in a WW1 version of 'Simplicity in Practice' which combines some elements of the fast play aspects of OHW, with a bit more crunchiness, but without the endless dice rolling of his more complex sets. Again, something on the to-do list.

Saturday, 2 July 2016

First day of the Somme (VIII Corps)

I recently picked up a copy VIII Corps on the Somme by Neil Reid and published by Vexillia. It covers the attacks by Hunter Westons Corps (specifically 31st Div, 4th Div and 29th Div) against Serre and Beaumont Hamel fronted by the Hawthorne Ridge and Heidenkopf redoubts on the far left of the British line.

As 31st Div contained the Sheffield Pals, and it is the 100th anniversary of the battle, this seemed a fitting time to run the game. I'm not quite sure why Neil picked VIII Corps as the attack was a bloody catastrophe, being into some the the strongest Germans defences and with both flanks hanging in the air, so the British have an uphill struggle at best.

The game itself is a card game, with the battlefield laid out using nine sector cards (front, second and support lines for each of the three assault divisions) and each side has a mixed deck of 'strategic' and 'tactical' cards. The strategic cards are mainly artillery barrages, gas attacks, trench raids and such like, whereas the tactical cards are used to resolve the various assaults (and resolve into combat points, the most combat points played wins).

It is a very clever design and I would highly recommend it. The first few turns (days) are spent by both sides building up the hands of cards while the British try to pound the German defences by laying down barrage cards (which remove some of the German cards, reduce the strenght of the defences and provide combat bonuses to the attackers). Once the actual fighting starts, the tactical cards are played by each side to resolve the individual assaults, and some cards (such as German 'wire' cards) can stop an attack dead.

The British aim is to capture two sectors of the Germans support line, but if the British suffer two consecutive failed assaults, the attack is called off and they lose. This is not designed to be a balanced game, and the chance of the British capturing the support line are virtually nil, however they do have a good chance of doing better than historically, and that is how I chose to judge it.


Although it is a card game, I wanted to represent the flow of the battle with toys, because I like toys. Besides, it is all very well for the generals with their cards and maps, out on the battlefield it is real plastic soldiers who are dying. In order 31st, 4th and 29th Div facing the Germans. Serre is closest to the camera. Toys are my usual mixture of Emhar, HaT and Revell 20mm. The card decks are visible in the distance.


The battlefield cards. Each sector has a variable defence strength depending on the level of fortification (Serre is a 6!) and weight of artillery fire on it.


Jerry and Graeme took the British, John and Tim the Germans. Jerry proved to be an excellent card player and adopted what he termed a 'Russian' approach to the use of artillery and infantry, piling in masses of artillery in narrow sectors with piles of tactical used in a few strong attacks. Very bite and hold. The only downside to this approach was that it relied on drawing good sets of replenishment cards.


The result of the initial 31st Div attacks was really rather promising. The Germans front line and then Serre fell in rapid succession behind the hammer blows of piles of artillery and tactical cards. The Germans were very unlucky with their wire cards, which were constantly being removed by artillery fire.


Over in the 29th Div sector, the Hawthorne mine was blown and the troops poured over the defences, Beaumont Hamel falling to their rapid assault. Things started to go a bit pear shaped after that as the British had essentially run out of cards (particularly the important 'Over the Top' cards which allowed them to attack). Failure to attack counted as a failed attack, and so everything hung in the balance as they drew a fresh hand and 4th Div launched its assault. The Germans only had three cards to play (of which one was 'wire') and the British barrage failed to remove it and poor old 4th Div was left hanging on the wire and the game ended with two successive failures.

Historically, even though small parties of troops did penetrate Serre and overrun the Hawthorne Redoubt, the only solid gain was the Heidenkopf redoubt in the centre, and even that was evacuated with its flanks in the air, so the British had done rather better than their historical counterparts. Hurrah!

Sadly I suspect that the British have just won two deep salients, and both would have to be evacuated, especially Serre. In real life Serre did not fall until towards the end of the battle, and even Beaumont Hamel was not taken until the Battle of the Ancre. 

So, an interesting little game with some useful mechanisms, I particularly liked the treatment of artillery fire against fixed defences, very simple but effective. I now need ot figure out some way to incorporate some of the mechanism into Drumfire. It is published through Vexillia: http://www.vexillia.com/common/shop_books.html#t-3

Saturday, 25 June 2016

5Core Brigade Commander

I was very excited to pick up a copy of 5Core Brigade Commander by Ivan Sorenson. It uses company sized stands and is aimed at brigade level actions to be played out in an hour or so. It has some very innovative features in the treatment of reactive fire (which essentially happens all the time), fire effects (primarily moral, not physical) and the resolution of AT fire which is based on relative effectiveness, not fixed attack/defence ratings.

I dragged out some of my 6mm toys and converted the Rapid Fire 'Maltot' scenario to use company elements. Playtesting at home went swimmingly well, and I worked up QRS sheets, briefings etc and took it down to the club.


The battlefield from the west. Hill 112 is on the far right, Maltot is visible in the middle distance, and a section of the River Odon is nearer the camera.


British artillery and reserves lined up. The British had a weak (two battalion) brigade supported by the Churchills of 9th RTR and a field artillery regiment.


The British push forward in the centre and south. The Germans initially have very weak forces (a single company of engineers and a company of Tigers from the 102nd SS Tiger Bn) but are reinforced by a panzer grenadier battalion supported by Pz IVs and a panzer recce battalion. Some of these units can be seen clustered around Maltot and the farm.


The German armoured engineers are obliterated by an artillery strike. Not much coming back from three sixes....


The panzer recce battalion takes the farm in the centre but comes under more artillery fire.


Further east, the Tigers and panzer grenadiers counterattack Maltot. British infantry supported by AT guns try to hold them off.


British infantry supported by Vickers guns and SP AT guns counterattack.


A (rather blurry) stalemate develops around Maltot, although the German infantry are now firmly in control of the town. The game was declared a German victory.

Although we did reach a conclusion fairly quickly (and with quite large forces) the game wasn't an unqualified success. There was just too much randomness in the unit activation and some of the combat effects, with entire companies vanishing in a twinkling of an eye (if they were unlucky). The British were appallingly unlucky in activating their forces which failed to move for three turns in a row (a 1:196 chance), but which rather detracted from their experience.

On reflection, all these things are fixable. It would be easy enough to give the companies more resiliance in the face of poor combat results, artillery can be toned down against armoured targets and Ivan has come up with a suggestion of rolling for activation by battalion instead of for the entire brigade. I think the randomness of the basic system is fine if you are playing a lot of battles, but we don't have that luxury, so I just need to make them a bit more predictable.

I would recommend these to anyone though as they have some very interesting ideas and cover a very wide period. They are available cheaply as PDF from Wargames Vault.

Troy

Tim arranged another outing to the Ancient world recently,  much to everyones surprise (well, mine anyway) we turned up at some place called 'Troy'. The Trojans had come out for a  bit of a scrap towards the end of the siege, and all our favourite characters were there - Paris, Hector, Achilles, Agamemnon etc. There were a couple of special rules covering the heroes, but otherwise it was standard CnC Ancients.

I got the play with the heroic Greeks, while the wicked Trojans skulked around their city walls. 

The game was played with Tims 25mm toys on hexon terrain.


View from the Greek side (with the sea at their backs, no retreating from here!). Achilles on the right, Agamemnon in the centre and Meneleaus on the left. Paris is over on the Trojan left while Hector lurks in the city.


The action primarily took place on the right. Here Agamemnon has a go at Paris (who ended up running away like a big girl).


Over on the left, Meneleaus tore the Trojans apart.


But in the end it came to the ultimate grudge match, Achilles (no longer sulking) slugging it out with the wimp Paris. The pile of crosses tells its own story as Paris was duly vanquished and victory went to the Greeks. 

This was brilliant fun, even though it was possibly slightly less historically accurate than the more dour recreations of say, Trebia. I couldn't help thinking about the relatively recent film with Brian Cox (plus ludicrous beard) as Agamemnon, Brad Pitts even more ridiculous impression of Achilles with his ninja sword fighter moves and Orlando Bloom utterly miscast as Paris. Go for it Brad.

Saturday, 11 June 2016

Simplicity in Practice

John and I both noticed a thread om TMP recently which pointed out (yet another) set of Neil Thomas Horse & Musket rules called 'Simplicity in Practice' published in issue 23 of Battlegames magazine. We both duly paid for PDF versions and got copies of the rules and comprehensive designers notes. SIP are pitched somewhere between One Hour Wargames and the rather more laborious eighteenth and nineteenth century sets, and are specifically designed to play Grants 'Tabletop Teaser' scenarios.

John duly produced a book of CS Grants Wargames Scenarios and we set to with the 'Delaying Action' scenario. I took the plucky British, while Tim and Tim took the wicked French. The scenario has a British force holding a reverse slope position (hidden deployment) until nightfall against a much larger French force coming on  in a somewhat irregular manner.   


The Black Watch and supporting artillery hold the vital gap. The rest of the British troops are hidden out of sight.


The French hordes pour on, Seven or eight infantry battalions (I lost count), three cavalry regiments,masses of artillery. They were handicapped by their entry points being randomised and they all converged in a huge traffic jam in the town.


The French sorted themselves out into a large column flanked by cavalry. First blood to the British as hits are registered on the leading French guns. This system has a traditional 'shoot at things' mechanism, the number of hits then translates into a morale roll which may (or may not) inflict a 'disruption point'. Units rout and are removed when they accumulate four such DPs. 


The French cuirassiers try and flank the guns, only to find a British battalion on the reverse slope. Oh dear! Over in the woods on the left, British light infantry (rifles, naturally) are operating. A couple of hits are visible on the Cuirassiers already (from the artillery) and the close range musketry of a fresh infantry battalion finished them off.


The French main attack lines up against the British right. The Black Watch fall back out of artillery range, while French light infantry threaten the extreme right flank. Another British battalion has been revealed, and they fell back to cover from the French guns.


On the left, French infantry engage the Rifles. Sharpe holds them off for now.


The climax of the battle, the main French assault goes in. The British artillery on the ridge have been driven back and the Light Cavalry and (very battered) Black Watch moves up in support.


As night falls, the French push the British off the ridge guarding the pass. The Black Watch and KOYLI are routed, but the French have also suffered heavy losses with their cavalry mauled and a number of infantry units routed.

This was great fun, really enjoyable and fast playing too (we got through fifteen turns in an hour and a half). The AMW yahoo group has a number of period variants including ACW, Pike and Shot, Ancient and FPW and I'd really like to try these out for some later periods. The rules included one novel mechanism I'd never seen before; in close combat units roll a certain number of dice depending on their morale, posture etc (so far, pretty normal) but then the scores are added up, the highest score wins. This worked really well and made close combat both very tense and quite unpredictable. A brilliant idea which I can think of ready application elsewhere.  

Highly recommended.

Sunday, 5 June 2016

I have been to....the Netherlands

Last summer we went on a cycling holiday in the Netherlands. It was slightly unusual in that major parts of it were on the islands located to the north of the Ijsselmeer, and we travelled between them on  a schooner, the Wapen am Friesland. While I put up a photo blog on Facebook, I've concentrated on the more military aspects here.


The naval museum in Amsterdam had this rather grand reproduction of an eighteenth century Dutch battleship.


Lined up and ready to go on a rather nice sunny morning from the port at Enkhuizen. Lots and lots of sailing ships in evidence.


Unfortunately sailing to Texel the weather was a little less kind. Another ship passes in the opposite direction crashing into the waves.


Texel is pretty flat, very flat indeed. There is one hill on the island, which the Germans obviously noticed when they occupied it. 


The entire hill was a network of Tobruk pits, bunkers, trenches etc. This view looking west, bunker on the ridge.


More bunkers covering the (south facing) beach.


A huge command bunker dug into the south east side of the hill.


The weather improved when we sailed to Terschilling. A Dutch navy warship in the harbour.


Terschilling is quite large and surrounded by treacherous sandbanks. It has a museum of naval wreckage which includes lots of debris from Jutland. This is a British destroyer wheel (I forget which ship now).  


Shell casings of various calibres.


Another ships wheel, a cruiser this time. Again, I can't recall which (possibly the Black Prince).


Debris from a shipping container. A whole beach full of trainers.


A WW1 era U-Boat conning tower. There are lots and lots of wrecked U-Boats around the island. The scrap metal on the right are parts of HMS Invincible.  


A Tobruk pit on the north side of the island (there was quite a complex of these).


Another conning tower, minus its outer shell.


And another, I think it is is a WW2 one. It is better preserved and still has some outer components.


A pleasant day at sea heading for Friesland, bikes strapped to the deck.


A medium sized bunker on the eastern side of the Ijsselmeer.