Saturday, 24 August 2024

Ponyri Station

 Continuing my Kursk mini campaign, the next stop was Ponyri Station on 7th July 1943. With the defeat of the ill timed counterattack by 2nd Tank Army, Model committed his Panzer Divisions to force a breakthrough into the Russian rear. At Ponyri Station, on the rail line to Kursk, 18th Panzer Division ran into units of 13th Rifle Corps. The Russians threw in everything they had left to stop the Germans. 


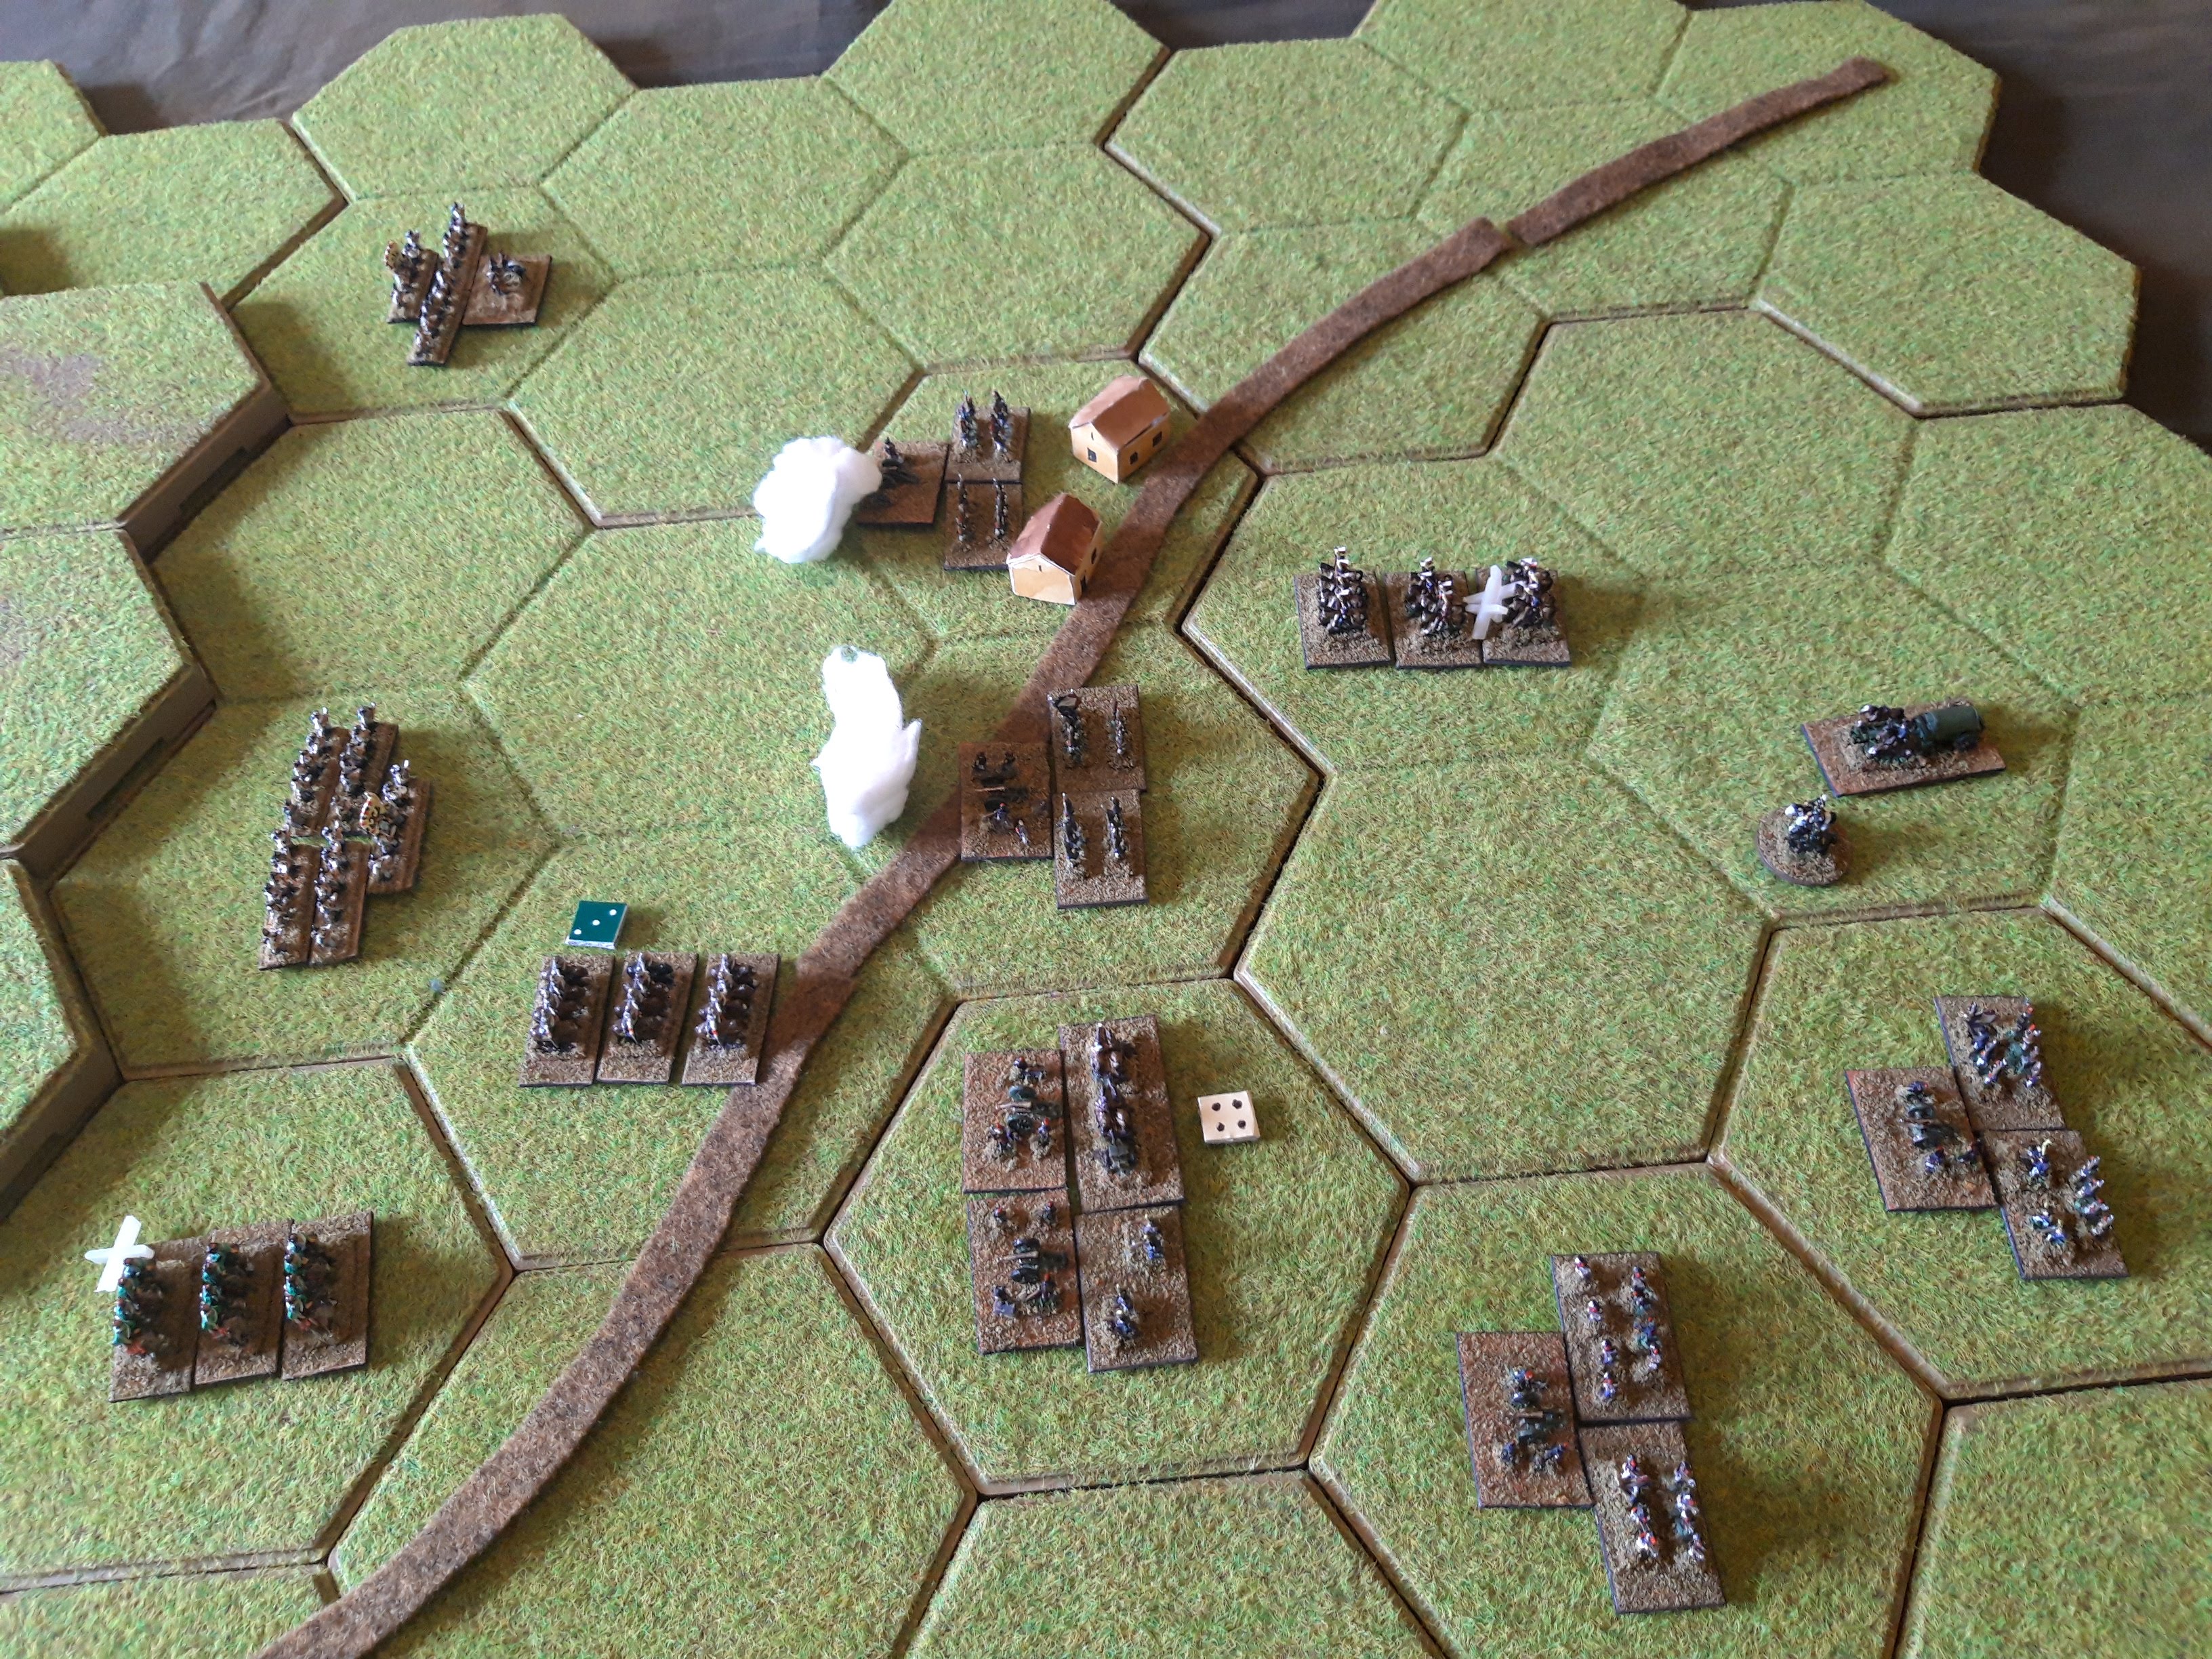
Battlefield from the south. Ponyri Station is at the crossroads, Ponyri village is on the road leading south. The rail line runs beside the E-W road. In this scenario, the hills and woods are bad going due to recent rainstorms. Astute readers will note the resemblance to Neil Thomas's 'Take the Crossroads' scenario.... Although irl many battles were fought over road junctions.


The initial Russian defenders are the remains of 307th Rifle Division, dug in along this low rise astride the railway. They have also erected some obstacles across the rail line. Each unit is a (very weak) Rifle Regiment. They still have some anti-tank guns, who are positioned with the 1010th Rifle Regiment along with an FAC. The trenches are all wired with field phones. 

John B commanded the 307th.


13th Corps HQ in the rear. As a very ordinary Rifle Corps, this is almost all horse drawn, including the combat debut of my horse drawn Field Kitchen! The Corps Commander and his friendly NKVD detachment get to ride in the command Gaz.

The Corps orders are to hold the crossroads at all costs. John A was Corps Commander.


307th Artillery Regiment offtable. Horse drawn 76mm guns.


Reinforcements on the way! 85th Rifle Division with attached Corps level assets. In the lead is the 85th Rifle Div Advanced Guard, a Rifle Regiment reinforced with 129th Tank Brigade, 237th Tank Regiment and 22nd Guards Mortar Brigade, all independant Corps level units. The tank units were designated for infantry support and a low priority for modern equipment. 

I based the 129th on the 225th which had a battalion of T70s, a battalion of Valentines and a 'heavy' battalion of 3" gun CS Matildas, so I gave it a Valentine and Matilda. The Valentine should be a 6pdr version, but I only have a 2pdr MK III. 

The 237th was based in a typical 1943 Independant Tank Regiment, which usually had a company of medium tanks and a couple of companies of light tanks, generally T60 or T70, so I gave it a T70. Later in the year they were standardised to be organised the same as the Tank Regiments in Mechanised and Cavalry Corps, with four companies. I rolled this into the Rifle Regiment.

This unit was commanded by Pete (in the snazzy BA64 Armoured Car) and the Katyusha Brigade had an FOO in a Gaz jeep. These chaps would arrive along the road to the east.


The 85th Div Main Body had two Rifle Regiments, the Divisional AT battalion and Division Field Artillery Regiment (horse drawn 76mm guns). John A commanded this as well as the Corps. These chaps would arrive late in the day from the north.


Along with their Field Guns and Katyushas, the Russians had the inevitable Sturmoviks. Another outing for my Stripey Tail.


To roll over the Russians we have the entire 18th Panzer Division! You don't often get an entire Panzer Division to play with. The 18th wasn't a great division, being a third wave unit and based on a converted infantry division (the 88th). It only had a single panzer battalion at Kursk, consisting of two companies each of Pz III and Pz IV. I was very generous and allowed them to form into two battalions, which basically meant 60 German tanks had the same combat power as 100 Russian ones, the Panzerblitz approach.

Tim G was division CO and organised the three Regiments (18th Panzer, 52nd and 101st PGR) into Kampfgruppen. The division would enter in column along the road from the west, their orders, to take and hold the crossroads.


First up was KG Markus (Mark) with a panzer battalion and motorised infantry battalion with attached combat engineers. Their job was to form up and bash through (or at least keep busy) the defenders across the road. I gave each panzer battalion a Pz III and a Pz IV as real panzer regiment had two companies of each. 


Then KG Wilhelm (Simon), another panzer battalion plus the armoured panzergrenadier battalion. Their job was to go right flanking and attack Ponyri from the south.


Finally we had KG Gow (Tim commanded these guys too). Two motorised infantry battalions, reinforced with Marders from the divisional panzerjaeger battalion. Their job to go left flanking and lock down the road from the north.


Indirect fire support included the 88th Panzer Artillery Regiment with battalions of Wespe and towed 105mm guns, the Luftwaffe with Hs 129s and 150mm Army Artillery which would fire a preparatory bombardment. 


Finally there was Divisional HQ, with a command halftrack, ambulance and my Bergepanzer III conversion.


The action opened with a heavy preparatory bombardment on the 307th, which suppressed the defenders and inflicted a couple of hits.


The lead elements of 18th Panzer began to drive on. KG Markus evidently hadn't received the orders about what they were supposed to be doing, but eventually formed up across the railway. The Panzer battalion of KG Wilhlem followed behind. 


From their vantage point on the rise, the Russian spotters could see the Germans and called in air and artillery on the Panzergrenadiers in their lorries.


Undeterred, the Panzers rolled forwards.KG Markus headed for the southern positions of the 307th. KG Wilhelm formed up on the reverse slope of the hill, prior to conducting an outflanking manouvre to the south, and 101st PGR finally rolled on heading north east.

The Russians continued to fire on Marks infantry, who became disorganised. Marks Panzers were very wisely uphill, which gave them some protection from the Russian AT guns.


All hell then broke loose as the 85th Div Advanced Guard (lets call it the Forward Detachment or FD) came storming on from the east, led by 129th Tank Brigade. The Russian tankers parked up across the railway, but both sides threw all their air and artillery into the battle for rise E6. Both the Russian and German infantry hit the deck and reorganised, ambulances ferried away the wounded while the Russian Field Kitchen brought up fresh supplies of bread and vodka.

In all the kerfuffle, KG Wilhelm advanced southeast across the muddy hills, while 101 PGR continued to march northeast.


Back at Ponyri Station 255 Rifle Regiment and their accompanying T70 Regiment began digging in, encouraged by the proximity of the Corps CO, the NKVD and Pete in his BA64!


On the rise, the 1020th Rifle Regiment was in dire straits, reduced to just one hit, and made the bold move of retreating (advancing?) north to join the 1019th. This left KG Markus a bit puzzled as to where all the Russians had gone.


KG Wilhlem had meanwhile swung around the south. Russian defensive fire hammered the panzergrenadiers who were forced to stop and reorganise, while 255 RR in Ponyri redoubled their digging in efforts. German fire meanwhile switched to 129 Tank Brigade, including the attentions of the Hs 129s. The Russian tanks were in a poor tactical position, trying to find cover behind the railway embankment while overlooked by the Panzer units on the hills to the south.


101st PGR had made it through the hills in the north and now fanned out, II/101 pinning the 1019th RR, while I/101 (with the Marders) parked up on a rise in the rear of 129 Tank Brigade! The Russian tankers were in danger of behind completely surrounded.


Hard pounding ensued, 129th Tank Brigade hung on and Simons Panzergrenadiers took heavy losses, while the defenders of Ponyri, supported by Sturmoviks, took on the nearby Panzers, inflicting light losses.


More seriously I/101 PGR was absolutely hammered, being reduced to two hits and requiring attention from the medical column to deal with the casualties.


The Panzergrenadiers had also taken heavy losses, but the Panzers finally got the upper hand against the Matildas and Valentines of 129 Tank Brigade, and the steppe was left littered with burning tanks and fleeing Tank Riders. To add insult to injury, the 1020th RR was destroyed by German artillery fire before to had a chance to reorganise.

The Russian position had been blown wide open, and the response from the defenders was muted, mainly concentrating on Simons Panzer Battalion, which took enough losses to disorganise it.


Up in the north. II/101 PGR and 1019th RR continued to trade shots, but I/101 PGR retired to the ridge behind. A rather healthier spot and out of sight of the Russians, to hopefully reorganise in peace. Both sides logistic units had been kept very busy, both in dealing with casualties, but also shifting shed loads of ammunition to the artillery, whose barrels were red hot by now. The Katyushas of 22 Guards Mortar Brigade in particular needed 'feeding' regularly as they were salvo firing two loads of ammo at a time.  


Time to finish the job. KG Markus and Wilhlem rolled up to assault Ponyri, while repair teams frantically tried to sort out the damaged Panzers on the hill. Dimly visible in the distance, 1019th RR has taken enough losses to become disorganised.


The Russians fired everything they had against Marks lorried infantry and engineers. Artillery, Katyushas, Sturmoviks, infantry, tanks... Under the sheer weight of fire the battalion disintegrated and the survivors fled for the rear. 


Going into turn 9, we broke for the evening. An overhead view of Ponyri. The Russians will have to hope their trenches save them.


An interesting situation in the north. The Russians are coming off worse here for now, but the Germans didn't have enough logistic units to reorganise I/101 PGR either. What the Germans don't know of course is that the rest of 85th Rifle Division is about to coming marching on down that road, right next to those disorganised Germans on the ridge! Well, lets see what happens tomorrow.


The first assault on Ponyri failed. The Panzergrenadiers were routed despite supporting fire from the entire divisional artillery and panzer regiment. 


And in the north the ongoing duel between the 101 PGR and 307 Rifle Div sputtered on. Supply columns and ambulances kept both sides in the fight, neither was strong enough to strike a decisive blow. 

At this juncture the rest of 85th Rifle Div rolled up, straight into the ZOC of the Marders on the ridge. The Germans had managed to inadvertently block their entry route. 


Back at Ponyri, Mark's Panzers launched another assault, covered by massed artillery fire. The defenders were disorganised from the previous attacks and unable to reorg due to last turns assault. 


Defensive fire did enough damage to disrupt the Panzer attack, and the Germans only scored one hit on the defenders. The attack was repulsed. Sturmoviks hammered the retreating tanks and they were reduced to one remaining hit! 


In the north the 307th received the attention of the Luftwaffe and had to be reorganised, while I/101 PGR was plastered by Russian artillery and the battalion became disorganised too.


Ambulances raced to the rescue of the beleagured Panzergrenadiers, apparently (based on this photographic evidence!) while being strafed by Sturmoviks. The 85th Rifle Divs leading Regiment sidestepped the obstruction while the Germans were busy, clearing the road.


Back at Ponyri, both sides paused to regroup after the previous few turns heavy fighting. Bergepanzers fixed up Marks Panzer battalion, while the doughty Field Kitchen sorted out Petes boys in Ponyri.


The Panzers rolled forwards once again, covered by Simons tanks on the hill and artillery, and once again took massive losses from Russian artillery and Katyusha fire. They were however adjacent to Ponyri once more. The Field Kitchen (and NKVD) once more had to encourage the wavering defenders.


At the 307th Div position things quietened down as both the 1020th RR and II/101 PGR needed reorganising. The Russians kept up a steady fire on I/101 PGR to cover the entry of the third Regiment of 85th Rifle Div.


At Ponyri Mark bravely volunteered to charge the town with his few remaining operational tanks to pin the defenders and allow Simons tanks to close. Von Gow vetoed this suggestion and instead ordered Mark to refit his battered tanks, while Simon and the artillery continued to pound the blazing village.

The gunners finally got their eye in and the battered defenders broke and ran under the heavy German fire, leaving burning houses and wrecked T70s behind them.


In the north the Russians continued to plaster I/101 PGR, keeping them thoroughly pinned.


This allowed one Regiment of the 85th Div to break free and rapidly march south through the woods towards Ponyri.


Sadly it was too late, Ponyri was now undefended and the Russian infantry was still a move away. Tims blocking action in the north had held up the Russian reinforcements just long enough.


As time ran out, Simons Panzers cautiously entered the demolished town and the Germans claimed victory.

Well done to all sides, that was a very close run thing! I was very impressed with the standard of play on both sides, there was admirable concentration of effort, economy of force, maintenance of the aim etc and both sides respective commanders were faced with tough decisions allocating their logistic efforts between keeping their indirect fire assets supplied and their combat formations effective.

A breakthrough here would have forced the Russians to commit some of their strategic reserves, which in turn would have hampered their strategic offensive towards the Dneipr later that summer. In reality 18th Panzer Div failed to break through at Kursk, and in fact suffered such heavy losses that the division fell apart with low morale and high rates of desertion. It was dissolved and struck from the Order of Battle. Elements of the division later reappeared in 1944 as 88th Artillery Division, but it never got any tanks again.

The failure at Ponyri ended 9th Army's hopes of breaking through the northern flank of the Kursk Bulge, and although the fighting fizzled on for a few days longer, Model essentially gave up at that point and instead starting looking nervously as the massed Soviet Armies behind his rear left flank. Something for another day perhaps.


Wednesday, 21 August 2024

15mm Morris Armoured Car

 The Morris was an early desert Armoured Car, and generally mixed in with Rolls Royces as it was equipped with a radio (and the Rolls weren't). 


It is actually a nice looking little vehicle. This one is QRF, and I have no great compunction about using it for the entire desert war as it has a similar "Mad Max" feel as Marmon Herringtons. 


The model came in several bits, turret, wheels, separate Boys ATR. The hull is hollow, which keeps it light, but it was the usual pig of a job sticking the wheels on, helped along by blobs of Blu Tak.  The wheels are cast with those very distinctive fat Morris tyres. 


The hull rear is an interesting arrangement. I can imagine some brave chaps riding the mudguards. The vehicle commander is a PP sitting figure in a service cap, cut about so I can wedge him in the turret. There is also a very spindly cast on gun barrel, which I think is supposed to be a Bren. When it falls off, I'll add an actual Bren from the spares box. 


I did it in Caunter, Dark Grey over Light Green over Light Mud, plus all the usual washes, dry brushing etc. 

That is a very nice model. It looks quite speedy, and also has something of that desert "gypsy caravan" look about it. 


Tuesday, 20 August 2024

One Hour Aspern Essling

 As I wanted to try out some revisions to the morale system in my OHW Napoleonic variant, I thought I'd give Steves 'Echeloned Attack' scenario a go. https://soundofficerscall.blogspot.com/2024/04/scenario-31-echeloned-attack-developing.html

It is based on Aspern-Essling, so a chance to get the Austrians out.


Battlefield from the south, Aspern left centre, Essling right centre. Imagine the Danube and the islands off to the south. Obviously I've converted Steves scenario to a 9x9 hex grid. The only terrain I added was the NW-SE highway which ran across the front. If doing it again I'd probably do a bit more research on the minor terrain features as I did for Friedland.

Massenas Corps starts deployed on table in and between the villages. I roughly worked out the OBs based on the historical forces, and as usual each unit is around 8,000 infantry or 4,000 cavalry (possibly a bit more for this one). On a 9x9 grid I prefer a higher unit density than the standard 6, so I aimed for 9 on each side.

Massena starts with two infantry, one Cavalry Corps and the lone French artillery unit - most of the guns are assumed to be factored into the units.


The French reinforcements straggle on across the Danube, each unit may be delayed by Austrian attacks on the pontoon bridges. First up is Lannes Corps with two units, then the Imperial Guard with one elite infantry, and finally Bessieres brings up the rear with the reserve Cavalry. I added another infantry unit to the Imperial Guard, which makes the number of units even on both sides, although the French have two leaders as well (Massena and Lannes). Napoleon and the baggage train are purely representational.


The Austrian right wing, Hiller and Bellegarde with two infantry and an artillery. Coming on down the road is Prince Frederick with another artillery and another infantry. The Austrians had such a huge artillery superiority in this battle that I gave them two guns. Each is assumed to be supported by around 4,000 infantry for headcount purposes. The Austrian Army HQ is lurking in the top corner.


Lichtenstein commands the Austrian centre, two cavalry and the Grenadier infantry. Finally Prince Franz is off in the far corner with another infantry unit. The arrival of all these units is staggered so Hiller and Friedrich move on first, then Lictenstein, then Franz, hence 'Echeloned Attack'.


I struggled with the French deployment. Both towns have to be occupied, which was best done by the infantry. I left them configured as massed infantry and not lights, which reduced their defence vs artillery fire, but increased their firepower. I put the cavalry in reserve, ready to intervene/block/harass as required and in the end went for quite an aggressive deployment of the Grand Battery, angled to cover the highway (which of course exposes its flank to Lichtenstein). I could always move it later I figured. Right.


Hiller came marching on first in column of route, but deployed his Grand Battery in range of Aspern. I really messed up the initial Austrian deployment, the lead infantry unit moved into range of the French unnecessarily and suffered two hits from long range artillery fire.


And then more Austrian infantry managed to mask the guns! What a cock up. Prince Franz at least came marching on, so there was a big local superiority over Massena in Aspern. The French cavalry went floating around north of the road to discourage anything too brave. It is now in charge range of the limbered Austrian guns, so they would be advised to deploy. 

One of Hillers units has now taken three hits. For this game I've dumped the old disorder rules, instead units which aren't adjacent to the enemy can rally hits off. The wrinkle is that they only get half back, and the rest become permanent hits which can never be removed (thank you NQM). Think of them representing actual casualties and/or a permanent loss of cohesion.

If a Leader is with a unit (like Massena in Aspern), they can attempt to rally next to the enemy, but at some risk to the Leader.  


The Austrians manouvre very aggressively against Aspern to maximise their local advantage. All their guns are deployed with the village in their firing arcs, and no less than three infantry units are now deployed, one has pressed hard up against the town to clear fields of supporting fire and assault the village.

Lichtensteins cavalry are now up on the high ground, forcing the French cavalry to fall back and cover the flank of their guns. The remaining French can only blast away and hope for the best. The Austrian unit beside Aspen is masked from the French guns so Massena will have to drive them away himself. That was why I left them formed up in close order.


Help is on the way as Lannes now starts to march on in column of route, heading for the sound of the guns. Neither unit was delayed crossing the Danube.


All hell breaks loose around Aspern as almost every Austrian unit opens fire, the Austrian guns rip into the French infantry and Massena suffers heavy losses. Lannes closes up on Aspern and deploys behind the village, while his other column moves to support the Grand Battery. Massenas defensive fire is quite effective, and the Austrians now have one unit on four hits and another with five. Massena in Aspern is now on three hits though.


At Essling it is a bit of a Mexican standoff. The Austrian cavalry occupies the high ground but needs more infantry support to attack effectively. Lannes' relief column will arrive before the Austrian infantry.


The Austrians pour more fire into Aspern. Massena is forced to retreat or be destroyed. He could try and rally in place but the risk is too great. Instead Lannes marches in and occupies the village while Massena falls back. 


Meanwhile, things are happening at Essling. The Grenadier division is now deployed on the ridge and Prince Friedrich is moving up on the left. The Austrian cavalry has a go at the French, but only inflict one hit and bounce off. Lannes' other infantry unit deploys next to Essling.

The French cavalry counterattack and inflict two hits on the Austrians. Was that wise? It was too tempting. They are still covering the flank of the French guns but are now a bit exposed. 


The intense fighting at Aspern continues. Massena and Lannes concentrate their fire and one Austrian unit is finally routed, but Lannes is shredded in Aspern and takes four hits. Unlike the real battle, Lannes survives, for now....


Back at Essling, the Austrian Cavalry come back again, and supported by the Grenadiers, the French cavalry are shredded. They withdraw behind Essling to rally. This of course leaves the flank of the Grand Battery exposes tot he Austrian Cuirassiers on the ridge. I got too carried away firing at the Austrian assault on Aspern.


At Aspern, Massena rallies, recovering all his hits but keeping two as permanent ones (those unsightly white markers). If I keep this mechanism I'll make up some different markers for permanent hits which are less obtrusive. Lannes is now quite weak, hopefully I can swap the units back next turn.


The Austrian attack on Essling finally goes in. The infantry advance off the ridge and then cavalry charges the French guns and inflicts a whopping four hits! (flank attack). The French cavalry rallies, obtaining two permanent hits, and now Napoleon and the Imperial Guard are moving up in support. I could withdraw the guns to rally, but the French infantry are so near now....


The Austrians take Aspern. The French are routed and Lannes escapes by the skin of his teeth.


And the Austrians crash into the French at Essling. The Austrian infantry very aggressively moves up to Essling, and the Austrian cavalry charges both the French infantry supporting the town outside, and the French guns. The Grand Battery is overrun.  The guns are lost and the gunners flee or are cut down.

The crisis of the battle is upon us.


The Austrians assault Essling. The cover of the village proves to be good protection and the defenders are largely unscathed. The revived French cavalry even puts in a charge on the Austrian infantry. The struggle hangs in the balance. 


In the centre the exposed Austrian cavalry pull back to rally and are subject to long range fire from the second line of French infantry. Massena heroically leads his battered infantry in a counterattack and retakes Aspern!


The Austrian attack on Essling begins to struggle, and the French cavalry rout one of the attacking infantry units..


The Austrian Grenadiers don't have any choice but to turn to face the French cavalry, and the Austrian horse (with one hit left) puts in a final charge. I completely forgot that Line Infantry can turn to face cavalry, and so what would have been a devastating flank attack, became an ineffective frontal attack. 


The final Austrian units at Essling are blown away by massed defensive fire. Even though the Austrian horse on the ridge has rallied, they are now carrying three permanent hits and are very fragile. There isn't much the Austrians can do here now.


And back at Aspern, the Austrians still have their guns, but only one weak infantry unit (also carrying three permanent hits). If the Austrians hang around, they might batter Massena some more, but they are just going to get their guns overrun by French cavalry.


So game over, Napoleon has (just) pulled it off. Wagram next!

That was a really good scenario, very enjoyable, and well balanced. As it is a while since I've played the Napoleonic rules, I made a few rules mistakes. I also messed up some of the play for both sides, particularly Hillers deployment and the French battle in the centre. The Austrians need to be aggressive in this scenario as the French reinforcements will tip the balance later in the game, but I erred on the reckless  at times. This was the first game I've played where the combined arms stuff really worked though, as if you could get your artillery/infantry/cooperation going properly, it was just devastating.

The new rally system also worked well. It felt less gamey than the old system and it perhaps increased the impact of player decisions as it was less random. Deciding whether to fight, run or stand and rally was really quite hard a times. I'll try another game with it, and if I stick with it as a mechanism, I'll make up some more markers for permanent hits as the tile spacers I was using stick out like sore thumbs.  As I was solo playing, I didn't use the sabot bases for this either, which looks much better I think, but I'll keep them for remote games as it makes the pieces easier to manage.

Regular readers may have noticed a drop off in solo game posts, that is down to me playing Fallout 4 (again) but on Survival Mode, thanks to the TV series. I don't usually play big computer RPGs in the summer, but for some reason it grabbed my imagination. As the last run through took me 180 hours, this may take me a while, especially as I've downloaded the Far Harbour and Nuka World expansions. I will try and keep a bit of solo gaming up, but there are only so many hours in the day. Normal service will be resumed at some point! 


Friday, 16 August 2024

Kaliningrad - NATO prepared

 We had another crack at the Kaliningrad game, this time scenario 3 which has  a higher level of NATO preparedness. There are some NATO units already in the Baltic States and NATO has tac nukes available. Belarus is still 'neutral', but Russian units can pass through the country.

As before, Russia aims to open up a land bridge to Kaliningrad, both sides get points for enemy units destroyed, occupied capital cities and big points if the land bridge is open (or not). Use of tac nukes risk nuclear escalation and the end of the world. I missed the Tuesday night session which ended in a nuclear WW3, and lined up for Wednesday starting afresh. Mark and I were NATO and Jim was the Russians.


Starting positions. You can see the extra NATO units in Estonia, Latvia and Lithuania and there are already the first Swedes and Poles in Finland and Poland respectively. The NATO reinforcements schedule is also accelerated. NATO has roughly 50% more forces in this scenario at start than the first one we played.


The Russians made use of Belarus to mass forces in safety, while the Kaliningrad garrison utterly annihilated the Poles and tentatively pushed into Lithuania. NATO pulled back where appropriate to improve local force superiority but did have a little push towards St Petersburg.

Reinforcements began to roll up and we pushed them onto requisitioned car ferries heading for Latvia.


The Russians now pushed hard into Lithuania and Latvia. Vilius held out but we had to fall back to Riga. The NATO offensive towards St Petersberg also petered out and the Finns fell back to Helsinki. There was now a regular conveyer belt of NATO units sailing across the Baltic into Latvia and the Russian Baltic Fleet seemed very reluctant to intercept. Masses of Russians were now marching west though. 


Perhaps a bit too massed. A big stack of Russians in southern Lithiunia suddenly found themselves turned into radioactive dust, which cleared the way nicely for a NATO counteroffensive to isolate Kaliningrad again. WW3 didn't break out (phew) and the force ratios were suddenly looking a bit more favourable. Ideally we woudl have nuked the troop concentrations marching through Belarus, but that would have made the Belarussians hostile.

Meanwhile we were careful to avoid stacking more than two units together to avoid presenting a juicy nuclear target. There was now a nice mass of NATO units in northwest Lithuania and Latvia, while Estonia had actually repelled the Russian invasion.


The Russians came on into Lithuania from Belarus, but rather more dispersed this time, which led to a vicious series of small battles along the border with Belarus. NATO units were also operating in eastern Poland now and the Kaliningrad garrison looked a bit thin on the ground. 

We ran out of time at that point with NATO ahead on points.

That was certainly an easier fight than the first scenario for NATO, but Russia is still terribly strong, and the early NATO first use of nuclear weapons probably wasn't going to go down well on the world stage. I'm still not convinced about the penalties for using nuclear weapons, the way the game is structured it doesn't make much sense not use them at the earliest opportunity, it just gets a lot more dangerous after the initial exchange. 

Still, it was another  interesting outing to a potential flash point, which like so many others, could kill us all very quickly. 


Thursday, 15 August 2024

Dodge 4x4 truck

 Although I have lots of GMC 6x4 trucks, I don't have much medium sized US transport, so I thought I'd try out one of the BPM Dodge 4x4 trucks to see how they are.


As it was a trial, I went with an APL model, which was cheap, but has very obvious striations on the tilt. That is OK as it is battered canvas. I went for the covered version, but in fact the tilt comes as a separate piece. The model itself had the usual great bed of printing flash to remove, but it came away OK.


It is actually a very clean model with nice detail (apart from the lines on the tilt)


The wheels and bonnet detail and very good indeed. As it is covered I didn't bother adding any crew. I just did it overall OD with a bit of a dusty drybrush.


I did pick out the headlights and tail lights with POSCA paint pens though.

That is a nice model, I may get a few more of those as they are handy for all sorts of things. Not sure about tilt on vs tilt off though.


Monday, 12 August 2024

Forged in Battle 105mm LeFH

 I thought the DAK deserved some dedicated artillery, and I wanted some sand coloured 105mm guns anyway. Sadly BPM don't do 105s, so metal it would have to be. I did vaguely think about getting some more QRF 105s, but in a moment of madness I passed the Forged in Battle stall at Partisan and saw they had packs of two 105mm LeFH, including crew.

What they didn't have on was a price, but I was in 'must have' mode, and had a horrible shock when I came to pay. Fifteen quid! Fifteen quid for two guns? I could buy an entire battery of QRF guns for that. To paraphrase Samuel L Jackson in Pulp Fiction, we'd better be talking some absolutely charming motherf***ing guns here.


Anyway, they are actually rather charming motherf***ing guns. Exquisitely detailed, and with lovely crew figures who aren't loaded down with gear and actually have bare arms. One guy is even in his shirt. Hooray! 


They are reasonably easy to assemble, the wheels and trails are a single piece casting thank goodness, the barrel sits on them fine, but sadly the shield is separate, so a degree of cursing was involved to get all the relevant bits to stick together at the correct angles. Compared to some guns I've built those, these were a walk in the park though.


The detail on the breech etc is great, as are the tyres on the wheels. There wasn't much flash on them, although one model did have a damaged tyre. I couldn't be bothered to repair it, put it down as battle damage.


The guns were just done in overall sand (VJ Dark Sand this time) over a grey undercoat. I did the crew in tropical uniforms, but went a bit heavier on the olive green so they are good for other warm weather campaigns in Russia and Europe.

I also only used a few of the supplied crew figures and fleshed them out with some Peter Pig DAK gunners. I have other uses in mind for them in the future.

So, despite my price shock (I've obviously lived too long in Yorkshire), these turned out very well in the end and I'm pleased with them.