Saturday, 16 April 2022

Neil Thomas ACW - Stones River 1863

Next up in my ACW campaign was Stones River in 1863, using the OHW 'Control the Bridge' as the scenario. Close enough. It could be done with Pitched Battle, but Stones River ran right through the middle of battlefield and so this looked a better candidate.


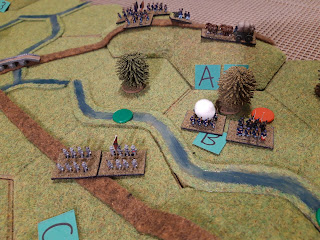
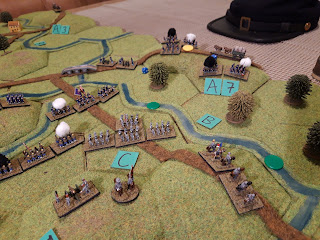
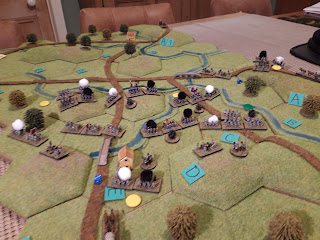
Battlefield set up as per the scenario. Hill bottom left, small wood top right, the rest is scatter terrain. The Union enters first from the north, CSA from the south. This gives the CSA a chance to respond to the USA deployment as historically the CSA attacked.


The US Army under Rosencrans. I used historical unit proportions, so they have a Cavalry unit, two guns and six infantry for nine units. I just allocated unit quality proportionately so they have one Veteran, three seasoned and two green infantry. 

I'd made a few rule changes: artillery was beefed up so generally got two dice, cannister was now four dice. I also added Army Morale with each side starting to dice at 50% losses, and some Leader rules. There was a command distance, units more than 8" from the leader had to roll to move, and leaders could also influence morale tests and rally results at some risk in certain circumstances. Finally I reversed the order of morale tests for charging. Paddy Griffiths noted that the more experienced units became, the less likely they were to charge frontally in the ACW, so now Green troops charge on a 4+, Veterans on a 6. As close combat is so bloody in these rules, that seems sensible.


The CSA under Bragg. Strangely they ended up very like the Union, with two guns, a cavalry and six infantry (1 x V, 3 x S, 2 x G). I added one of my new wagons for flavour and there is also a dismounted cavalry stand for if the troopers get off their horses.


Over on the left the USA put three infantry in line abreast towards the bridge. Their guns unlimbered in the centre. The CSA responded with no less than three infantry (including their Veterans), their cavalry and both guns on the hill! This is actually a much better spot to fight and I made a big error with the USA deployment here. The CSA cavalry even made it over the bridge and got off their horses before the US could get there.


Over on the right the USA also made a cavalry dash for the bridge, supported by two infantry. Id somehow managed to deploy everything so there wasn't actually room for my sixth US infantry unit, not a brilliant piece of staff work. Well, it kept one in reserve which I'm sure will be handy. The CSA responded by simply marching up a line of three infantry to cover the bridge.

That d**n wood! It completely got in the way. I'd planned to put an infantry unit in it to cover the bridge, but it basically just slowed everything up as I had to manouvre through and around it. The US cavalry didn't get as far as the CSA as a result, and dismounted on the wrong side of the river. A withering volley of CSA rifle fire inflcited 50% losses on them in one turn. Ouch!


The US cavalry duly routed right into their supports and were destroyed. What a disaster. Over on the other flank the CSA cavalry were also battered by the US infantry, but being better quality, stayed so I mounted them and rode them out of harms way. Unfortunately they were also parked right in front of a great mass of their own infantry....


The USA duly shot them up again and the CSA cavalry disappeared. Now the entire CSA infantry line rolled forwards to the river supported by their artillery. Hilariously there still wasn't space to deploy the reserve US infantry unit. I'd left gaps, but none big enough to fit another unit. 


Now the grim attritional phase of infantry combat started. Both sides blazed away at each other. The CSA had more units in line, but the US had one unit in cover and slightly better artillery, As units lost bases the fire became more ragged and some units fell back. One of the victims of this was the CSA infantry in front of their artillery, they were forced to retreat into the guns and destroyed. That is a lesson for the future.


As the firefight intensified, both sides Generals positioned themselves to aid morale and rallying instead of optimising their positions for movement. The numbers engaged were  now equal, and the USA brought their reserve unit on. It stayed far enough back not to impede any retreats!


CSA units started to pull back with heavy losses (the black puffs indicate lost bases). This of course tipped the advantage ever further to the other side.


The seasoned CSA unit at the left hand bridge was overwhelmed with fire, just leaving the Veteran Zouaves and the General. On the right the CSA units had all fallen back and set about trying to rally. They still covered the bridge with fire from their position. One of the USA units had also fallen back.


The Zouaves also fell back and a bit of a lull fell on the battlefield as both sides tried to rally hits off. The Generals were very helpful here. 


The USA felt a bit more confident now and a unit rushed the bridge on the left as the whole flank rolled forwards (again carefully leaving a gap for any retreats). The CSA infantry and guns opened up on them, but the accompanying US General helped them pass their morale test. One of the CSA units from the right moved across to help.


The US Zouaves approached the bridge on the right and ran into a hail of fire from the remaining CSA units. Being Veterans though, they held their ground.


Meanwhile the US column pressed on over the left bridge, supported by the units on its flanks. They were now in cannister range of the CSA guns. Three bases lost! But the General kept them going.


The intrepid infantry then charged the guns. I'd completely forgotten they needed a morale test to do this, but they rolled a 5 and overran the first artillery battalion. They had lost three bases and had three hits on the remaining one. I can see why ACW units were reluctant to charge... 

The reserve infantry meanwhile followed their mates over the bridge.


Over on the right the Zouaves also crossed the bridge in the face of rather scattered CSA fire. The Green infantry marched out of their wood in support.


Now it was the CSA turn to charge. The infantry made their charge test and the Zouaves were hideously unlucky with their defensive fire.


Over on the left the impetuous chargers were despatched by point blank cannon fire, but the US managed to push back the CS relief unit. More US units lined up to cross the bridge.


Over they went. This time they failed their charge test. Probably a good thing. Two US units were well over the river by now.


Over on the right, the Green US infantry charged the CSA. Green units pass their charge morale test more easily, and fortunately for them, the defensive fire was fairly ineffective. Three hits but not enough to lose a base.


They also won the close combat and threw the CSA units back. I was a bit dubious about the very simplistic close combat system, but it does actually work quite well as a lot of the situational factors are already accounted for. Well done Neil Thomas, avoiding double counting again.


Over on the left both sides settled into a firefight again with the Union firmly in control of the bridge.


On the right the Green US troops fell back after taking some hits, but then CSA ran out of time to re-capture the bridge. So after a rather shaky start, it was an unexpected US victory.

That went really well and flowed along quite nicely. At one point I was worried it might just become a dull dice throwing contest, but it suddenly opened up again and there were some difficult tactical decisions to make. 

It took almost two hours to play, so certainly slower than vanilla OHW, but not as tedious as some of the NT rules which have endless dice throwing and not much to show for it. The leaders worked really well although no units ever actually failed a move roll, it was always a bit tense when they were out of command range. Where they really came into their own was in rallying, and both commanders took big risks intervening in tactical battles. I'm amazed they both survived.

The only real problem was the space taken up by the units. How can half a dozen units with a 60mm frontage fill a 60cm wide table? I'm still baffled. I might try upping the table size, or play around with a grid and see  how I get on. Something for next time.


Wednesday, 13 April 2022

Desert Airforce - bombers

 Along with the Hurricanes, my 6mm Desert Airforce needed some bombers. Being the desert they weren't exactly top of the priority list for shiny new stuff. I went for planes which could be used for daylight ground attack as well as operational bombing stuff.


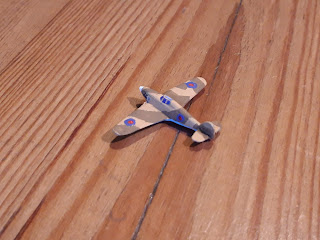
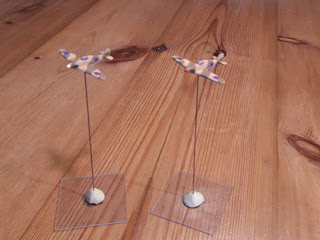
More 1/300th scale H&R. On the left is a Blenheim IV and the on the right a Martin Baltimore (which replaced the Blenheim).


The Blenheim is a lovely little model, really very clean and quite dinky. It must have been a bit of a cramped ride as it isn't a lot bigger than a Hurricane. Easy to see how it could function as a heavy fighter as well as a light bomber.


As with the Hurricanes I did this using a temperate scheme as a template but with the green replaced with sand. A wrinkle on this one are the metal leading edges of the engine cowlings, which I picked out in gunmetal. 


The Martin Baltimore was a US built aircraft which replaced the Blenheim in the light bomber role. Like the Blenheim it is also a very dinky little plane, with a pleasing configuration. This one is also done in an RAF scheme, with hand painted roundels. It was a bit easier to paint them on the larger aircraft than the Hurricanes.


Both the Blenheim and the Baltimore have a fair amount of glazing. I painted this dark blue with some sky blue highlights. In retrospect the highlighting was probably a mistake as I picked out (some) of canopy struts in sand and there isn't much contrast between the sky blue and the struts. Oh well, it doesn't look too bad from a distance. 


Here they are patrolling the dining table on their flight stands.


This time with a Hurricane escort. You can see how small both the bombers are (although the Hurricane is also quite a large fighter).

I'm glad to have those as an addition to my desert forces, hopefully they will get to bomb something soon.


Saturday, 9 April 2022

1st Bull Run (again) - with people this time

 I'd volunteered to run a game and I wanted to try out my reworked Rifle and Kepi with a human audience. We'd played the old card driven version many times at the club, but I'd hoped by moving to the Belle Epoque dice driven system and with a streamlined combat system, it would work better for remote play. Well, lets see how that turned out.


The battlefield from the south. Regular readers will be familiar with this as I'd used it for solo testing. The Bull Run is the river running E-W towards the top, and the objectives for both sides are the stone bridge and ford nearby which cross it, as well as the two hill hexes right in the middle (Henry Hill and Bald Hill). Newmarket is the small town in the foreground and Sudley Springs up in the top left.


Stone Bridge was held by Evans Brigade, and Balls Ford by Cocke. These were commanded by Mark and Jerry respectively.


Union 1st Division waiting to march on from the North. Sherman and Schencks brigade plus some artillery, all commanded by Diego.


Union 2nd and 3rd Divisions marching down from the northwest. The whole lot was commanded by John (BG McDowell).


The rest of the Armies of the Shenandoah (Johnstone) and Potomac (Beauregard) hurrying westwards from Manassas. Tim C was Johnstone, overall CO, Jerry was Beauregard and Mark commanded individual brigades within those commands.


I thought the CSA might have time to do some digging, and I found these rather neat log based entrenchment markers in  my box of fortifications.


Bartow and Bee (I'd merged their brigades) waiting to come on along the Newmarket turnpike. 


The action opened in the northwest as 2nd and 3rd US divisions came marching on towards Sudley Springs while Johnstone watched from the nearby hill. Evans occupied the hill next to stone bridge (as happened irl). The ZOC seriously impeded the US march columns.


Over in the east, Sherman marched on smartly but only had enough movement points (MP) to deploy into battle formation up on the ridge. Schenk came piling down the hill in fine old style and engaged Cocke, who was waiting to receive them. Sadly for the Union, the woods masked their artillery from firing at the ford.


Bartow and Bee made a  magnificent movement throw (rolled a 6, for 8MP in march column) and marched four hexes along the turnpike, making it as far as the bottom of Henry Hill.


The action didn't open well for the Union. As Cocke had prepared to be attacked, he had the combat advantage, and bad dice rolling by Schenk resulting in him taking losses and routing! He might have been better off waiting for Sherman and making a combined attack.


Over at Sudley Springs the leading Union brigades (Porter and Burnside) deployed into combat formation while Howard was still in Sudley Springs in march column. In the face of superior numbers, Evans fell back, and was joined in line by Bartow who deployed into battle formation.


Back at Balls Ford, Schenk rallied to shaken and Sherman moved up in support. The extra fresh brigade tipped the balance the other way and Cocke became shaken. I made a mistake here, Schenk should have routed to the nearby wood and then rallied, instead I left him in place. It is hard work running a game for half a dozen people and I was distracted.


At this point Jacksons brigade came on, along with some artillery. Jackson immediately deployed and marched into battle, while the guns moved onto the hill to the south but didn't have enough movement to unlimber. Jackson evened the odds and both sides just exchanged fire, suffering some losses.

The white puffs indicate a single hit (not enough to remove a base), and the black puffs are two hits, which removes the base from combat. I left the bases on but marked as inffective with the black puffs. Well, I've painted all those figures so they may as well stay on the table.


Over in the west, Burnside got stuck trying to cross Bull Run, but Howard and Porter piled into Bartow and Evans. The resulting engagement was inconclusive, despite effective Federal artillery support. Both sides suffered some losses but stood.


Now it was a case of hard pounding. Burnside managed to enter the battle from the north, and coupled with support form both Union artillery battalions, Bartow and Evans came off worst and became shaken.  The CSA units are at a serious disadvantage now, the US combat advantage is 5:1, not even accounting for the US artillery support. If the CSA don't rally they will have to withdraw or face being routed.


The CSA artillery was able to open fire at Balls Ford at (almost) point blank range, supervised by Johnstone. This was enough to tip the balance and both Sherman and Schenk took losses and became shaken. The Union units here are now at a big disadvantage, and they are the ones who need to rally or pull back. 

We ran out of time and called it a night there. The mechanisms seemed to be working OK and the players said they enjoyed the decision making around the dice allocation to units. The rules around the leaders were a bit complex, I need to think of a better way to manage them, possibly the BBB mechanism of having a separate leader movement phase?

The biggest problem was that we'd only got through four turns of a ten turn game, so it was playing a bit too slowly. Have to see how we get on tomorrow, evening starting with the critical rally attempts for both sides. Now the forces are all engaged it may move a bit faster.


The action opened on turn five with Sherman managing to rally while Schenk fell back shaken. Cocke retired to the CSA gun line and Jackson took over at Balls Ford.


Evans and Bartow fell back to Henry Hill, but the run of dice draws meant the US was able to follow up closely and engage them. Howard lost contact, so it was only a portion of the Union force which was able to attack.


The battle at the ford went Jacksons way and Sherman took some losses and was disorganised.


On Henry Hill, Evans and Bartow were routed by the superior numbers of Union troops with artillery support. Evans fell back to Newmarket and was joined by Gen Beauregard, while Bartow lurked in some woods to the south. Evans failed to rally despite the presence of the General and his routed troops dispersed (routed units lose one step a turn and they only had one step left).


Sherman was now outnumbered 3:1 in combat dice by Jackson, so retired away from the ford to rally on the ridge along with Schenk. They were safe up there as the Union artillery was deployed and firing away.


In an act of astonishing heroism, Cocke now reoccupied Henry Hill, accompanied by Beauregard (they rolled a 6 on the move dice). This forestalled the Union occupation by a turn. Howard was able to move up to the creek though, ready for a mass attack next turn.


Under artillery fire and heavily outnumbered, Cocke was routed and fell back to Newmarket. The Union had failed to occupy Henry Hill this turn though and now JEB Stuarts cavalry had arrived and Jacksons artillery was deployed north of Newmarket.


Union 1st Div was stuck on the ridge trying to rally as CA reinforcements poured down the road from the east. The Union finally occupied Henry Hill, but Jackson placed his brigade squarely in their path at the base of the hill (which was exactly where he ended up in the real battle).


As the Union occupied the ridge, Kirby-Smith and more guns arrived and rapidly marched to the heights south of Newmarket. Everything now hinged on Jackson, could his brigade hold back the Union for a turn?


In a brutal exchange of fire, Jacksons brigade took heavy losses but held firm at the base of the hill. And that was how he got is nickname, 'Stonewall' Jackson.


The time gained allowed the CSA to slip in another brigade to support Jacksons right, while Stuarts cavalry moved towards the unguarded ford. Schenk had managed to rally up on the ridge though, while Sherman was still disordered. The US artillery massed into a grand battery north of Stone Bridge.


Finally Kirby-Smith and Ewell moved up to support Jackson and attacked the Union troops on Bald Hill, while Stuarts cavalry dismounted in the woods across the Bull Run and were engaged by Schenck. The battle line now extended along 7km of front and all the artillery was in action.


There were an awful lot of combat dice to throw. The CSA had committed some fresh units however, so had a dice advantage (the white ones) over the tired Union forces who had been engaged with Evans, Bartow, Cocke and then Jackson.


In a massive exchange of fire the Union came off much worse, and their units became disordered. They were still hanging on to three of the five objectives.


As dusk fell no-one was in a position to manouvre, it was just a case of blazing away. The Union were now seriously disadvantaged as so many units were disordered, and their heavy losses meant that none of them were able to rally. On the last turn the CSA beat the US again and the entire Union Army disintegrated and routed! They were still in control of the majority of the objectives however, so could claim a win of sorts. 

Hilariously this mirrored the real battle where ostensibly the US had 'won' as the CSA was worn out and wavering, but then their Army just fell apart for no apparent reason. Both sides could reasonably claim a victory, and went away happy. 

In hindsight, the crucial turning point was Cocke's counterattack onto Henry Hill, as it held the Union back just one turn. If they had a chance to consolidate their position on the hill, it would have been enough to turn the tide against the Confederates when they attacked. Ah well, such is war and wargaming.

That all went OK, although it was rather slower than the playtesting. The dice draw mechanism worked really well and I liked the way the draws coupled with the dice roll generated movement points added some friction. There was a reason I did that in Panzergruppe originally and I'd forgotten how well it worked. The leaders were a bit clunky, I need to figure out how best to activate them in a way which is simple.

The main problem is a nagging doubt about the combat system. I much prefer the dice to the old arithmetic heavy combat system, but as one of the players noted, it is very much 'winner takes all' and I'm not convinced ACW combat was like that. The simplest thing would be to inflict some losses on the winner. Some things to think about for next time anyway.


Tuesday, 5 April 2022

Desert Airforce - fighters

 I seem to have settled on 6mm for my WW2 western desert activities. I toyed with 15mm for some time (I even had a large 15mm desert armies in the late 90s), but 6mm seems to where I'm happy for this theatre.

One thing my desert forces have lacked for a very long time is any dedicated air support, instead they had to make do with aircraft pressed into service from cooler climes, and even on the odd occasion, cardboard counters. Oh the shame!

Anyway, a rummage through the aircraft box, plus a few purchases from H&R and a bit of painting soon put that to rights.

First up we have some of the RAF desert contingent.


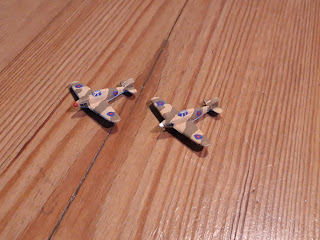
A pair of 1/300th scale H&R Hurricane IIs. I went for these as they were fairly common in the desert and can also double up as tank busters if needs be as well as providing some top cover. Nice simple models with very kittle flash, and unlike their 1/144th scale pals, no assembly required. Always a bonus.


I spent a fair bit of time peering at photos trying to work out the right pattern for the colour scheme. Then it came to me in a blinding flash of realisation, this is just the temperate green/brown scheme but with the green replaced with sand. That made it pretty easy to do.

I haven't got any RAF decals small enough, so like the Horsa gliders I did last year, I hand painted the roundels. They are a bit wobbly but good enough from a distance. Planes without any markings at all look too plain imho.

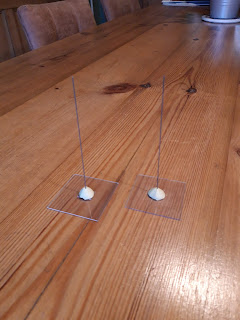
As I was doing some more aircraft, I also made some more flight stands and beefed up the existing ones. They are just piano wire stuck into clear plastic sheet, but with some of the heavier metal planes they are a bit bendy, so added a collar of milliput to give them some more heft and support the metal shaft. That seemed to work OK and even held up the 1/144th scale metal Mosquito which weighs a ton.


Here are the Hurricanes on patrol over the dining table on their new flight stands. I was very pleased with how they turned out, there is something rather smart about hard edged desert camo schemes. 


Saturday, 2 April 2022

Origins of WW1

 Russell had dug out a very old Jim Dunnigan SPI game from 1969, the Origins of WW1. I recall vaguely looking at AHGCs Origins of WW2 many decades ago, but as it didn't have a 'proper' map, or tanks etc, I wasn't particularly interested.


The game covers political machinations prior to the outbreak of WW1, and despite the picture on the box, it has three main protagonists: Britain, France, Russia, Germany and Austria Hungary. Essentially they deploy diplomatic resources around the world to achieve foreign policy objectives of their own (mainly to obtain treaties) and thwart the aims of everyone else.


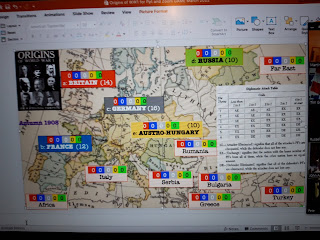
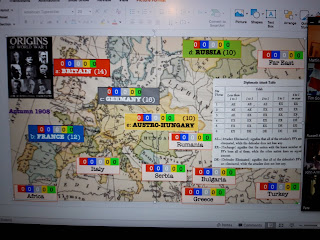
Russell had worked up the map into a Powerpoint presentation, with boxes to track the running totals of each countries diplomatic efforts in the various regions. This meant it worked brilliantly well for remote play, as it was really clear and easy to see what was going on - as opposed to looking at piles of counters on a map. Eagle eyed readers will see there is also a Combat Results Table, more on that later.


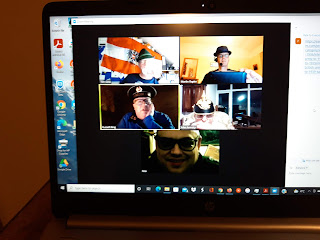
We assembled the optimum number of players, five. I was Britain, Tim Austria, Pete France, John Germany and Russell played Russia. Needing five players is also something a bit tricky for f2f gaming. As ever it was an excuse to assemble an outrageous variety of hats. 


The opening moves. Each country has a certain number of diplomatic points they can deploy each turn (I had 14). If you had ten or more points in a country, you could claim treaty rights, which generated various victory points. You could also use your points to 'attack' one other countries diplomatic points in a region - to deny them the rights, which is where the CRT came in. The most common result was 'exchange' so if 11 points attacked 4 and get an Ex, the attacker was left with 7. The CRT was pretty brutal, even at 2:1 there was an AE possible on a 1. Odds below 1:1 were 50:50 AE or Ex, which made spoiling attacks useful.


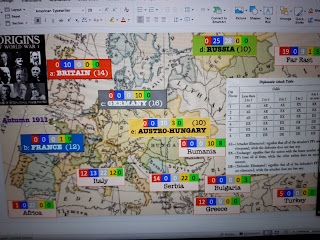
Here we are in 1911. You can see the various point totals in the country boxes eg France has a treaty with Britain, Italy is apparently allied with everyone! while there is something very odd going on in Serbia. The victory points are very, very asymmetrical - different for each country, some are dependant on denying other countries treaties (hence Britains interest in Serbia above) and cleverly designed. They reminded me of the points allocations in Mike Youngs decision games. The VPs combined with the CRT and limited points allocation made for fiendish decision making every turn, and as other players made their own decisions and attacks, the situation could change in an instant.

It worked really well indeed. And with only one page of rules!


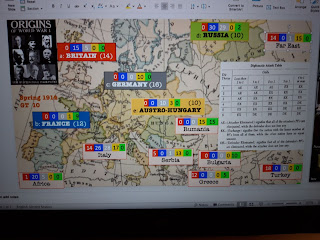
I won't bore you with a blow by blow account, but here we are in Spring 1914. I had the exciting task of maintaining the balance of power by preventing any single country getting more than 12 VPs (worth 10VP), stopping the French blocking Germany from getting any treaties (5VP) as well as some territorial objectives. 

Italy was hilarious as lots of people piled in but without much in the way of diplomatic combat. There was a vicious three way struggle for influence in the Far East between Britain, Germany and Russia, while Russia and Britain almost came to blows over Turkey. At one point my 20DP had been reduced to 5DP by repeated attacks. France and Germany had a ding-dong over Africa, but Germany launched a very unfortunate 1:1 attack which rolled a 1 and wiped out the entire Germany diplomatic effort.

Stars of the game were Austria however, who quietly went around building up influence. Their big point winner was Serbia, they got 10VP for an exclusive treaty. Russia had a similar goal but showed very little interest as they had objectives available all around the globe. I was doing a great job in keeping the balance of power for many years, but I had to keep piling the points into Serbia as no-one else was. On the penultimate turn Austria attacked the British diplomats in Serbia and got an exchange, leaving them with just enough to clinch the exclusive treaty and no real possibility of anyone else taking them down.

Nicely played as that reversed my overall VP lead and gave Austria a huge bonus, and the Emperor won the game!

Highly recommended with excellent replay value. It is even available for free on the SPI rules scans website.