One of may gaming pals has expressed an interest in early desert warfare, so I thought to was time to visit Operation Compass once more (we last went there way back in early lockdown, after which I got a bit distracted by Operation Crusader).
So here we are as 5th Indian Infantry Brigade takes on 2nd Libyan Infantry Div, dug in along along the Egyptian/Libyan border. The day has started with an attack on Nibewa, and now the Corps artillery and 7th RTR have been switched to support 1st Royal Regiment of Fusiliers as they attack the westernmost fortified camp of 2nd Libyan Divs position.
As ever, the scenario is taken from Frank Chadwicks 'Benghazi Handicap'. John and Mark took the British, and Tim G, Tim C, Pete and Jerry the Italians.

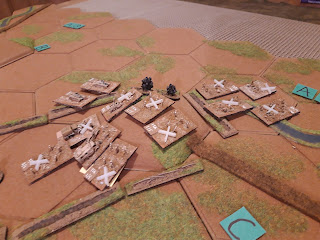
Battlefield from the south. The Alam el Tammar position is in the upper centre of the table, British approaching from the south. There is an area of rough ground in the southeast, plus some wadis and desert tracks. The fortified camp is built around two hills (Hill 92 and 89).

4th Libyan Raggruppamento. Two infantry battalions reinforced with AT guns and 105mm howitzers from Division, plus a battalion of 75mm field guns. A further 75mm battalion is offtable. Tim C had the VII Bn, Jerry XIV Bn, Pete the 75s and Tim G was regimental CO.
On turn one a sandstorm is just blowing out, which restricts visibility to one hex.

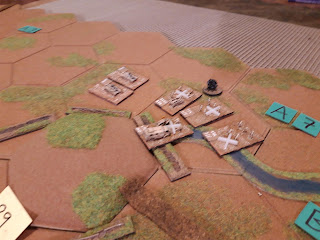
1st RRF, split into two groups and reinforced with an extra infantry company (actually the New Zealand lorry drivers who took part in the assault once they dismounted). As this is such a small force in NBC terms, I modelled the Carrier Platoon as a full company, and also added in the battalion pioneer platoon as a separate unit and included the battalion HQ company. This turned it into quite a decent force. The Italians weren't short changed as many of their rifle companies only had two platoons but I did them as full company stands so the overall force ratio stayed the same.
The entire battalion is motorised, and the cover of the sandstorm let them get really close to the defences without being spotted.

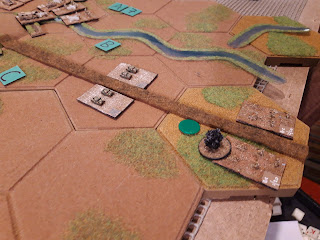
The Italians also had some reserves. The XV Libyan battalion and the IX Light Tank Battalion equipped with L3 tankettes. These chaps would arrive from the eastern table edge at some point. The guns on the right are a battalion of 75mm field guns.

The British also had some offtable units. 7th RTR with Matildas. Their numbers have already been reduced by breakdowns so they only have two squadrons. The regiment is hurrying north from the battle at Nibewa and is already two hours late. It will arrive on turn 1.

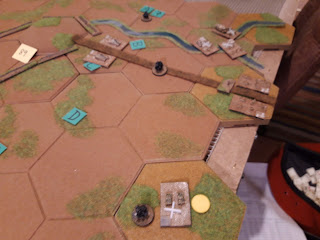
The British artillery. One dedicated battery of 25 pdrs and a mixed artillery group with another 25pdr battery and two heavy batteries of 60pdr and 6" howitzers respectively. I used a 5.5" gun and a German 170mm (!) as substitutes.

On the first turn the British used the cover of the sandstorm to close on the Italian defences. The left group got right up to the barrier and dismounted. The right group just moved up in their lorries. The Italian onboard and offboard field guns opened fire and managed to drop shells both on the British and their own positions! None of the fire did any damage, and the defensive fire from VII Bn was largely ineffective although their 47mm guns inflicted a hit.

The Matildas came on up the track. As they are rated as 'slow tracked' vehicles, they needed all the road bonuses they could get.

Back at the camp, small arms fire disorganised VII Bn and they fell back from Hill 92, but not before inflicting serious losses on the assaulting British infantry. Meanwhile the bigger group pushed up to the wire under direct fire from Petes field guns, who inflicted some losses. XIV battalion's attached 105mm howitzer opened fire but was ineffective.

The Matildas continued their road march. The Italians could now see the plumes of dust in the distance.

As 7th RTR approached the perimeter, Jerrys Libyans hit the British on Hill 92 with 105mm fire and their morale failed. The survivors (down to 33% strength) fell back to the reverse slope. The Main Body of 1 RRF assaulted the Italian gun positions in the centre of the fort. One battery was overrun as was their supporting infantry, but another group of Italian gunners grimly hung on firing over open sights. The British infantry companies suffered 50% losses as they assaulted the fortifications but their morale held.

The disorganised VII Bn had suffered losses in the assault and continued to fall back northwards, joining the Libyans on Hill 89.

The Libyans now came under fire from the British heavy artillery and suffered some losses. This forced a morale check which they promptly failed, and were now pinned by the artillery. VII Bn continued to fall back and moved into the wadi below hill 89 to reorganise.

Main Body of 1RRF finally overran the Italian gunners who fought to the last man. This also eliminated the Italian regimental HQ. The British now controlled two hexes of the fort. 7th RTR was finally in range and opened fire on the Libyans on Hill 89, but the BESA fire and 2pdr solid was ineffective against the Italian fortifications at that range.
The British fired a massive stonk on Hill 89 and followed up with an Infantry/tank assault. The Matildas failed to cross the perimeter but the British infantry stormed up the hill. The disorganised Libyans surrendered, but the British infantry were now below half strength and reorganised the battalion. The only bright spot for the Italians was that VII Bn in the wadi and the base of Hill 89 reorganised and brought the hill under fire.

However, what is this! IX Tank Bn and XV Libyan Bn came marching on along the track. The British need to capture this exit hex to win (it leads to the next fort in the chain), so there is everything to play for. We broke for the night at that point, and both sides had a chance to ponder their next moves.

Sadly for the Italians in the wadi, the British (just) activated first. The Matildas rolled up to their position firing wildly, but the British infantry put in an assault behind a 25pdr stonk. The Italians inflicted some losses in the close quarter fighting, but to no avail and the survivors surrendered. 1//RRF was now down to two weaked rifle companies and half the Carrier Platoon.
The British heavy artillery fired at the L3s but overshot onto the Libyans. The fire actually hit the Libyan units, but they scattered into cover and didn't suffer any significant losses. They were suppressed however and needed no urging to start frantically digging. The L3s pushed forward to cover the wadi.

The British now pushed forwards to engage the L3s. The tankettes MG fire was ineffective and artillery dropped all over the place. The Matildas had to push on through the fort so could only get themselves within effective range this turn.

Next turn a close range firefight erupted and the British heavy guns got the range of the Italian tanks. The Matildas knocked some of them out and the guns disabled some more, but they were buying valuable time for the defenders.
Another round of fire saw more L3s knocked out but not before they destroyed another British rifle company with MG fire. The Italian tanks fell back in disorder to the southeast and the British infantry pushed east along the wadi, The Libyan infantry had finished digging in and opened ineffective small arms fire against the British.

The Matildas then rolled up the road and right over the Libyan position. In the absence of any effective AT weapons the Libyans failed their morale test and surrendered. The British had (just) managed to take the objective on the last turn! It was pretty touch and go as the Matildas only had a 50% chance of moving that far, and had to pass their pre-assault morale test.

The only survivors were the remains of the L3 battalion, hunkered down and hoping for a better day.

Meanwhile British lorries began moving up to the captured position.
That turned out to be a lot of fun and a very well balanced scenario. It is always a bit depressing being the side whose job it is get wiped out, but the Italians had plenty to do try and frustrate the British. It was nice to get the desert stuff out again as well, and it inspired me to look at painting a few more bits and pieces. After all, you can never have too much stuff can you?

Really interesting battle this. The Matildas were genuine battle winners throughout this operation! The infantry losses seemed a trifle heavy on both sides, although I imagine the rules are thinking of effectiveness as the measure rather than body-counts.
ReplyDeleteYes, 'losses' are every much in terms of exhaustion/loss of combat effectiveness instead of casualties. I'd expect the destroyed units to reorg back to around 2/3rds strength.
DeleteIt is a hard scenario for the British as they are outnumbered and outgunned and have the burden of attack, just relying on quality to make up the difference.
Yes, the scenario does look pretty tricky for them, a bit more difficult than the real thing probably.
DeleteThe original was designed for Command Decision so the relative movement distances would be a bit longer, so perhaps a bit easier for the British.
DeleteExcellent fight, Martin, thanks for sharing! I am SOOOO happy to have you back in WWII with the NBC rules. Great stuff, glad the good guys won.
ReplyDeleteOn a side note, I don't use the "Flames of War" rules but I do keep an eye on their website, in particular I really like the 'Firestorm campaign' stuff that gets posted. A gentleman just posted a "Firestorm Gazala" campaign and I'm not sure I can resist, despite the fact I've been painting my butt of to get ready to play a 'Firestorm Market-Garden' campaign (or the Rapid Fire version, both of which I really like)...
"After all, you can never have too much stuff can you?"
That is correct ;)
V/R,
Jack
LOL, no, you can never have too much stuff. The Western Desert is one of those things I come back to time after time, so it is good to have some stuff in stock to scratch that itch. I seem to have settled on 6mm for it having wavered between 6mm and 15mm over the years. Gazala sounds interesting, that was one of the reasons I bought AHGCs Tobruk many decades ago.
Delete