I wanted to get some of my new 15mm desert stuff into action, but having very cleverly not yet painted any Italians, I was a little stuck! However Scenario 12 in 'Benghazi Handicap' has a nice 8th Army/DAK tank battle featuring Crusaders and Stuarts, so that fits the bill.
I could have done it with NBC, but I've had a few ideas around One Hour WW2, so I converted the scenario for that instead. This battle took place at the end of Operation Crusader as the Axis retreated westwards once more.
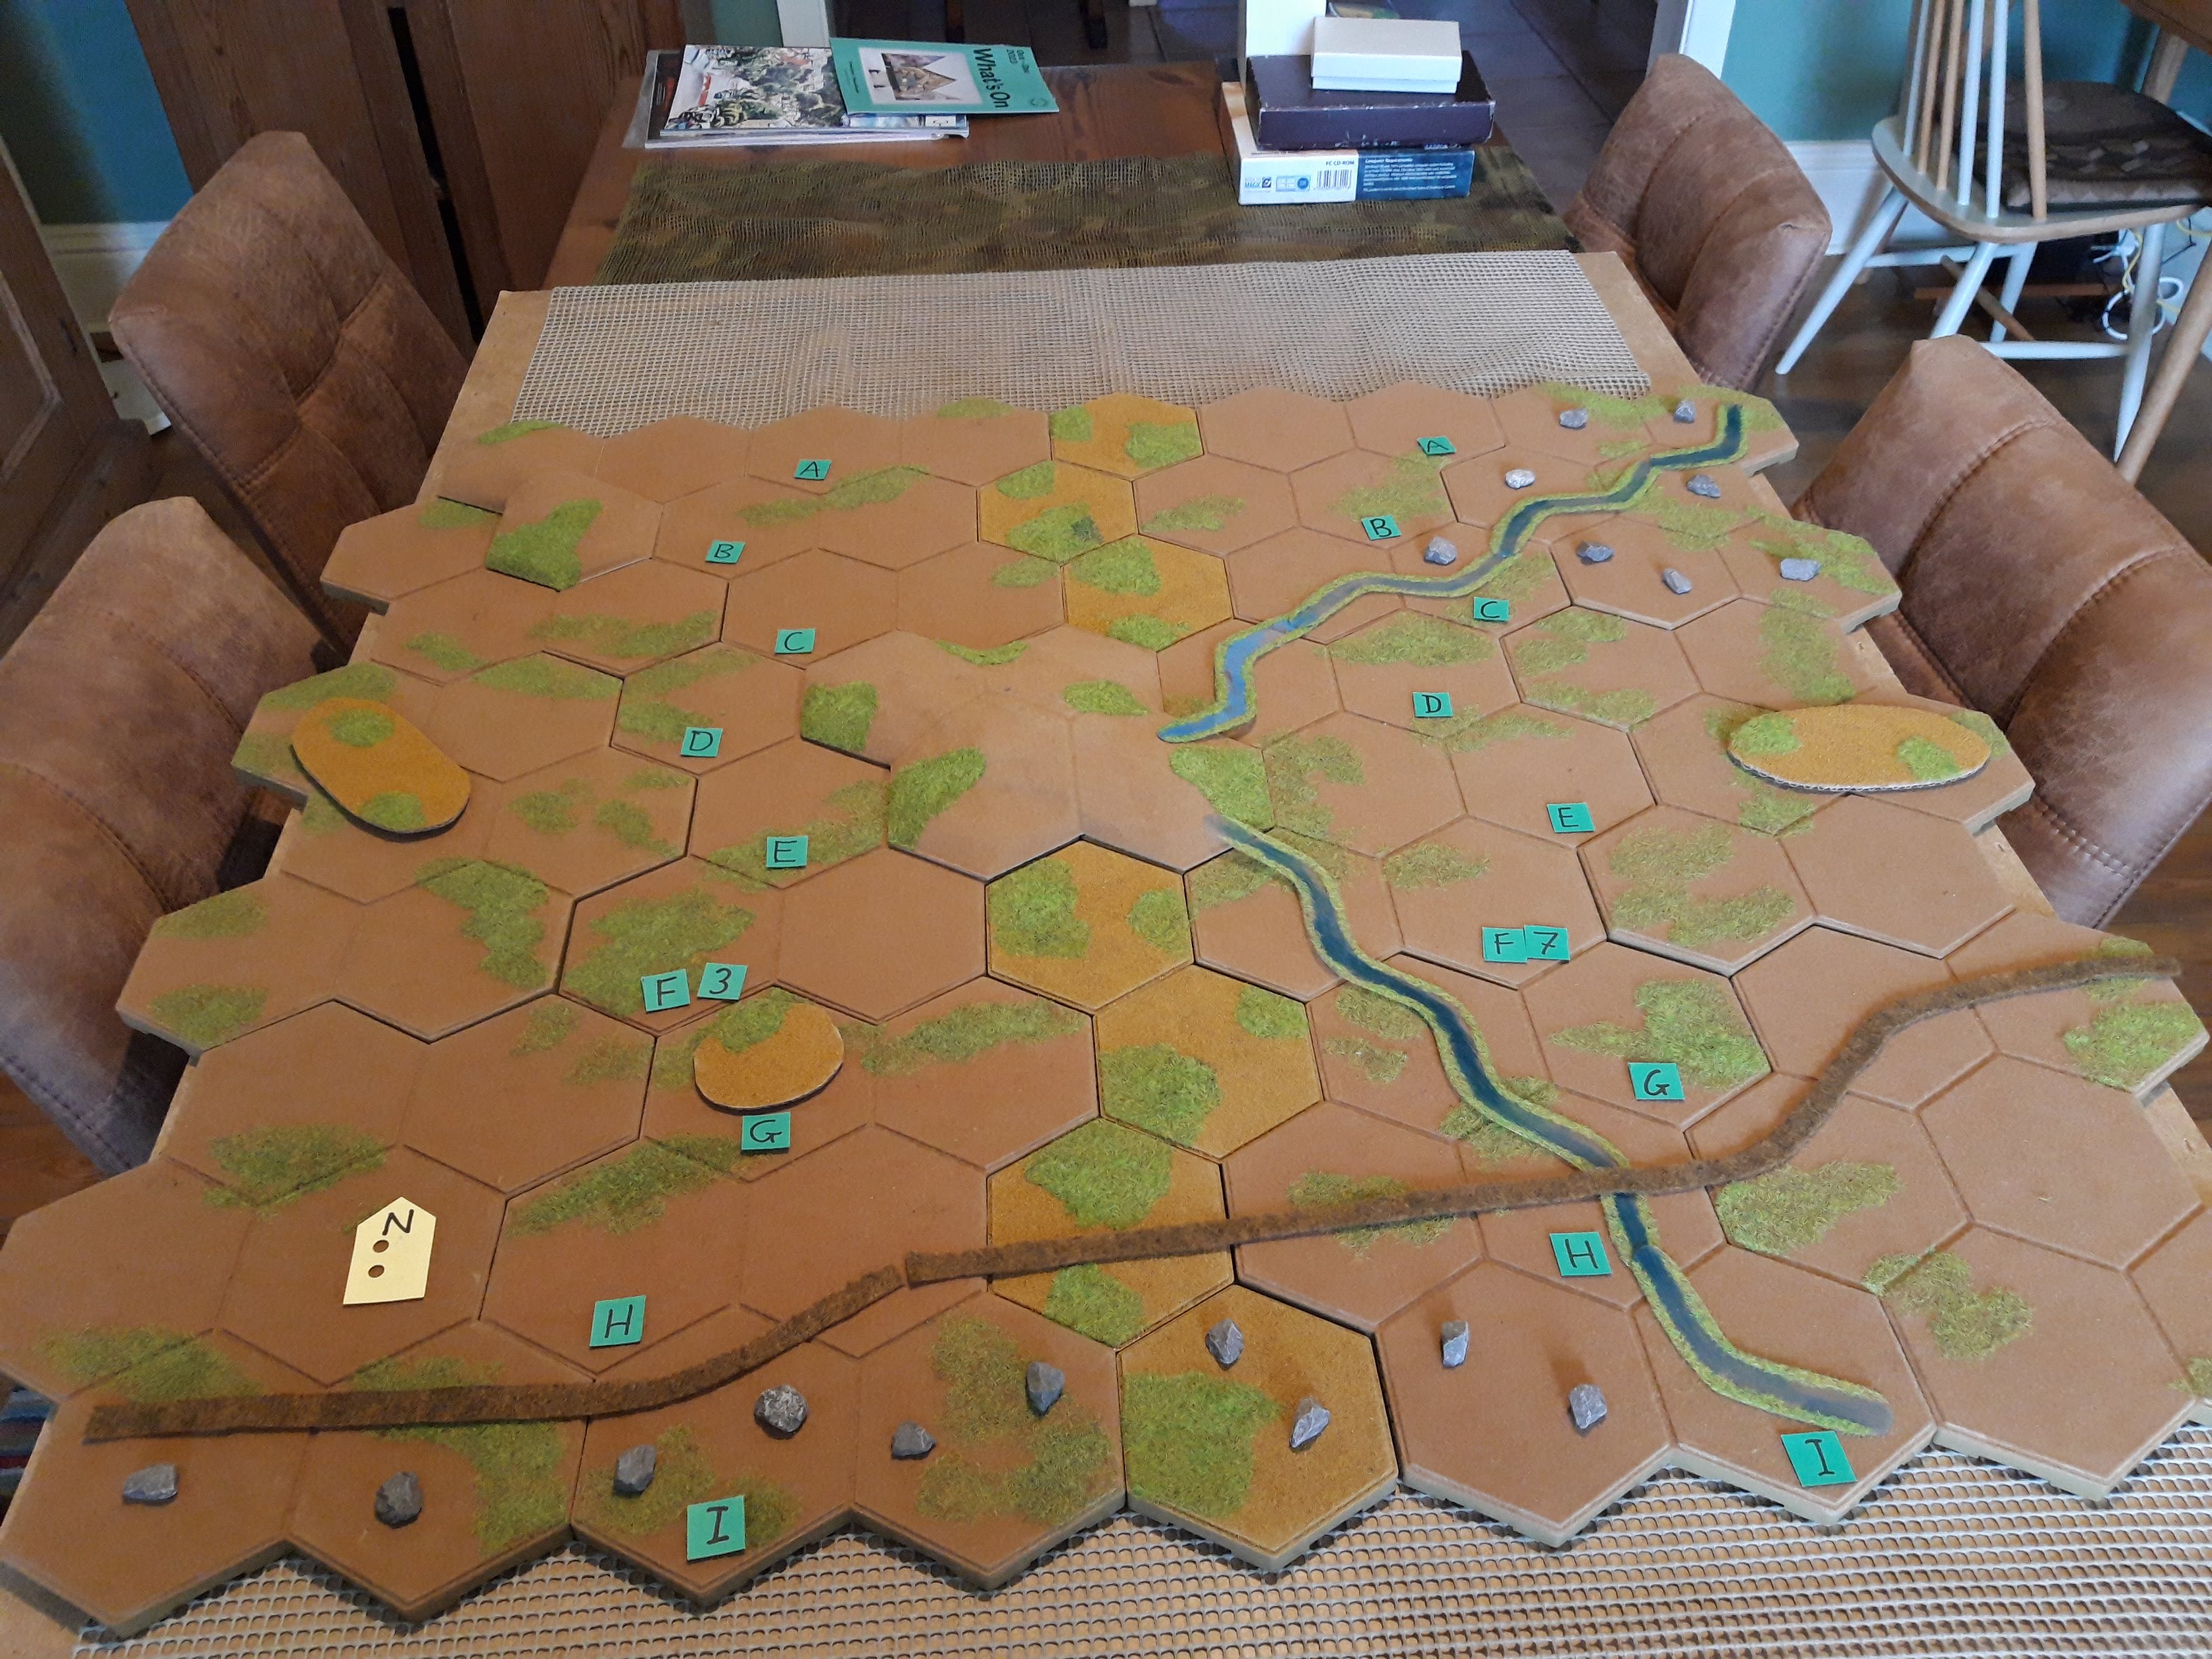
Battlefield from the south. PanzerArmee Afrika is off to the north at Agedabia, pursued by 8th Army apart from 22nd Armoured Brigade which is left hooking around the desert to cut them off. Rommel regarded this as an opportunity to give the impudent British armour a good kicking.

Chor es Sufan is this large hill in the middle of the battlefield, which gives it its name. There are three objectives, including this hill, a hill in the northwest and the wadi exit hex in the south. Each side needs to control two of these to win (it is a bit more complex than that but close enough).

22nd Armoured Brigade at around 50% strength. It includes two consolidated Regiments of Crusaders and two more of Stuarts loaned from 4th Armoured Brigade. Overall tank strength is still only 90, rather than a TOE strength of 200.

3rd CLY, 4th CLY and 2nd RHA. John commanded these and was overall British CO.

102nd RHA, 5th RTR and 8th Hussars. The tank units average 20-25 tanks each. Mark commanded these.
The various B echelon vehicles I'll use to manage reorganisation actions.

15th Panzer Division, also massively understrength (around 25%). 5th Panzer Regiment has been attached from 21st Panzer, but each entire regiment only has about 25 tanks.

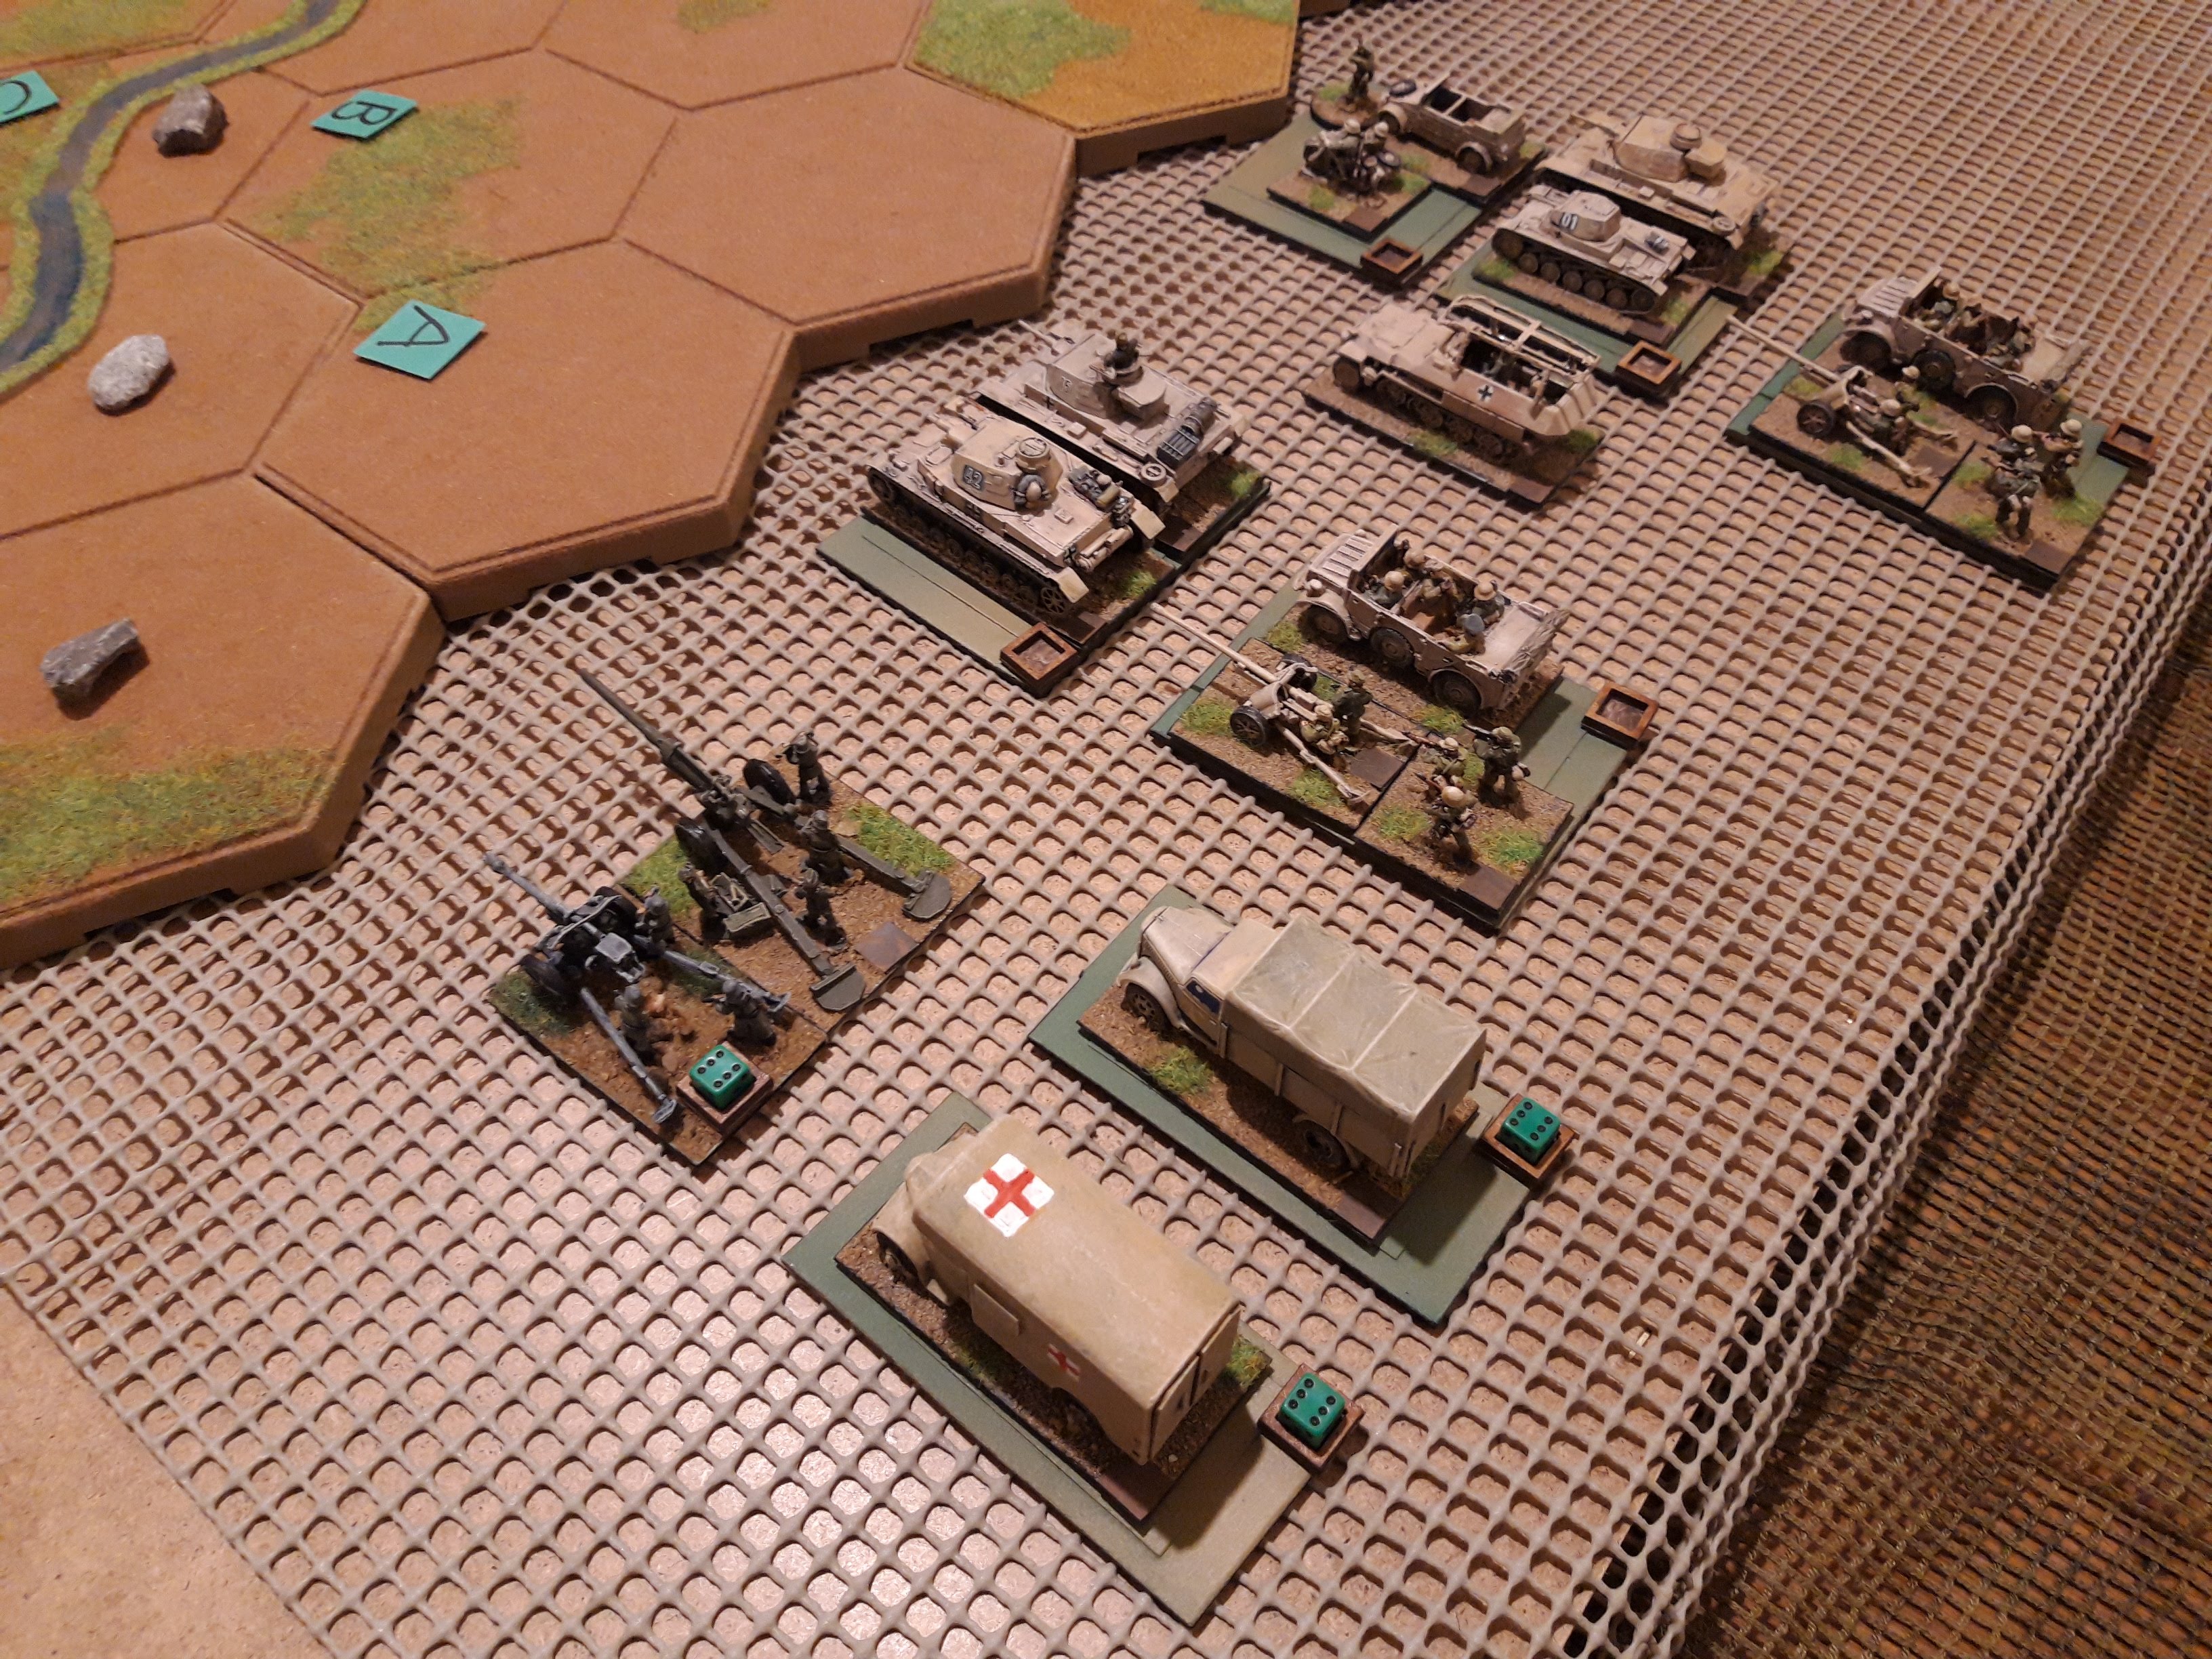
33rd Recce Battalion, 5th Panzer Regt and 1/115th Schutzen. Simon commanded these. At this point the 33rd has a couple of platoons of motorcyclists, a troop of armoured cars and is reinforced with the remains of 33rd panzer engineer battalion (at less than company strength).

8th Panzer Regiment, 2/115th Schutzen and 33rd Artillery Regiment plus some B echelon stuff. Pete commanded these and was overall CO.
5th and 8th Panzer Regiment had recently been requipped with a high proportion of uparmoured H and J model Pz IIIs, which the 2pdr firing uncapped ammo can't actually penetrate frontally (although the Stuarts 37mm can manage the Pz IIIH). Frontal penetration at battle range is my criteria for rating tanks as 'heavy' so to keep things simple I rated 5th Panzer as normal armour and 8th Panzer as Heavy armour. By the time we get back to Gazala things will sort themselves out a bit.
I also faffed around a bit with how best to mount the SP dice, and ended up putting most stuff on sabot bases. I'll think about that. I might make some special magnetic markers as they would be much easier.
You will note the B echelon vehicles have SP too. I'm going to limit the number of reorganisations by counting them against these numbers and see how that works.

The British went first and surged on fromo the south. Marks Stuarts and 102nd RHA came on from the southwest and Johns Crusaders from the southeast. All were slowed by the rough ground. The 25pdrs drove on and unlimbered in the wadi hex objective.

The Germans also went for something of a dispersed approach. Simons infantry and panzers grabbed the northwest hill while the recce Bn motored onto Chor es Sufan itself.
Petes panzers and infantry headed southwest in a column. Both the German infantry units were heavily reinforced with AT guns from the entire 33rd Panzerjaeger Bn, making them potent AT units.
First clash! The Crusaders and Panzers motored onto opposite sides of the hill and artillery dropped all over the place. The panzergrenadiers set up their AT guns in the wadi at the base of the hill and traded shots with 4 CLY who took up hull down positions in the wadi nearby.
Very wisely 33rd Recce dropped back out of the mayhem.

Meanwhile Marks Stuarts had a go at the northwest hill. The panzergrenadiers stopped digging and started shooting, as did every other German unit in the vicinity. The German artillery ranged in on vulnerable the Portees. 5th RTR took enough hits to disorganise it.

Concentrated British fire from every unit in range, supported by the 25 pdrs, disorganised 5th Panzer Regiment. Ouch!

As the ambulances raced to the rescue, the AT guns on the hill finished off 5th RTR.

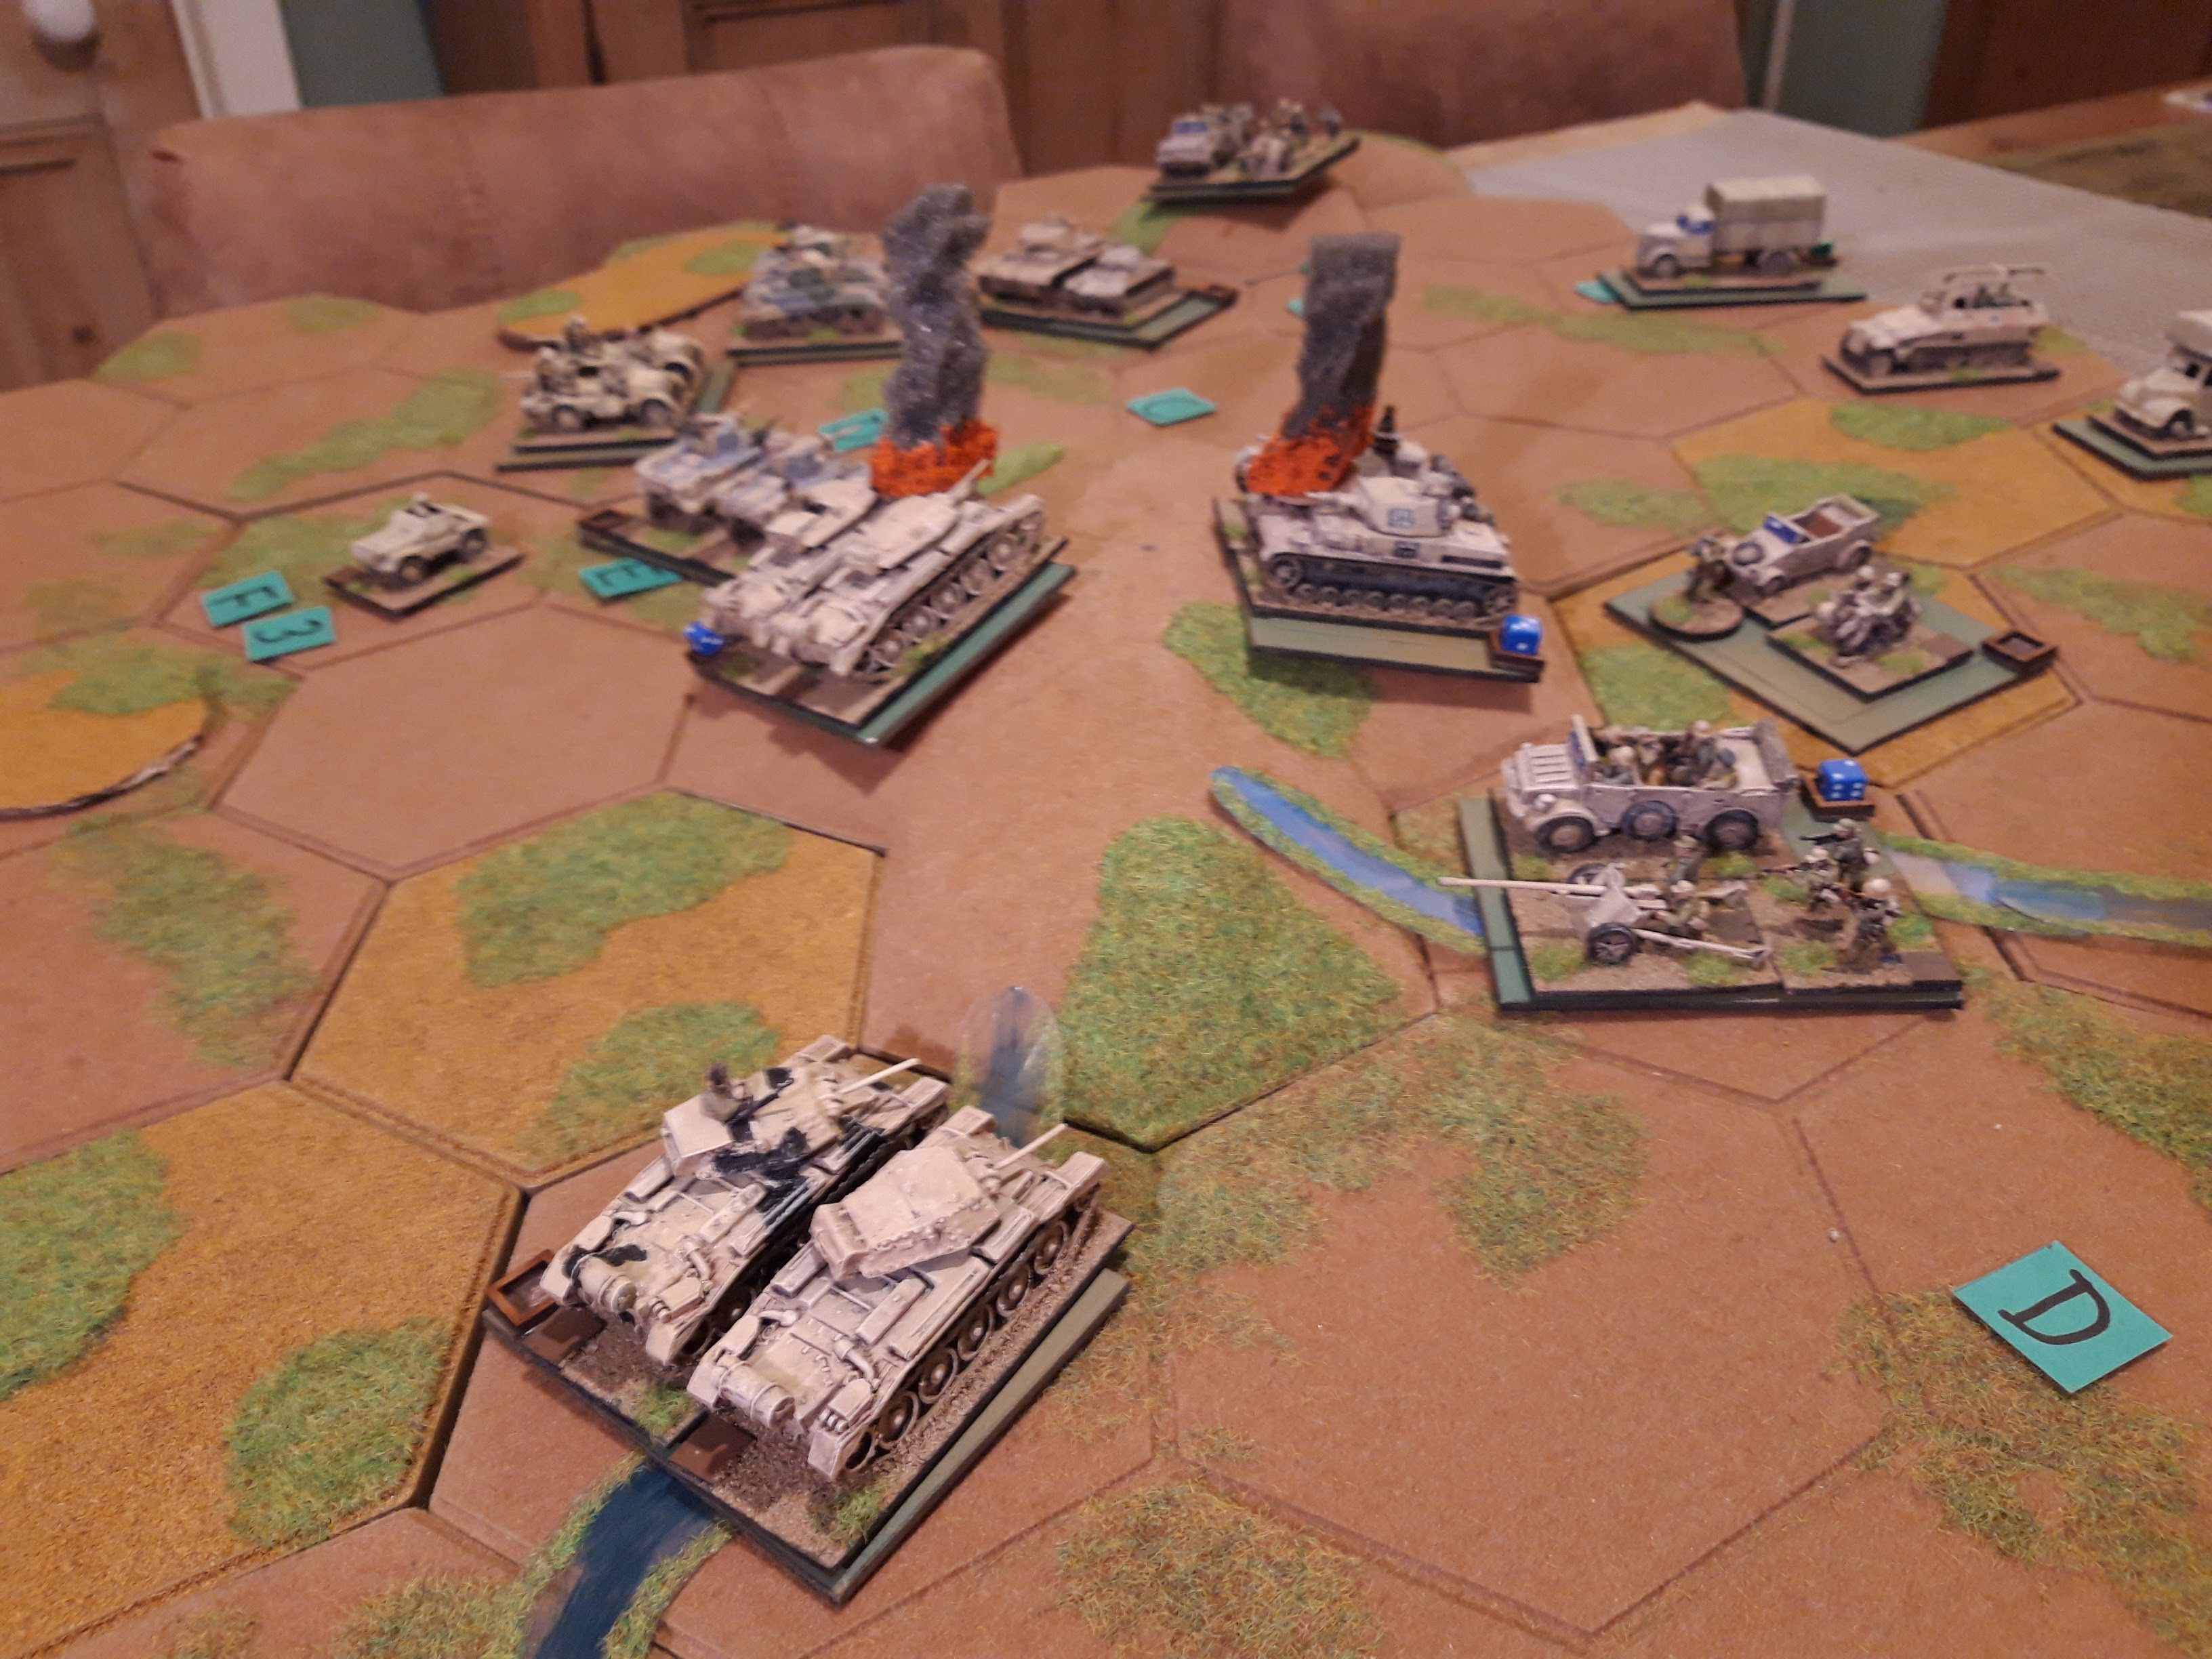
In the centre, 8th Panzer Regiment gained the upper hand and assaulted 3rd CLY.

The assault (just) failed, leaving 3 CLY with only 1SP left, but the Panzers had to fall back.

Over in the northwest, 1/115th finished digging in as the British pulled back.

Instead the surviving British mobile forces swarmed the central hill while 3 CLY frantically reorganised.

The artillery on both sides had been firing continuously for several turns and would soon need resupply.

General view from the south at the end of Turn 7.

And the view from the northwest. The British have apparently 'got there the fastest with the mostest'.
We broke for the evening at that point, interesting to see what happens tomorrow.

There was a certain amount of deliberation overnight and the Germans boldly decided to go for broke and contest the central hill, pushing all their panzergrenadiers forwards. Obviously there was a risk the British would then just dash for the northwest instead, but they seemed very reluctant to give up their big hill.
Eagle eyed readers will have noted that the last of the panzers have vanished - they were finally removed by massed British tank and artillery fire, but I forgot to take a photo in all the excitement.
Both sides had also run out of artillery ammo, and there was a pause in the shelling while resupply columns stocked the guns up again.

Meanwhile, 33rd Recce Bn had outflanked the hill to the east, crossed the wadi and was heading for the British artillery position!

Von Luck surveys the desert with his binoculars.

The 25pdrs were fully stocked with ammo again and kept an eye on the dust clouds getting closer across the desert. Still too far to make out clearly, so they kept shelling the panzergrenadiers at this end of the ridge. This fire, combined with all three Regiments of British tanks, finally managed to finish off 2/115th panzergrenadiers. Iron Crosses all around, they'd been under continuous fire since turn 2.

Desperate times called for desperate measures and 1/115 conducted a close assault against the rear of 3 CLY! The Crusaders were fairly shot up already, and the assault succeeded, removing the British tanks. In fairness, they only had one hit left, but it was still exciting stuff.

This left the panzergrenadiers sandwiched between the two remaining tank Regiments.
The British now had two options, dash for the hill in the northwest, or try to clear the central hill. They opted to stand and fight, as I was running with a variable turn end. Although the Germans were damaged, they were left in place.

In a typical shabby Nazi trick, 33rd Recce now drove into the wadis on the hill, while the panzergrenadiers reorganised. German artillery fire was sufficient to disorder 8th Hussars.

The British kept plugging away and finally 1/115 was removed, however 33rd recce still contested the hill. The only other British unit on it was 8th Hussars as 4 CLY were still stuck down in the valley.

The Royal Artillery were firmly in control of the wadi though, despite having fired off all their ammo (again).

On the very last turn, 8th Hussars had three hits left, and 33rd recce supported by the last rounds of German artillery, had three firing dice. It was a pretty long shot as neither were great against armoured targets but they managed to chip two more hits off, leaving 8th Hussars hanging in with 1 hit left.
It doesn't get much closer than that, so with the third objective contested, a draw was duly declared and both sides withdrew to lick their wounds.
That was a really good game, and most of my experimental rule changes worked OK. Restricting the total number of reorganisations was just pointless bookeeping, but only allowing each side to reorg a maximum of two units per turn worked well. My simplified firing table worked OK as well and didn't produce any startling silly results (a benefit of attritional combat systems).
I kept forgetting that units which have been assaulted can't reorganise the next turn. I need to use some sort of temporary 'shock' marker to remind me. I'm also minded to add some sort of benefit for assaulting disorganised units, possibly ignore cover/armour? I don't want to overdo it as disorganised units are already quite weak. I also need to check the rules about recce units, as it strikes me they would automatically fall back if assaulted.
I need to have another think about how units are rated, and I'm minded to have some light infantry units with only one dice (units with no integral heavy weapons). I want to also include obstacles as at the moment I make those up on a scenario basis.
I'm just about ready to do a new draft of the rules incorporating the latest changes.

Lovely stuff Martin! Your priority is obviously to paint some Italians!
ReplyDeleteNeil
Absolutely, Italians are next on the list. Coming to a blog near you soon....
DeleteA lot of action - I do like games where the armour / penetration factors just sit at the margins of being able to penetrate or not, it brings the characters of each of the vehicles out.
ReplyDeleteYes, the late 41/early 42 period is very interesting in the desert from a gun vs armour pov. It really came out in the old AHGC game 'Tobruk', and makes a very big difference tactically. In a more abstract game like this one, I need to be careful not to overdo it, but if weapons can't actually penetrate the front of the most numerous enemy AFVs, you've got big problems. I can see why British tank crews preferred to engage Pz IIs and M13s... and were delighted with the Grant.
DeleteNice looking set-up, and plenty of action. Excellent!
ReplyDeleteThanks. The bigger toys certainly have more character than my 6mm stuff, you just have to look past the FOW 'tank parking lot' effect. As the elements are battalions, it doesn't phase me, but I know some people don't like it.
Delete