Tim took us off on another 54mm skirmish game using Fistful of Lead, this time we were back in the Western Desert during Operation Compass, the assault on the Italian fort at Nibewa to be precise.
The scenario was taken from the relevant Skirmish Campiagns book, we've already done a few of these. Essentially the Italians are caught asleep by a British dawn attack, and have to wake up, man the defences and get in their tanks while being rudely attacked by by a small British force which includes a mighty Matilda.
John, Jerry and Tim C were the British, taking the Matilda, Infantry and Sappers respectively. Me, Pete, Russell and Diego were the Italians. Pete and I had an infantry section each, Russell had three tanks (two L3s and an M13/40) alebit with the crews asleep in tents! Diego was CO and had platoon HQ and the crew of a 47mm AT gun. Also asleep.
Many apologies for the grainy photos, I'm sure Tims will be a lot better.
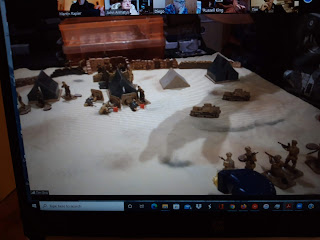
The battlefield from the west in the early morning gloom. The Italians are snoring in the tents in the distance, the parked M 13 on the left and the L3s on the right. The 47mm AT gun is in a pit behind the central tent, facing the wrong way!
First up is Petes section, awakened by some noise or other and they pile put of their tent. Meanwhile Jerry and Tims infantry are sneaking on.
One of Petes eagle eyed riflemen spots some of the British and they open fire. The British return fire fells one of them. At the same time, the Matilda comes rumbling on. All this noise is sufficient to wake my guys up, and as Petes troops are already fighting to our front, we head for the fortifications around the camp with the intention of moving to the south.
Here is a rather better shot of the Matilda, a 1/48th scale kit. Tims sapper group are behind it.
Russells tankers also wake up and dash for the L3s. These are actual, proper tank crew figures. Jerrys infantry section can now be seen, the very finest Airfix 1/32nd scale figures.
In the centre, Diegos platoon HQ has also woken up now.
Petes section spreads out and uses the parked M13 as cover. It is going to take a while for Russells tank crew to get there. A lucky burst of Italian LMG fire kills the Matilda CO. The Matilda is busy firing at the M13 and unaccountably missing.
The L3 crew finally mount up under a hail of small arms fire. Jerry now engages Diegos HQ group, although the officer very bravely runs for the rear! My guys are busy making their way along the wall, but some of the rearmost riflemen have managed to get stuck trying to cross it in the gloom.
The erratic nature of the Matilda gunner may be explained by this. AT fire is resolved by Tim firing at a block of oasis with a nerf gun on the basis of the gunners directions. Up a bit, left a bit... just like the Golden Shot of yore. The Italian AT gunners have now woken up and prove to be just as bad at it as the British.
Petes guys are nicely spread out now and in cover or prone (there are markers by the standing figures). They start shooting at the sappers and cause some suppression. A few of my tumbled riflemen can be seen in the distance behind the wall.
The exchange of fire between the British and platoon HQ is rather one sided. A lot of Diegos men go down wounded. Hopefully my guys will be in position to help next turn, and Russell might have a chance to get his tanks started up!
Here is the Italian 47mm AT gun, and rather grand it is too. They finally managed to score a hit on the Matilda, which unfortunately hit the thickest part of the armour and bounced off.
The guys in the middle are the M13/40 crew sheltering behind a tent. The infantry at the top right are my blundering riflemen who fell over the wall.
The AT gun hit however spurred the British into action. The Matilda gave up shooting at the uncrewed M13 and instead set off across the table at top speed in the direction of the tents.
The British sapper team sprinted for the M13, despite Italian MG fire, as Russells crew climbed inside.
One of them got there and wedged a satchel charge under the turret!
His success was short lived as he was cut down by MG fire. Definitely a posthumous VC there. Petes NCO dashed around the back of the tank and pulled the charge away with its fuse fizzing. What a hero!
The Matilda piled through the Italians and the tent. Diegos officer was run down as were two riflemen. Dear me, an atrocity.
Sadly for Pete, he joined Tims brave sapper as a casualty next to the M13. He dropped the satchel charge next to the tank (it took two turns to go off).
Over on the other flank, the L3s were now in action and sprayed Jerry's section with MG fire. My section was finally in position behind the wall and the LMG team opened fire as well.
The MG fire covered my riflemen who advanced in open order around the tents to support the L3s. Faced with this torrent of fire, Jerry began to lose the firefight. The most significant casualties were the Bren team, but not before they'd managed to immobilise one of the L3s.
At the other end of the battlefield, Russells crewmen tried to start up the M13 and failed. This led to a dash for the hatches and two of them got out.
BOOM! The M13 was engulfed in smoke from a huge explosion as Petes remaining infantry moved away from the blast area.
Meanwhile the Matilda just ran right over the 47mm AT and fell into the gun pit. (It is a bit hard to make out in the distance). More of my section crossed the wall and hastily advanced away from the rampaging Matilda.
The game ended at that point. As the smoke cleared, it turned out the blast had been big enough to knock out the M13, although some of the crew escaped.
The Matilda had also destroyed the 47mm gun, although it was now stuck in the gun pit. I'm sure it will make a nice prize.
The British had achieved their objectives (to either knock out all the Italian tanks or to knock out the M13 and the 47mm), but at huge cost. Overall losses were over 70%, and the only player figures left on their feet were myself and Jerry. Diego, Pete, John and Tim had all perished in the close quarters fighting. In the real battle the dawn attack sowed utter confusion in the Italians, although it took longer to clear the fortress than planned which delayed the attack on the Tummar position (covered in a recent operational game).
Well, there was certainly a lot of chaos and confusion in the game. It was a real blast to play, and the ticking timebomb really added to the tension. Our FFoL games aren't usually that bloody, but then again, we don't usually have four tanks on the table. Looking forward to the next one in the series.


My nerf-gunnery is erratic at the best of times and wasn’t helped in the game by Golding the iPad in my other hand while responding to shouted aiming instructions!
ReplyDeleteI thought the shooters eye view and gunnery directions were very imaginative and hugely entertaining.
DeleteWhere were the NZ lorry drivers?! They entered the fray in the real story? Something about showing the Poms how to do it right....
ReplyDeleteThe NZ lorry drivers were at Tummar West, which is a couple of blog posts back. They were why the British infantry battalion had an extra company. The original scenario title was "Cmon you bloody poms".
DeleteThis was a great game- lots of fun and produced a great narrative in the best tradition.
ReplyDeleteCheers,
Pete.
I thought you did extremely well holding off the entire British army on your own!
DeleteMartin,
ReplyDeleteWow, fantastic, what a fight! Innovative solutions to challenging problems, had a little bit of everything, didn't it? Tanks, infantry, ATGs, dismounted tank crews, satchel charges, Nerf guns ;)
A load of fun to read, and very interesting from a wargaming standpoint. I have a ton of forces for the Western Desert but have yet to play a game; part of my inertia owes to not really knowing how to get into it. My thinking immediately goes to large-scale operations, battalions and regiments clashing, so very interesting to see a small scale, let's call it company-level (-) shoot-em up, which, for whatever reason, hadn't really occurred to me.
Thanks a bunch for sharing, and I look forward to more.
V/R,
Jack
We've done a few desert skirmish games - the scenarios are all taken from one of the Skirmish Campaigns scenario booklets (North Africa 40-41). They are usually very manageable and involve a platoon or so. In the US I think Brigades Games stock them.
DeleteVery interesting, thanks Martin!
DeleteV/R,
Jack